User interface

Understand the structured FrameMaker authoring user interface and the tools that it provides to help you in authoring structured documents.

The Structured FrameMaker authoring interface provides the following tools to enable authoring in structured (hierarchical) documents:

Structure View, Elements, and Attributes pods
StructureView, Elements, andAttributes pods in Structured FrameMaker authoring interface

Structured View

Displays the hierarchical structure of the document. You can add, remove and move elements in this pod as you author your structured document.

Elements catalog

Displays the list of elements available for use in the current document. The elements in the list are defined in the structured application on which the current document is based. By default, the elements that display in the list are based on the insertion point in the document. This ensures that you do not inadvertently place elements at invalid locations in the structured hierarchy. For more details, see Working with elements.

Attributes pod

Displays the list of attributes for the currently selected element. Set or remove values for the attributes of an element. For details, see Working with attributes.

Note: Use the XML/Structured workspace to automatically organize all windows and pods that are most commonly used in the structured authoring environment.

Views

This topic explains the three editing views in FrameMaker: XML View, Author View and WYSIWYG View.

FrameMaker has three views that help you author your content:

XML View

XML View allows you to work with the plain XML code of your structured FrameMaker XML files.

XML View
XML View in StructuredFrameMaker authoring interface

A. XML Code View B. Tree view C. Error console

FrameMaker indents the child elements by one tab space compared to their parent elements. Word wrap keeps the content of the elements visible in the width of the window. The XML view supports Unicode. You can edit multilingual content in XML View. You can also copy/paste content from the clipboard.

When you edit or change references, such as conrefs, links, and cross references, in XML View, FrameMaker updates them in WSIWYG View also. XML View automatically validates the XML content with the DTD and helps you ensure that the content is well-formed at all times. While you are working in XML View, FrameMaker automatically inserts attribute values and close tags for the tags you insert in the file.

A Find/Change dialog in XML View helps you search through the XML code. You can also use regular expressions, such as with ampersand and pipeline, to search through text. XML View also has support for XPath. You can build and use XPath expressions to locate XML content. For more information on XPath, see XPath.

The following features can be accessed using XML View only:

Console Pod

The Console pod in XML View describes the errors, if any, in the open XML files. The Console pod also displays the filename of the error. To go to the file and location of the error, click an error row.

  • To display the Console pod, select View > Pod > Errors.

Tree view

XML View provides a treelike outline that allows you to navigate and view the structure of your XML document. The Up and Down arrow keys let you move up and down in the tree view. Left and Right arrow keys allow you to collapse and expand the elements.

To display the tree view, select View > Tree.

Author View

Author View provides a WYSIWYM (What You See Is What You Mean) view of your structured FrameMaker documents. The WYSIWYM environment of structured FrameMaker simplifies structured authoring by keeping out unstructured FrameMaker and features not relevant for XML authors.

Note: If you have enabled the Simplified XML feature, then clicking the Author View button opens the Simplified XML view. Form more information about Simplified XML view, see Simplified XML user interface.
Author View
WYSIWYG viewof your structured FrameMaker documents in Author View of FrameMaker

Author View includes the visual tools for structured authoring, such as the element tags, Structure View, the Elements catalog, and Attributes Editor. At the top of body page, the breadcrumb of the currently active element is shown. You can select the element by clicking on the element name in the breadcrumb.

Author View does not have the following features that are relevant only for unstructured FrameMaker authoring:

  • Page breaks (no pagination for up to 20 pages)

  • Headers and footers

  • Master pages

  • Keyboard shortcuts and menus related to content formatting and unstructured workflows, which are not retained when a document is saved as XML

  • Menus not relevant to structured authoring

Using Author View, you can concentrate on the structure and content of the document rather than on the appearance.

WYSIWYG View

WYSIWYG View is the classic FrameMaker view, which supports structured and unstructured authoring. WYSIWYG View has all the features of FrameMaker.

The following can be managed using WYSIWYG View only:

Switch between the views

You can switch between the three views by clicking the relevant icon in the Application bar.

Icons of the three views in the Application bar
Switching between the authoringviews of FrameMaker

A. XML view B. Author view C. WYSIWYG view

Author View and XML View support only structured files. When you have unstructured files open and you switch from WYSIWYG View to Author View or XML View, FrameMaker hides the unstructured files. When you quit FrameMaker from Author View or XML View and there are unsaved unstructured files, FrameMaker alerts you.

Structured authoring mode

Know the structured authoring mode in FrameMaker, how you can switch from unstructured to structured FrameMaker.

By default, FrameMaker opens in Structured FrameMaker authoring mode.

Alternatively, if you are currently working in FrameMaker mode, to change the interface:

  1. Open the Preferences dialog (Edit > Preferences) and go to the Global > General tab.

  2. In the Product Interface list, choose Structured FrameMaker and click OK.

You need to restart FrameMaker for the change of interface to take effect.

When you open FrameMaker in the Structured FrameMaker mode, the menu options specific to structured FrameMaker are available. The following interface options are only available in the Structured FrameMaker interface:

Working with the Structure View

Understand how you can perform various workflows in structure view to enable authoring in structured FrameMaker, also explore the structure view pod.

Expand or collapse structure

In the Structure View, you can expand or collapse elements, showing or hiding a detailed outline of your document. (When elements are expanded or collapsed in Structure View, text in the document window does not change.)

An element is sometimes defined to have attributes, which provide supplemental information about the element. You can also expand and collapse the attributes associated with an element.

Tip: Collapse elements to get a higher-level look at the document structure. Collapsed elements are also easier to move around. It’s especially helpful to collapse long lists of items and procedures with many steps.
  • To expand or collapse elements, click the plus arrow symbol on the left side of element bubbles.

  • To expand or collapse attributes, click the arrow symbol on the right side of element bubbles.

  • To expand or collapse all child elements or attributes, hold down Shift while you click a arrow sign.

View element boundaries in the document window

Element boundaries shown in the document window mark the beginning and end of each element. Working with visible boundaries helps you see how the document content is divided into elements. Viewing the boundaries also makes it easier to place an insertion point properly or to make the right selection.

For most elements, the boundaries appear as opening and closing brackets [ ] or as two boxes with an element tag. For some elements (graphics, footnotes, markers, tables, and equations), the element location is marked only by one box with a tag.

When elements are inside other elements, their brackets or tags nest to show the hierarchy.

  • To surround each element with brackets, choose View > Element Boundaries.

  • To surround each element with a text label, choose View > Element Boundaries (As Tags).

  • To hide element boundaries, choose View > Element Boundaries or Element Boundaries (As Tags).

Note: The brackets and tags that mark element boundaries are characters that both print and occupy document space. Hide them before printing to suppress them in print output. Also hide them to see the document layout unaltered by element boundaries.

Expand and collapse elements in document window

If you are viewing element boundaries as tags in the document window, you can perform the following operations:

  • Collapse all elements, even in the document view.

  • Collapse a parent element to hide the child elements, without collapsing them.

  • Collapse child elements, when collapsing the parent element.

  • Collapse all elements to the same level, when collapsing an element.

  • Select the element, by clicking the element tag.

  • Toggle the collapsed state of an element, by double-clicking the element tag.

  • View expanded element structure, when any operation (for example, Find/Change) results in a selection, within a collapsed element structure.

  • Have the document view and Structure View synchronized with respect to the collapsed state of the elements.

Show and hide attributes for new elements

You can show or hide attributes for new elements in Structure View. The view can display all the attributes in the flow, none of the attributes, or only required attributes or attributes that have a value. This setting applies to new elements as you enter them.

  1. Make the appropriate document window or book window active. If a book window is active, select the documents for which you want to set the attribute display options.

  2. Choose View > Attribute Display Options to open the Attribute Display Options dialog:


    Attribute Display Options dialog

    Select one of the following attribute display options:

    • Select Required and Specified Attributes to show only those attributes in the Structure View that are required and attributes that already have an attribute value defined.

    • Select All Attributes to show all attributes that an element can have in the Structure View.

    • Select No Attributes to show no attributes at all in the Structure View.

  3. Click Set.

Show and hide element content

You can show or hide the content from Structure View. Hiding the content from the Structure View gives a clean view of the structure of your document. By default, the topic’s content is shown in the Structure View. You can show or hide content from Structure View through the main menu or the context menu.

  1. Make the appropriate document window active. Choose View > Show Text in Structure View.

  2. Right-click in the Structure View and choose Show Text.

Insert or paste elements

The Structure View gives you easy ways of inserting or pasting elements before or after a selected element.

  1. To insert an element, right-click the element before or after which you want to insert a new element. Choose the desired option (Insert Before or Insert After) from the context menu. Select the element you want to insert from the Insert Element Smart Catalog and press Enter.

  2. To paste content from Clipboard, right-click on the element before or after which you want to insert the copied content. Choose the desired option (Paste Before or Paste After) from the context menu.

Change the scope of elements available in a structured document

When adding elements to a structured document, insert only elements that are valid at the current location. (Valid elements have heavy check marks, heavy check marks and a plus sign, and question marks in the Elements catalog.) If you add elements this way, you can work from the beginning of a document to the end and be sure that its structure is valid at every point along the way.

Sometimes you want to work more loosely, and in these cases you can make more elements available. For example, some draft documents must adhere strictly to a predefined structure but follow the structure only as a guideline. Or, you can plan your document to conform to a structure without having all the information to complete it from start to finish.

When more elements are available, the additional elements appear in the Elements catalog and are available if you insert elements from the keyboard. You can also list inclusions after other valid elements in the catalog.

  1. Make the appropriate document window or book window active. If a book window is active, select the documents you want to affect.

  2. Choose Element > Set Available Elements to open the Set Available Elements dialog. You can also click Options in the Elements catalog.

    SetAvailable Elements dialog
  3. Select one of the following options in the Show These Elements area:

    • To show only elements that are valid for the current location, select Valid Elements for Working Start to Finish. Use this option if you plan to go through a document from start to finish and fill in the elements in their correct order and hierarchy.

    • To show elements that are valid for the current location or later in the current element, select Valid Elements for Working in Any Order. Use this setting if you plan to build a valid document but not necessarily by working from start to finish. This is helpful if you don’t have all the information you need.

    • To show elements allowed anywhere in the current element, select Elements Allowed Anywhere in Parent. Use this setting if you want more flexibility for filling in elements. You can insert elements that are invalid and correct the errors later.

    • To show all elements defined for the document, select All Elements. Use this setting if you’re not building a valid document, if you want flexibility and will correct errors later, if you’re wrapping elements around contents, or if you want to see what’s available elsewhere in the document.

    • To show a set of elements that you specify, select Customized List. Use this setting to work with a subset of the elements, to display elements in a fixed order, or to work with a list that is static instead of context sensitive.

  4. If you selected Customized List, click Edit and create or change a list of elements.

    To move element tags between the Show and Don’t Show lists, use the arrow buttons or double-click the element tags. Transfer all of the elements from one list to another by holding down Shift as you click an arrow button. Click the Move Up and Move Down buttons to arrange the elements in the Show list in the order you want them to appear in the Elements catalog. Click Set when the list is the way you want it.

    Note: A customized list of tags is always the same regardless of the location of the insertion point, so be careful to include all the tags you need. The only indication of validity is a check mark next to a tag.
  5. To list inclusions separately in the Elements catalog, turn on List after Other Valid Elements.

    This groups the inclusions right after the other valid elements. Use this setting if you have a large number of inclusions that you rarely need.

  6. Click Set.

Structure View pod

The Structure View pod displays the underlying XML structure. The view uses bubbles to represent elements and their relationship to one another. It also identifies errors in the document structure. In Structure View, you can insert, select, expand, collapse, move, merge, or split elements. When you work with structured documents, you’ll use the document window and Structure View together. These windows help you organize elements in a valid structure.

Both windows are editable, and anything you do in one is mirrored in the other. You can have the two views open side by side, to keep track of both contents and structure. If you click or select in one view, an insertion point or selection appears at the equivalent place in the other view. Any editing you do in one is reflected in the other. It’s easier to make your changes in Structure View, where you can drag-and-drop bubbles to rearrange elements or select bubbles to edit them in other ways. If you click or select in an unstructured flow in a document window, Structure View is empty.

To display, choose Structure > Structure View.

Elements catalog

The Elements catalog lists the elements you can use at the current location and provides commands for adding and editing elements. It also displays other information about the current location, such as whether you can type text there. The information in the Elements catalog comes from content rules in the definition for the current element.

The catalog is preset to show only the elements that are valid at the current location, though you can have it display more elements if you want greater flexibility. The catalog is empty if you click or select in an unstructured flow, if the document has no element definitions, or if no more elements are required at the current location.

Choose View > Pods > Element Catalog to display the Elements catalog:

The Elements catalog uses the following symbols to identify whether an element is valid:

Heavy check mark

The element is valid at the current location. If you insert the element, the current (parent) element will be correct and complete up to this location.

Plus sign (+)

The element is an inclusion (SGML only) in the current element and is valid at the current location. The plus sign always appears next to a heavy check mark. Inclusions are valid only in SGML documents, so this sign does not appear in XML documents.

Tip: Although inclusions are as valid as elements identified with just a heavy check mark, you might find it helpful to list inclusions separately. If a document has many inclusions, it can be difficult to find other valid elements in the catalog.
Question mark (?)

The element is a possible replacement for the element right after the insertion point or for the selected elements. It is valid at the current location, but will make child elements after it invalid. If you insert an element with a question mark, the current (parent) element will be complete and correct up to this location, but you’ll have to correct errors after the new element.

Light check mark

The element is valid later in the current element. If you insert one of these elements, the current (parent) element will be correct but incomplete up to this location. You’ll have to go back and fill in missing child elements.

No symbol

If an element in the catalog has no symbol, it is not valid at the current location or later in the current element. It may be valid earlier in the current element or outside the element.

The Elements catalog may also include the following indicators to provide other information about the current location:

<TEXT>

You can type text at this point.

<UNDEFINED>

The current element does not have a definition in the document. The element was probably pasted from a document with different element definitions. (This does not appear when the catalog is set to display all elements.)

<INVALID>

The contents of the current element are invalid. (This does not appear when the catalog is set to display all elements.)

You can use buttons in the Elements catalog to insert an empty element, wrap an element around contents, and change the type of an existing element.

If there are many elements in the catalog you can type in an element name or part of an element name or the element's "friendly name" in the search bar to filter the list:

Search bar in the Elements pod to find elements more easy
Search bar in the Elementspod to find elements more easy

Working with elements in structured documents

Understand how you can work with various elements in structured documents in FrameMaker, insert, edit and import elements, assign attribute values and correct errors.

The basic unit of information in structured documents is called an element. Elements hold other elements, text, graphics, tables, cross-references, and markers.

You can add elements to a document to build its structure, and you can edit existing elements in many ways.

If you create a FrameMaker document by opening a structured file, you do not need to add elements to it. The document already contains elements. You can edit the document’s elements, and add more elements.

To build a document’s structure, you can either add elements to the document and then fill in the contents, or select existing contents and wrap them in elements.

A structured document has element definitions stored in its Elements catalog. These definitions describe the allowable contents for each type of element the document can have. They sometimes specify attributes and formatting for the elements. If all the elements in a document have contents and attributes that meet these specifications, the document is valid.

Valid contents for elements

An element’s definition has content rules that determine what the element can contain. For example, perhaps the definition of a Section element specifies that a Section must begin with a Head element, then must have a Para element, and then can have any combination of Para, Figure, and other Section elements. A Para element sometimes allows text and CrossRef elements, in any order.

The Elements catalog indicates valid elements for the current location with a heavy check mark. It shows that text is allowed with the <TEXT> tag.

Two classes of elements

Elements fall into two basic classes determined by their allowable contents:

  • A container element can hold text, other elements, or both. Container elements, such as heads and paragraphs, build the document’s structure.

  • An object element is a single object—a marker, cross-reference, system variable, equation, or anchored frame. You cannot type in these elements or add child elements to them.


Container element and object element

A. Containers have round-cornered bubbles. B. Object elements have square-cornered bubbles.

A container element can be defined to remain empty. For example, perhaps a table cell is empty as part of a table’s design. If an element contains only spaces or non-printable characters such as tabs, its text snippet in the Structure View is <WHITESPACE>.

Attributes for elements

An element can have attributes, which provide information about the element that is not part of the element’s contents. Your document uses attributes for several purposes:

  • To control the formatting of an element. For example, perhaps a Type attribute in a List element has two possible values—Bulleted and Numbered.

    Attributes can provide formatting information.
    Element'sattributes providing formatting information

  • To record descriptive information about an element, such as level of classification. An attribute value can even trigger a custom routine that hides the element when the document is displayed.

  • To store source and destination information for elements, typically for cross-referencing. A Section element sometimes has an ID attribute that stores a unique value. A cross-reference element that points to the Section stores the same value in a Reference attribute, to maintain the connection between the elements.

    You typically enter and edit the values for attributes, unless the attributes are defined to be read-only. Cross-reference IDs are often read-only and are generated by FrameMaker.

Import element definitions

If you’re not sure whether a document has element definitions, open the Elements catalog and click in a text flow. If you see elements in the catalog, the document has definitions. You sometimes must select the All Elements option to get elements to appear (Element > Set Available Elements > All Elements option).

If you are using a structured template, then element definitions are usually defined in it. However, sometimes your application developer may provide you with an EDD or DTD that you can directly import into your documents.

  1. Open the template, EDD, or DTD with the element definitions. The template, EDD, or DTD must be named and saved.

  2. Create a blank document or open the document or book that you want to update. If a book window is active, select the documents you want to update.

  3. In the document or book you’re updating, choose File > Import > Element Definitions.

  4. Choose the template, EDD, or DTD from the Import From Document pop-up menu. The pop-up menu lists all open documents.

  5. To remove special formatting and book-related changes in the document, do the following:

    • To remove format rule overrides, select While Updating, Remove Format Rule Overrides. Use this setting if you have made text or paragraph formatting changes to elements and now want to return to the formatting described in the EDD or DTD.

    • To remove element information derived from a book file, select While Updating, Remove Information Inherited from Book. Use this setting if the document used to be included in a book but is now a standalone document.

  6. Click Import. FrameMaker adds the element definitions to the document’s Elements catalog, replacing existing definitions.

Insert elements

To add an element to a document, you either insert an empty element and enter contents, or wrap an element around existing contents. Before you can begin, your document must have element definitions in its Elements catalog.

If you haven’t yet fully planned your document, consider inserting just the high-level elements, such as Section and Head elements, and then use this structure as an outline for developing the document.

You can also enter all the elements in their correct order and hierarchy as you go, or concentrate on contents rather than on structure, and then validate later to correct errors.

The Elements catalog shows the elements that are available at the current location. You can change the scope of elements available—for example, to show elements that are not valid at the current location. Ask your application developer for a summary of what each element can contain.

If you have turned on element boundaries, then once you insert or wrap an element, a pair of element boundaries appears in the document window, and a new bubble appears in the Structure View.

Empty element boundaries (left) and bubble for the new element (right)
Empty elementboundaries in the document view and bubble for the new element inthe Structure View

Insert an element using the Element Catalog

  1. If the document does not have element definitions, import the definitions from a structured template, EDD, or a DTD.

  2. Specify the scope of elements available.

  3. Click where you want to insert the element. If you’re inserting it between other elements, work in the Structure View rather than the document window.

  4. Select an element tag in the Elements catalog, and click Insert. If only one element appears in the catalog, you can click Insert without selecting it.

    You can also double-click an element tag to insert the element.

    Note: The Elements catalog always displays only those elements that are valid at the insertion point.
  5. If the Attributes For New Element dialog box appears, enter attribute values for the element and click Insert Element.

    This dialog box appears only if the element has attributes and if an option is set in the New Element Options dialog box to prompt for attribute values when you insert new elements.

  6. If you insert a table, a marker, a graphic, or a cross-reference, provide more information about the element in the dialog box that appears.

  7. Add content to the elements. You can add content as you insert elements, or after you build the structure of your document.

Press Return to insert elements

In many cases, pressing Return inserts an element automatically. Whenever you press Return, FrameMaker checks the current element’s definition for the following conditions—in the following order—and sometimes inserts a child element:

One valid element

If only one child element is valid at the current location, pressing Return adds that element. For example, after you add a <topic>, a <title> is the only element permitted as the first child element. You can also use this technique to create repeating elements, such as body paragraphs and list items.

More than one valid element

If more than one child element is valid, pressing Return highlights the Tag area to prompt you for an element tag. Type until the tag you want appears, and then press Return to insert the element.

End of an element

If the insertion point is at the end of an element and no more child elements are valid, pressing Return looks for valid elements in ancestors after this location. If a valid element is found, the insertion point moves to the ancestor and the element is inserted (if only one is valid) or the Tag area is highlighted (if more than one element is valid).

Other conditions

If none of the preceding conditions are true, pressing Return causes a beep and no element is inserted.

Set options for inserting new elements

  1. Make the appropriate document window or book window active. If a book window is active, select the documents you want to affect.

  2. Choose Element > New Element Options. The New Element Options dialog is displayed:

    New Element Options Dialog
    New Element Options Dialog
  3. Specify how you want to be prompted for attribute values when you add new elements:

    • To enter all possible attribute values as you add elements, select Always Prompt for Attribute Values.

    • To enter only required attribute values as you add elements, select Prompt for Required Attribute Values.

    • To enter attribute values after adding elements, select Do Not Prompt for Attribute Values.

  4. To allow FrameMaker to insert child elements automatically for new elements, select Allow Automatic Insertion of Children.

  5. Click Set.

Tip: To speed up the process of adding new elements, select the Do Not Prompt for Attribute Values and Allow Automatic Insertion of Children options.

Add text in a structured document

Place the insertion point anywhere inside a text frame in a document window. An insertion point also appears at the corresponding place in the Structure View. To place the insertion point in the middle of text, use the document window rather than the Structure View. When placing the insertion point at the beginning or end of an element, or between elements, click in the Structure View.

The Elements catalog describes what the current element can contain. You can enter text whenever <TEXT> appears in the catalog.

  1. Place the insertion point:

    • To place at the beginning or end of text, click to the left or right in the first or second half of the text snippet. After you click, a line on the left or right side of the triangle insertion point indicates that the point is at the beginning or end of text.

    • To place between two elements, click to the right of the vertical line connecting the elements, between the two bubbles.

    Insertion point between two elements
    Adding text at the insertion point between twoelements

  2. Begin typing. Don’t press Return unless you want to insert a new element, or begin a new paragraph in an unstructured flow.

Edit elements

You can edit a document’s structure in many ways—including changing an element to a different type, rearranging elements, and splitting and merging elements.

After editing one part of a document, sometimes you edit the document further to correct content errors. For example, if you split a Section element in two, you sometimes need to add a Head element for the new second Section. Use the Structure View as a guide for finding errors as you work, or validate the document when you’re finished.

Change elements

You can change an existing element to another element of the same type. For example, you sometimes want to convert a Para element into a Note element, or a series of Para elements into ListItem elements that you can include within a List element.

However, not all elements can be converted to other elements. For example, if you change a Para element containing text to a Marker element containing the same text, the name of the element changes, but the text is not converted to marker text.

Note: If you want to change contents to a table, use Table > Convert to Table to convert text rather than changing an element.
Changing elements to another type
  1. Select the element. You can select more than one element, even if the elements do not have the same tag. All the elements are changed to the new type of element. However, the elements’ children are not changed, but they sometimes become invalid because the parent changed.

  2. Select an element tag in the Elements catalog and click Change. Sometimes attributes in the element become invalid and need to be corrected.

Merge elements

You can merge two or more elements into a single element. Merging places the contents of the second element (including any child elements) at the end of the first element.

Merging two Sections, before and after
Beforeand after merging two elements

You sometimes must edit the document after merging elements.

Note: If you want to combine table cells, use Table > Straddle rather than merging the cells. You cannot combine other table parts.
  1. Select the elements you want to merge. The elements can be of different types, but they must be siblings and next to each other in their parent element.

  2. Choose Element > Merge.

Merging retains the attributes for the first element only.

Split an element

You can split an element into two elements that have the same tag and are at the same level. For example, perhaps you split a Section element in two.

Splitting a Section, before and after
Beforeand after splitting an element

You sometimes must edit the document after splitting an element. In the example above, after splitting you would add a Head for the new second Section.

Note: You cannot split an element that is a table part (such as a row or cell).
  1. Click where you want to split the element. The contents after the insertion point go in the new second element.

  2. Choose Element > Split.

Splitting sometimes results in two elements with identical attributes. However, if the original attribute had a Unique ID attribute, the second element loses its ID value.

Wrap elements around existing content

You can add structure to content already in a document by wrapping a new element around the content. The content can be any part of a document, including other elements. The element’s content is formatted as specified in the element’s format rules.

Note: You cannot wrap content in elements that are for parts of tables (such as rows or cells), but you can wrap text or other elements that are within a cell or a table title element. If you want to convert text and elements to a table, use Table > Convert to Table rather than wrapping.

After wrapping an element, you sometimes must edit the document to correct structure errors. For example, if you wrap Para elements in a Section element that requires a Head element, you’ll need to insert the Head element.

Wrap an element using the Element Catalog
  1. Select the contents you want to wrap in an element. If you’re selecting text, use the document window. If you’re selecting entire elements, use the Structure View.

  2. Select an element tag in the Elements catalog, and click Wrap.

  3. If the Attributes For New Element dialog box appears, enter attribute values for the element and click Insert Element.

    This dialog box appears only if the element has attributes and if an option is set in the New Element Options dialog box to prompt for attribute values when you insert elements.

Wrap elements throughout a document
  1. In the document window, wrap text ranges, system variables, and other items that are inside paragraphs. Don’t worry about errors you see in the Structure View. You’ll correct many of these errors when you wrap the lowest levels in parent elements. You can correct the other errors when you’re finished.

  2. Wrap paragraphs, headings, and other paragraph-level items in their elements.

  3. In the Structure View, wrap the elements you have so far in parent elements, such as Section and List.

Wrapping helps in manually providing a structure to an existing unstructured document. When you wrap the first element in the document, the Structure View immediately changes to show a default invalid structure, as follows:

  • A highest-level element is added with the tag NoName, unless you begin by wrapping the contents in a valid highest-level element. NoName is a placeholder for your valid highest-level element.

  • All tables become structured and are given default element tags, such as TABLE and ROW.

  • Objects become elements with default tags such as CROSSREF, GRAPHIC, and EQUATION.

  • Footnotes become FOOTNOTE.

  • Rubi text becomes RUBI and RUBIGRP elements.

Note: Variables and markers do not become structured object elements.

You can correct the structure of the document when you’re finished wrapping elements.

Tip: If your application developer has set up a conversion table for the document, you can apply the table to wrap elements throughout the document all at one time. This is much faster than wrapping text manually.

Unwrapping the contents of elements

Unwrapping deletes an element but leaves its contents in the same place in the document. You usually unwrap elements as part of a larger editing process. For example, if you plan to convert ListItem elements into Para elements, sometimes you must unwrap the parent List element first. Then use Edit > Find/Change to convert the ListItem elements to Para elements.

Unwrapping ListItems, before and after
Beforeand after unwrapping the contents of elements

You sometimes must edit the document after unwrapping an element. For this example, you would change the ListItem elements to valid elements or rewrap them.

Note: You cannot unwrap an element that is a table part (such as a row or cell).
  1. Select the element with the contents you want to unwrap.

  2. Choose Element > Unwrap.

Move or copy elements

You can move an element to another location in a document by dragging its bubble in the Structure View. When you move or copy an element, its contents, including descendants, all move along with it. This does not affect the contents of the clipboard.

Tip: If you’re moving an element that has many descendants, collapse the element first. In Structure View, Shift-click an element to collapse/expand all its sibling elements. Alt-click an element to expand or collapse its child elements.

You can also move or copy an element by cutting or copying it to the clipboard and pasting it in a new location, even across documents. If you paste an element from another document, sometimes the element is not defined in your document. If you don’t plan to add a definition for the element, change the element to a valid one. You cannot cut and paste elements in a book file.

  1. Do one of the following:

    • To move an element, drag the bubble to the location you want.

    • To copy an element, hold down Alt and drag the bubble to the location.

    As you drag the bubble to copy, the pointer changes to a hollow, stacked up-and-down arrowhead, and a horizontal arrow moves to indicate where the copy goes if you release the mouse button.

    As you drag the bubble to move, the pointer changes to a solid up-and-down arrowhead, and an arrow moves to indicate where the bubble goes if you release the mouse button.

    If the element is valid in the location where the arrow points, a check mark or question mark appears in the bubble.

Nudge an element one place

  1. Drag the element’s bubble slightly to one side or up or down. As you drag a small distance, the pointer changes to a single arrow. (If you drag too far, the arrow changes to an up-and-down arrowhead.)

    Nudging a List one place, before and after
    Before and afterNudging an element one place

    When you release, the element moves one place in the indicated direction, as follows:

    • Moving an element up places it right above the sibling right before it. Moving an element down places it below the sibling after it.

    • Moving an element to the left makes it a sibling of its parent. Moving an element to the right makes it a child of the sibling before it.

Hierarchical element insert

Using the Elements quick catalog, you can select and insert multiple levels of elements. When you select an element in the quick catalog, FrameMaker displays the elements available within the selected element.

Hit Enter and use the pointer or the arrow keys (or the pointer) to select a hierarchy of elements that you want to insert. When you hit Enter, if there is only one valid element at the pointer’s position, FrameMaker inserts the element.

Use the following keys to navigate through the hierarchy of elements in quick catalogs:

Key/Key action

Type of navigation/action

Place cursor in an element and hit Enter

Display the quick catalog

Right arrow

Display the elements available within the selected element

Left arrow

Hide one level hierarchy of elements

tab

scroll down

shift+tab

scroll up

Alphabets/combination of alphabets

Type an alphabet or combination of alphabets to select an element. For example, press B to select Body and Type T,O to go to Topic.

The list of elements in the quick catalog appears according to the settings in the Set Available Elements dialog. If Show Descriptive Element Names is selected, the element tool tips in the catalog display the element descriptions.

Hierarchical element insert takes care of auto insertions for the last selected element in the hierarchy, as specified in the EDD. If there are auto insertion rules in place for elements apart from the last element, they are ignored.

Hierarchical element insert
Selecting and inserting multiple levels of elementsin a hierarchy

A. Select a hierarchy of elements B. Elements get inserted as a group

Select and edit text

Select text in flow

To select all the text in a flow, click in the flow and choose Edit > Select All In Flow.

Select text in structured document window

You can select entire elements and any part of the document contents in a document window. A corresponding selection also appears in the Structure View.

If an element has contents, you can select all or part of the contents without selecting the element itself. If an element consists of a single object, such as a graphic or a cross-reference, select the entire element.

When you select an entire element, its contents are selected along with it.

Tip: Work with element boundaries showing, so that you can see the beginning and end of each element. After selecting, check the status bar for the correct tag name of the selection parent element. The complete path of the tag name appears following the “E:” text as breadcrumb.
  1. To select text in an element, do one of the following:

    • To select text without selecting the whole element, drag through the range of text. Be careful not to drag across an element boundary. If you do, you select the entire element.

    • To select one element, drag from anywhere inside the element to outside one of its element boundaries.

    • To select more than one elements, drag through the elements. FrameMaker selects each element as you drag across one of its boundaries.

Select element content in Structure View

You can select entire elements or the element contents in the Structure View. A corresponding selection also appears in the document window.

If an element has contents, you can select all of the contents without selecting the element itself. If an element is a single object, such as a graphic or a cross-reference, you select the entire element. (Elements that are allowed contents have round-cornered bubbles; elements that are a single object have square-cornered bubbles.)

When you select an entire element, its contents are selected along with it.

  1. To select element content, do one of the following

    • To select an element, click the middle of its bubble.

    • To select more than one element, click the first bubble and then Shift-click the other bubbles. You can also drag to the right of the vertical line connecting the elements. Start above the first element you want to select, and drag down to the last element you want to select.

    • To select contents of an element without descendants but not select the entire element, double-click the text snippet.

    • To select the contents of an element with descendants but not select the entire element, double-click to the right of the vertical line connecting the first level of descendants.

Remove elements

You can remove any element, with or without its contents. For example, you sometimes want to delete a Section element and its contents, or delete the Section but leave the contents in place, so you can place them in a different element.

For elements that are defined to contain text or other elements, you can also delete the contents and leave the empty element in the document. For elements that are single objects without contents, you must delete the entire element.

  • To remove an element and its contents, select the element and press Delete.

  • To remove an element but not its content, select the element and choose Element > Unwrap. FrameMaker reformats the contents based on the new context, if necessary.

  • To remove the contents of an element but not the element itself, select the contents and press Delete.

  • To remove an element and its contents and replace it with another element, select the element. Then select the replacement element in the Elements catalog, and click Insert. A new empty element replaces the selected element and its contents.

  • To remove all elements from a document to base it on paragraph and character formats, choose Structure > Remove Structure From Flow. If the document has additional structured flows, repeat this command for each flow.

    FrameMaker removes all elements from the current text flow. If the formatting was created or modified by format change lists in the Elements catalog, the removed elements become format overrides in the document.

    Note: To create named formats for each removed element variation and save them in the catalog, use the Create And Apply Formats command.

Assign attribute values

Attributes store supplementary information about an element that does not appear with the contents of the document. You can see attributes and their values in the Structure View.

Attributes in the Structure View
Attributesof an element in the Structure View

An attribute’s definition specifies the type of values that are acceptable (such as text or numeric) and sometimes includes a list of possible values or a numeric range.

The definition also determines whether the value is optional, required, or read only. It sometimes provides a default value. You can assign values to an attribute if the attribute is not read only.

If an attribute’s current value does not conform to the specifications in its definition, the attribute is invalid.

Note: FrameMaker can provide the values for ID and ID Reference attributes used in cross-referencing. (These attributes are often defined to be read only.)

Enter attribute values as you insert elements

You enter some attribute values as you insert elements, particularly for required attributes and attributes that affect formatting. Optional attributes can perhaps wait for a later pass.

Some font property values used in an element definition document (EDD) require that you use specific units. For example, if the Offset Horizontal value is set as a percentage of an em space, typing 5pt creates an offset of 5 em spaces instead of 5 points.

Do not use multibyte (Asian-language) characters when entering attribute values. Sometimes these characters are not exported to SGML correctly because multibyte characters are not supported in the SGML workflow.

Note: Attribute names support the Unicode text-encoding standard.
  1. Make sure you are prompted for attribute values when you insert elements.

  2. Insert the element. If attributes are defined for the element, the Attributes For New Element dialog box appears, listing all the attributes (except read-only ones) defined for the element.

  3. For each attribute value to provide, select the attribute in the Attribute Name scroll list, enter the value in the Attribute Value box, and press Enter. If an attribute is required, you must enter a value for the element to be valid.

    If an attribute has a set of predefined values, choose from the Attribute Value pop-up menu rather than entering a value.

    The value you can enter, such as text or a number, is determined by the attribute’s type.

    A description of the selected attribute (its type, whether a value is required, and so on) appears in the dialog box below the Attribute Value area.

  4. Click Insert Element.

Enter or edit attribute values for elements already in a document

To change an attribute name rather than a value, use Edit > Find/Change. Sometimes this is necessary if you imported element definitions that use different attribute names with identical meanings, such as Security instead of SecurityLevel. The new attribute name must be defined for the element.

  1. Select the element with the attribute value you want to change.

    You can select more than one element of the same type, and apply the change to all. The elements must be contiguous. For example, if several Para elements in a row have a Security attribute, you can change the value of that attribute for all the Para elements at one time.

  2. Double-click an attribute name or value in the Structure View to display the Attributes dialog box.

    Alternatively, access the Attributes modal pod from Elements > Edit Attributes.

  3. For each attribute value to enter or edit, select the attribute in the Attribute Name scroll list, enter the value in the Attribute Value box, and press Enter.

    If an attribute has a set of predefined values, choose from the Attribute Value pop-up menu rather than entering a value.

Auto-generate unique IDs for attributes

FrameMaker allows you to define the elements in your structured application for which you want it to auto-assign unique IDs. For example, say your structured application includes a section element that has an id attribute. You can create configurable rule that ensures that whenever you add the section element to your structured document, FrameMaker will auto-generate a unique ID. FrameMaker will then assign that ID to the id attribute of the section element.

Define the auto-generation rules for a structured application
  1. Choose Element > Launch Config File Maker.

  2. In the Configuration File Settings dialog, you define the ID generation rules.

    ID Prefix
    A text and number combination that will be prefixed to the ID that FrameMaker auto-generates.
    Assign ID to Attribute

    The name of the attribute to which FrameMaker will assign the auto-generated ID.

    Note: You can specify any attribute to which FrameMaker will assign the ID.

    Choose <auto> to allow FrameMaker to decide to which attribute the ID is assigned.

    For Elements

    Specify the names of elements to which FrameMaker will assign an ID to the attribute specified in Assign ID to Attribute described above.

    Note: The list of Elements will increment as you enter an new element name. This allows you to enter any number of elements to which to assign IDs for the specified attribute.
    For Elements having Attributes

    You can also choose to specify elements by their attribute values.

    This implies that you can define an attribute name to ensure that FrameMaker assigns an ID to any element that contains the specified attribute. For example, you can ensure that FrameMake will assgin an ID to all elements that have the attribute @audience. However, the ID is assigned to the attribute that is specified in the Assign ID to Attribute field described above.

    You can also add attribute values to the above attribute rule. For example, you can ensure that FrameMake will assgin an ID to all elements that have the attribute @audience and the value admin.

    Also, you can specify multiple values and FrameMaker will assign the ID based on any one of the values. For the audience example, you can specify the value as admin or end-user. In this case, the ID is assigned if the element contains the audience attribute and the value of the attribute is either admin or end-user.

    Note: The Attribute list will increment as you enter an new attribute names.
  3. Click Save or Save As to save the ID generation rules to a configuration (.xml) file.

    To load the set of rules defined in an existing configuration file, click Load Configuration File.

  4. You can then include this configuration file to your structure application.

Types of attributes

An attribute’s type determines the kind of values that are allowed in the attribute. For example, the value version 1 is not valid for an attribute defined as an integer, but the value 1 is valid. Numeric types (such as integer or real number) can also be limited to a predefined range by their attribute definition.

Choice

An attribute with a list of predefined values.

ID Reference

An attribute with a value that is a Unique ID value from another element. It is typically used for element-based cross-references.

ID References

An attribute with a value of one or more Unique ID values from another element. (Sometimes the developer specifies this attribute if you’re exporting to a structured application that uses multiple values for source information.)

Integer

An attribute with a whole number value (no decimal parts). Examples of valid integers are 22, -22, and +322. An integer can be defined to fall within a range.

Integers

An attribute with a value of one or more integers. Enter each number on a separate line in the Attribute Value box.

Real

An attribute with a real number value, with or without a decimal part (the value can also be expressed in scientific notation). Examples of valid real numbers are 2, 22.4, -0.22, and 2.3e-1. A real number can be defined to fall within a range.

Reals

An attribute with a value of one or more real numbers. Enter each number on a separate line in the Attribute Value box.

String

An attribute with a value of a series of characters (text).

Strings

An attribute with a value of one or more strings. Enter each string on a separate line in the Attribute Value box.

Unique ID

An attribute with a value of a unique text string. An element can have only one ID attribute (which can be of type Unique ID or Unique IDs). All ID values must be unique in the document or book. An element with a Unique ID attribute can be the source for an element-based cross-reference.

Unique IDs

An attribute with a value of one or more unique text strings. Enter each string on a separate line in the Attribute Value box. (Sometimes the developer specifies this attribute if you’re exporting to a structured application that uses multiple values for source information.)

Copy attribute values

You can use the clipboard to copy and paste attribute values from one element to another. If you paste values to an element that does not have corresponding attributes defined, the attributes are invalid. To preserve element-based cross-references, an ID attribute value is not pasted.

If you copy an attribute from another document, the attribute sometimes is not defined in the current document.

  1. Select the element with the attribute values you want to copy, and choose Edit > Copy Special > Attribute Values. All attribute values associated with the element are copied to the clipboard.

  2. Select a different element and choose Edit > Paste.

  3. (Optional) To delete an undefined attribute copied from another document, select the element with the undefined attribute, open the Attributes dialog, select the attribute, and click Delete Attribute. In the next dialog box that appears, remove the attribute for the current element or for all elements that have the attribute.

Find and edit elements and attributes

You search for elements and attributes in a structured document to keep track of them or to make changes to them quickly. Searching is especially useful when you want to apply the same change to more than one occurrence of an element or attribute.

You can also search for many other items in FrameMaker, including strings of text, specific formatting, unresolved cross-references, and objects (such as anchored frames) that are not elements.

Note: The Find/Change feature supports the Unicode text-encoding standard.

Search for element tags, attribute names, or attribute values

You can search for an element tag, attribute name, and attribute value either separately or in combination. For example, you can search for a <List> element to find each <List> element, or perhaps you limit the search to find only <List> elements that have a @Security attribute set to Classified.

  1. Choose Edit > Find/Change.

  2. Choose Element from the Find pop‑up menu.

  3. Select the options you want in the Find Element dialog box.

    The settings can be used in many combinations. These are a few examples:

    • To find any element, leave all three boxes empty.

    • To find a specific element, type an element tag but leave the Attribute Name and Attribute Value boxes empty.

    • To find any element with a specific attribute, type an attribute name but leave the Element Tag and Attribute Value boxes empty.

    • To find any element with a specific attribute value, type an attribute value but leave the Element Tag and Attribute Name boxes empty.

    • To find a specific combination of element and attribute, type an element tag and choose an attribute name.

    • To find a specific combination of element and attribute value, type an element tag and choose an attribute name and an attribute value. (If the attribute type is Choice, type the value.)

    • To find a specific element with an attribute that has no value, type an element tag, choose an attribute name, and choose No Value from the Attribute Value pop-up menu.

    Leave a box empty if you do not want to restrict the search. An empty box has the same effect as searching for any element, or choosing either Any Attribute or Any Value.

  4. Click Set.

  5. In the Find/Change dialog box, select Consider Case, Whole Word, Use Wildcards, or Find Backward.

  6. Click Find.

Note: After searching the main flow, FrameMaker looks at other text frames and text lines. Because a search is flow by flow, it sometimes appears to jump around the document.

Change elements or attributes you find

After you find an element, attribute, or attribute value, you can change it to another element, attribute, or value. For example, you can quickly and globally change the value of a @SecurityLevel attribute from Declassified to Top Secret.

When changing items in a document, you can change each occurrence of the item as it is found or have FrameMaker automatically make the change throughout the document.

Tip: After pasting material from another document or importing new element definitions, use the Find/Change command to clean up your document. For example, pasting a table from an unstructured document gives the table and its parts default, invalid element tags. You can use Find/Change to change CELL elements, for example, to TableCell elements.
  1. Choose Edit > Find/Change.

  2. In the Find/Change dialog box, choose Element from the Find pop‑up menu.

  3. Select the options you want in the Find Element dialog box, and click Set. Then choose an option from the Change pop‑up menu in the Find/Change dialog box, and type the replacement tag or value.

    The Find Element dialog box and the Change pop-up menu work together. These are a few examples of combinations you can use:

    • To change one element to another, type an element tag in the Find Element dialog box but leave Attribute Name and Attribute Value empty. Then choose Element Tag To in the Change pop-up menu and type an element tag.

    • To change one attribute to another, type an attribute name but leave Element Tag and Attribute Value empty. Then choose Attribute Name To and type an attribute name that is defined for this element.

    • To change one attribute value to another, type an attribute value but leave Attribute Name and Attribute Value empty. Then choose Attribute Value To and type a value.

    • To change an attribute with a specific name to a certain value, type an attribute name but leave Element Tag and Attribute Value empty. Then choose Attribute Value To and type a value.

    • To change a specific element with a specific attribute value to another element, type an element tag and choose an attribute name and attribute value. Then choose Element Tag To in the Change pop-up menu and type an element tag.

    • To remove an attribute value, type an attribute value but leave Element Tag and Attribute Name empty. Then choose Attribute Value To and leave the Choose box empty.

    If you try to make a change that is not allowed—for example, if you try to remove an element tag—an alert message appears explaining the problem.

  4. Click Find.

  5. When FrameMaker finds the element or attribute, do one of the following:

    • To make the change but not continue searching for other occurrences of the item, click Change.

    • To make the change and continue searching for other occurrences, click Change & Find.

    • To change all occurrences of the item, specify all occurrences in the document or only occurrences in the current selection and click Change All.

Find and correct errors in document structure

An error in a structured flow can be a structure problem, such as an element in an invalid location, or an invalid attribute, such as an attribute with a missing required value. In Structure View, when a collapsed element has invalid content in its structure, the arrow on the right of the element name is red.

You can also validate a document to find errors. After you know where the errors are located, use the Elements catalog and the Structure View as guides to help you correct them.

If you’ve made any formatting changes to text in elements, the elements perhaps do not conform to their format rules.

Use the Structure View to find errors

When an element doesn’t conform to content rules and attribute descriptions in the document’s element definitions, the Structure View identifies the error for you.

Missing elements

If an element is missing one or more child elements required by the element definitions, a small red hole appears on the vertical line where the child element should be.

At least one required child element is missing.
A required childelement missing in the StructureView

Elements at an invalid location

If an element is at a location not allowed by the content rules, the vertical line next to it is broken from the position of that element to the end of the parent element.

The Para element is invalid at this location.
Invalidelement at a location in the Structure View

Undefined elements

If an element is not defined for the document, its bubble is red. This sometimes happens if you have pasted the element from another document.

Invalid attributes

If an attribute has an invalid value or is not defined for the document, it appears with a red x to the left of the attribute name and its value is red.

The DraftVersion attribute is invalid.
Invalid attributeof an element in the Structure View

Attributes missing a required value

If an attribute does not have a value, no value appears to the right of the attribute name. If the attribute requires a value, no value is red and a red hole appears to the left of it.

The XRefLabel attribute is missing a required value.
Missing a requiredattribute value of an element in the Structure View

Validate a document

When FrameMaker validates a document, it searches for elements that do not conform to content and attribute rules in the document’s element definitions. If FrameMaker finds an error, it selects the element and describes the error.

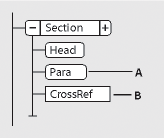
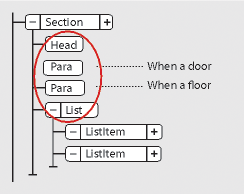
You can validate an entire document, the current flow, or the current element. If you validate the current element, FrameMaker does not check the descendants of the element’s child elements. 
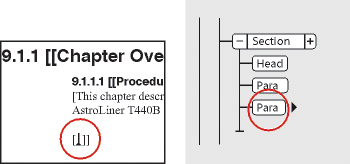
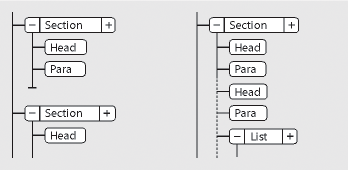
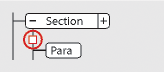
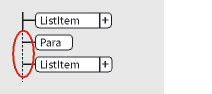
For example, if you validate the Section element below, FrameMaker makes sure that the <Head> element, the two <Para> elements, and the <List> element are valid, but does not check the <List Item> elements in <List>.

Only the section’s child elements are validated.
Validated child elements ofa section in the Structure View

If the document has conditional text, only the versions that are showing are validated.

You can also validate an entire book including all its files, only the book file, or only the current element in the book file.

  1. Choose Structure > Validate.

  2. Select Entire Document/Book, Book Elements Only, Current Flow, or Current Element to specify the scope of the validation.

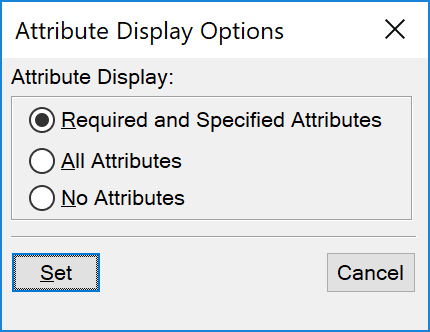
  3. To exclude missing elements or attribute values from the search, select Ignore Missing Elements or Ignore Missing Attribute Values.

    If these settings are selected, FrameMaker does not look for places where a required child element or a required attribute value is missing. Consider selecting these if you are not trying to build a complete document yet.

  4. Click Start Validating.

    FrameMaker starts checking at the beginning of the current element. If you’re validating only the current element, it checks the element with the insertion point or the selected element. If more than one element is selected, it checks the first element in the selection.

  5. If FrameMaker finds an error, click Start Validating again when you’re ready to continue validating.

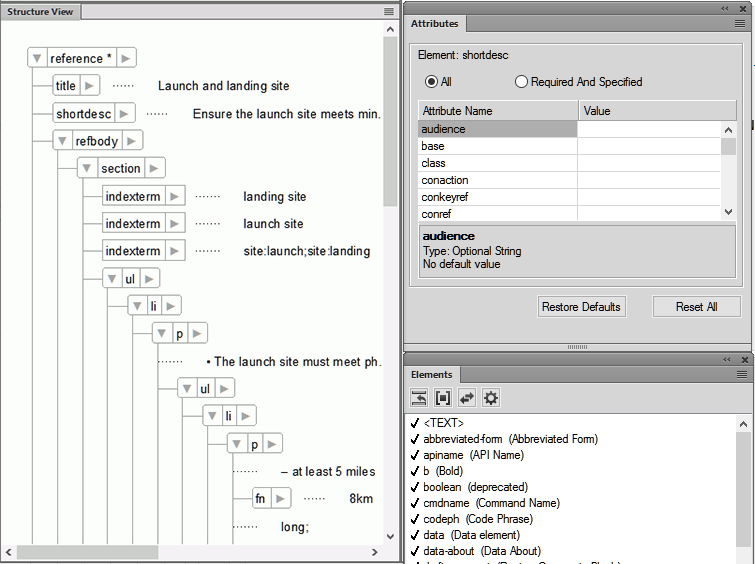
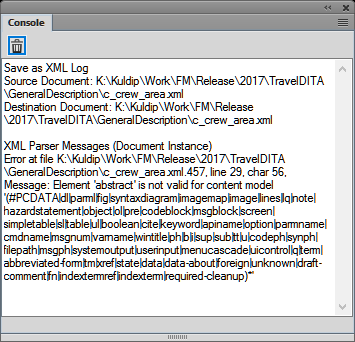
    The top of the Element Validation dialog box shows the tag of the element and a brief message about the problem.

    You can correct the error, ignore it, or click Allow As Special Case. If you mark it as a special case, FrameMaker won’t identify the error the next time you validate the document.

  6. Repeat step 5 until FrameMaker does not find any more errors.

When FrameMaker reaches the end of the document, it returns to the beginning and continues validating. When FrameMaker reaches the end of a flow, it continues to the next one.

Note: When validating a book, FrameMaker tells you if a file in the book has invalid content, but for a more detailed evaluation, you must open and validate the file.

Validation of the elements in an EDD includes attributes in if-then clauses. For example, suppose that the possible values of an attribute are A or B or C, and a context rule says If [attrval = "D"]. This is flagged as an error and reported as an invalid structure when the element definitions are imported.

Similarly, if an element’s text formatting rules or prefix/suffix rules use attribute names in the context specifications, the attribute name and case must match the attribute definition in the element’s definition.

If an attribute’s value is changed to the same value it previously had, the action is not flagged as a change. This enhances performance by eliminating unnecessary value checking.

Clear all special cases

  1. Choose Structure > Validate.

  2. Click Clear Special Cases. FrameMaker clears the special cases in the document, the flow, or the element—whichever scope is selected in the dialog box.

Validation error messages

The following error messages can appear at the top of the Element Validation dialog box. (In the descriptions, tag represents an element tag, name represents an attribute name, and value represents an attribute value.)

Current flow is unstructured

The current flow does not have elements in it.

Element is undefined

The element is not defined in the document. You perhaps copied this element from another document.

Missing element before tag

At least one required element is missing before the specified element.

More contents required at end

At least one more child element is required at the end of the current element.

No current element

There is no insertion point or selection. (This message appears when the scope is set to Current Element.)

No current flow

There is no insertion point or selection. (This message appears when the scope is set to Current Flow.)

Not highest-level element

The element is not permitted at the highest level in the document.

<TEXT> not permitted in this element

The element contains text, but text is not allowed.

<TEXT> not valid at this position

The element is allowed to have text but not at this location.

The name attribute refers to an undefined ID value

The attribute is an ID Reference and refers to a Unique ID value that doesn’t exist in the document (or in the book, if you’re validating a book).

The name attribute is undefined for this element

The definition of this element does not include a name attribute.

This element should be a type

The element is the wrong type, where type can be graphic, marker, cross-reference, equation, or system variable. For example, a cross-reference element sometimes consists of text instead of a cross-reference.

Value must be a type for name attribute

The attribute value is the wrong type for the attribute.

Value for name attribute must be in the range from n to n

The attribute’s numeric value is out of the specified range.

Value for name attribute is not one of the allowed choices

The attribute’s value must match a value from the pop‑up menu of valid choices.

Value for name attribute must be unique

A Unique ID value must be unique for all elements in the document or book.

Value required for name attribute

The attribute does not have a required value.

tag excluded in this element

The tag element is not allowed because of an exclusion rule for the parent or one of its ancestors.

tag not permitted in this element

The tag element is not allowed anywhere in the parent element.

tag not valid at this position

The tag element is allowed in the parent element but not at the current location.

Correct errors in elements

After you have identified errors in elements and attributes, use the Elements catalog and Structure View as guides for correcting them:

  • To correct an element in an invalid location, move the element to a valid location, or change it to an element that is valid for its current location.

    You can select an invalid element, or if you’re validating, FrameMaker selects the element for you. When the element is selected, the Elements catalog shows which elements are valid at that location.

    li or ListItem is valid at this location.
    Elements Catalogshowing the valid element at a location

  • To correct an element with invalid contents (with the text snippet INVALID CONTENT), change it to an element that allows those contents.

  • To correct a structure with a missing child element, insert the required element.

    You can click where an element is missing, or if you’re validating, FrameMaker places the insertion point there for you. When the insertion point is at the location of the missing element, the Elements catalog shows which elements are valid at that location.


    Elements Catalogshowing the valid element to enter at a location

  • To correct an invalid attribute value, change the value to one that is valid for the attribute.

  • To remove an undefined attribute, select the element with the undefined attribute, open the Attributes dialog box, select the attribute, and click Delete Attribute. In the next dialog box that appears, remove the attribute for the current element or for all elements that have the attribute.

  • To resolve a cross-reference with an invalid ID, select the cross-reference, choose Insert > Cross-Reference, and change to a source that has a valid ID.

Quick Element Toolbar

Know what a quick element toolbar is and how to use it with structured authoring.

The Quick Element Toolbar contains commands that allow users to quickly insert (list, table, image) and wrap (bold, insert) commonly used elements in a structured authoring document.

It is specific to a structured workspace-view combination. The icons in the toolbar are enabled/disabled based on the current context (cursor position) of the application.

See the video, Quick Element Toolbar.

Using the Quick Element Toolbar

The out-of-the-box functionality provided by FrameMaker supports the DITA element structure. To use this toolbar, you will need to create a DITA document.

  1. Choose File > New > XML.

  2. In the New XML dialog, go to the DITA tab, select Topic, and click OK.

  3. To display the Quick Element Toolbar, choose View > Toolbars > Quick Element Toolbar.

    Quick Element Toolbar
    Quick ElementToolbar in FrameMaker

  4. As you place the document insertion point at a section in the document, the relevant options in the toolbar are enabled.

    This functionality is the same as the elements that are displayed (or hidden) in the Elements catalog.

  5. If you hover the mouse pointer over a button on the toolbar, the tooltip displays the name and description of the element as it displays in the Elements catalog.

  6. To insert an element (example: <ol>, <ul>, <table>) in the document, place the insertion point at the relevant point in the document and choose the element on the Quick Element Toolbar.

  7. To wrap an element (example: <b>, <i>) in the document, select the element and click the element on the Quick Element Toolbar.

Customization

The out-of-the-box functionality provided by FrameMaker supports the DITA element structure. However, you can customize the toolbar to associate the commands with any custom structured application.

You can customize the commands in the Quick Element Toolbar by adding commands associated with other elements from the Elements catalog of the structured application. For example, you can add a command to insert a <ph> (phrase) element in the current document.

Each FrameMaker view-workspace combination has an associated Quick Element Toolbar configuration XML file (quick_element.xml). Each configuration file contains the information that associates the toolbar with one or more structured applications. The file also contains information that associates toolbar commands with the corresponding elements in the Elements catalog.

Configuration XML file locations

The following table lists the locations for the quick_element.xml for the corresponding FrameMaker mode / view:

FrameMaker Mode - View

Quick Element Toolbar config file location

Structured FrameMaker - Author view

fminit\WorkSpaces\Structured\AuthorView\toolbars

Structured FrameMaker - WYSIWYG view

fminit\WorkSpaces\Structured\WYSIWYGView\toolbars

Structured FrameMaker - Simplified XML view

fminit\WorkSpaces\Structured\FormView\toolbars
Important: To make changes to the Quick Element Toolbar, you can edit the corresponding configuration files for each workspace-view. Alternatively, you can make changes only to the toolbar in a specific view.

Create a Quick Element Toolbar

The following steps include associating a new toolbar with a custom structure application. It also includes associating the commands in the toolbar with elements in the Elements catalog of the structured application.

  1. Open the quick_element.xml file in a text or XML editor.

    Note: To include the toolbar in all the views, you will need to update the quick_element.xml files in all the above locations.

    The XML file contains one <STRUCTURED_APPLICATION> node for each structured application.

    This node contains one <ELEMENT> node for each command in the Quick Element Toolbar.

  2. To create a toolbar for the custom application, you can simply duplicate one of the existing <STRUCTURED_APPLICATION> nodes.

  3. Set the @app_name attribute to the name of the custom application.

    <STRUCTURED_APPLICATION  app_name="<Custom app name>">

    From the Elements catalog for the custom application, choose the elements for which you want to create commands in the custom application Quick Element Toolbar.

    For each element, create one <ELEMENT> node in the <STRUCTURED_APPLICATION> node.

  4. Set the @elemTag attribute to the new command.

    For example, to add a command to insert the ph (phrase) element:

    <ELEMENT elemTag="ph">
  5. You also need to associate each command to an icon. The steps to set the icon for a command is described in the Customize icons section.

Error console

Learn how to use an error console to find and rectify error in FrameMaker document

While working on a document, the FrameMaker error console displays structural and other issues in a document, if any. This console also provides the following information about document issues:

Error console displaying error details
FrameMaker error console displaying structuraland other issues in a document


April 29, 2020

Legal Notices | Online Privacy Policy