Formats

Learn about paragraph formatting in FrameMaker, create paragraph formats.

Paragraph formats

Paragraph formats contain settings for how the text looks and the format applies to the entire paragraph.

Paragraph formats are the basis of document formatting in unstructured FrameMaker documents though they can also be the basis of document formatting in structured FrameMaker documents.

Paragraph Designer

The Paragraph Designer is used to create and manage paragraph formats.

Paragraph Designer
Create and manage paragraph formats using Paragraph Designer

Basic
Paragraph properties such as indentation, spacing, alignment, tab stops, line spacing, and next paragraph format to use.
Font
Font properties such as font family, size, angle, weight, background color, and language. The Language drop-down list allows you to select LTR languages such as, English, German, Thai and RTL languages such as, Arabic, Hebrew, and Farsi.
Pagination
Pagination properties such as Keep With and format properties such as In Column, Across All Columns
Numbering
Use the available building blocks to define a numbering format.
Advanced
Properties such as automatic hyphenation and word spacing.
Asian
Apply Asian language settings such as Asian character spacing. Includes the Use Asian Composer checkbox to choose the FrameMaker Layout Engine (see Asian language support).
Table Cell
Paragraph properties applied to a table cell.
Direction
Specify the paragraph direction to Inherit (default), Left-to-Right, and Right-to-Left.

The Paragraph Catalog lists all the paragraph formats available for a document. To apply a paragraph tag, select the text and select the tag from the Paragraph Catalog.

Paragraph Catalog
Apply paragraph tags using Paragraph Catalog

Create a paragraph format

  1. Click in a paragraph whose format is like the one you want to create. Be careful not to select multiple paragraphs.

  2. Open Paragraph Designer and enter a name for the new format in the Style text box.

    Note: The Update Style button changes to Create Style. All new paragraph formats are automatically stored in the paragraph Catalog.
  3. Click Create Style.

  4. Modify any of the properties you want.

    Paragraph formats must have all properties specified.

  5. Click Update Style.

Character formats

Learn about character formatting in FrameMaker, create character formats.

Character tags allow you to format one or more characters or words inside a paragraph.

By applying character tags, you can quickly format text without overriding the properties of the entire paragraph.

Creating character tags helps maintain format consistency as well as apply format changes globally.

Character tags also serve as building blocks for other FrameMaker features, such as cross-reference formats or variables.

Character Designer

The Character Designer is used to create and manage character formats. All character formats are listed in the character catalog.

Character Designer
Create and manage character formats using Character Designer

The Character Designer allows you to create new or update existing character formats. A wide range of character formatting options are available to you to design character formats as per your needs.

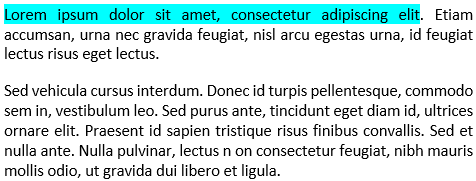
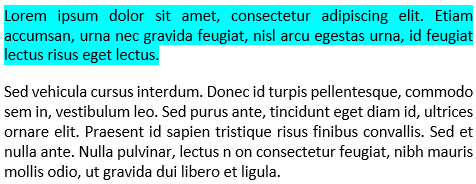
In FrameMaker, the PDF comments are imported with the highlighting retained due to the implementation of the text background color feature.

Set the text background color from the character and paragraph designers.

The Character Catalog lists all the character formats available for a document. To apply a character tag or style, select the text and select the tag from the Character Catalog.
Character Catalog
Apply character tags or styles using the Character Catalog

Create a character format

  1. Click in a paragraph whose format is like the one you want to create. Be careful not to select multiple paragraphs.

  2. Open Character Designer and enter a name for the new format in the Style text box.

    Note: The Update Style button changes to Create Style. All new character formats are automatically stored in the character Catalog.
  3. Change the properties you want to include in the new character format.

  4. Click Create Style.

Manage formats

Know how FrameMaker provides features to manage various paragraph, character, and table formats and also learn how to add graphics to paragraph formats.

Update formats

You can change format properties and then use them to redefine, or update, the stored formats and all the text in the document tagged with them.

When you update a format, you can update all properties or just one group of properties. For example, you can change the default font family for all formats in a document without changing any other properties.

Importing paragraph or character fonts is also possible through the File > Import > Formats command.

Update a paragraph or character format

  1. For paragraph format changes, indicate the scope of the changes you want to make by doing one of the following:

    • To update one paragraph format or all paragraph formats in the document with a property group from a paragraph, click in that paragraph or select consecutive paragraphs.

    • To update more than one paragraph format but not all paragraph formats, select consecutive paragraphs that use the formats you want to update.

  2. Choose the appropriate designer.

  3. Display the properties by doing one of the following:

    • To display the properties of a paragraph including any overrides, click in the paragraph.

    • To display properties of a format stored in the catalog, choose the format from the Paragraph Tag or Character Tag pop-up menu.

  4. Change any properties, and then click Update Style. FrameMaker asks whether you want to remove overrides.

Tip: If you change properties in a designer and then decide against updating the format, you can cancel the operation and reset the properties by clicking in text.

Update specific format properties or single property group

  1. Choose one of the following:

    • If you are updating specific properties, then change only properties you want to update.

    • If you are updating a single property group of a paragraph format, choose Format > Paragraphs > Designer, and delete the tag from the Paragraph Tag box if the box is not empty. Deleting the tag sets the box to As Is; FrameMaker does not change the tags of the formats that you update. Then display the property group; change the properties as needed.

  2. Choose Global Update Options from the Commands pop-up menu.

  3. Click the current property group in the Use Properties area.

  4. Do one of the following:

    • To update all formats in the document, click All Paragraphs And Catalog Entries or All Characters And Catalog Entries.

    • To update all paragraphs or characters in the selection and all paragraphs or characters with the same tags, click All Matching Tags In Selection.

    • To update formats with a specific tag, click All Tagged and choose a tag from the pop-up menu.

  5. Click Update Style in the Designer dialog box.

Rename or delete formats

When designing a template or importing a catalog from a template, you sometimes must rename or delete a format.

Deleting a format from a catalog does not affect any paragraphs or characters that have the same tag. The paragraphs or characters simply have a tag that isn’t in the catalog.

  1. Choose a designer, and choose the format to rename or delete from the paragraph or character Catalog.

    Do this even if the format you want is already displayed. This step ensures that the properties do not include any format overrides.

  2. Do one of the following:

    • To rename, enter a new name in the Style box and click Update Style.

    • To delete a format, select a format from the catalog and click Delete, and then select the format in the scroll list and click Delete. Click OK.

    • To delete all unused formats from a catalog, click Delete. Then click Delete until all formats have been removed, and click Done. Choose File > Utilities > Create And Apply Formats, and then click Continue. Any paragraph or character format used in the document is added back to the catalog.

    To avoid creating paragraphs for every override in your document, import the formats from your template. Importing formats from a template overrides any changes to paragraph and character tags and does not create additional tags in your document.

Apply formats

Paragraph formats apply at paragraph level, character formats at character or word level, and table formats apply to complete tables.

  • Paragraph and table formats: Place the cursor inside the paragraph or the table, and select a format from the catalog.

  • Character format: Select the text and click a format from the catalog.

Tips for creating new formats

When working from a stable template, you rarely have to create a format. If you’re designing a new template or if the template you’re using is incomplete, you may have to create new formats. The easiest way to create a format is to modify the properties of an existing format.

When you’re creating new formats, consider these suggestions:

  • Use consistent naming conventions for similar kinds of paragraphs or text items within a paragraph, such as Head1 and Head2.

  • To apply formats by using the keyboard, name the formats so that often-used ones are unique or alphabetically first in their letter group, such as “H1 Head2” or “H2 Head2.”

  • Give each format a name that’s easy to remember, recognize, and type. If you assign a tag based on its use and not its appearance (for example, Emphasis rather than Italics), you can later change the format properties without having to change the tag.

  • Be aware of capitalization. Tags are case sensitive. Also, you sometimes want related tags to appear together in the catalog, with names such as Body and BodyIndent.

  • If you have many formats, precede them with a period to avoid excessive scrolling in the catalogs; an initial period brings often-used formats to the top of the catalog. To force occasionally used formats to the bottom of the catalog, precede them with a z or a tilde (~).

Specify formats for the paragraphs that follow

Well-designed templates often connect formats so that FrameMaker automatically applies a format to the paragraph that follows the current one.

  1. Click in the paragraph.

  2. Display the Basic properties of the Paragraph Designer, and choose a tag from the Next Paragraph Tag pop‑up menu. FrameMaker applies this tag when you press Return to create a paragraph.

  3. Click Apply.

Add graphics to paragraph formats

A paragraph format can include a line or other graphic that appears above or below a paragraph. Perhaps all top-level headings in a document rest on a long thin line.

  1. On a reference page, draw or import the graphic in a reference frame, or locate one already there that you want to use.

  2. Click in the paragraph you want to change. To place a line above or below several adjacent paragraphs, select all the paragraphs.

  3. Display the Advanced properties of the Paragraph Designer, and choose the name of a reference frame from the Frame Above Pgf or from the Frame Below Pgf pop-up menu. All reference frames appear in the pop-up menus.

  4. Click Apply.

Tip: Because the Frame Above Pgf and the Frame Below Pgf settings can’t place graphics to the right or left of a paragraph, you can’t use these settings to place boxes around text. Box text by using a single-cell table with outside ruling.

Format catalog

Understand format catalog and how you can apply them on various formats in FrameMaker.

FrameMaker offers enhanced features to manage and apply paragraph, character, and table formats. This is possible from the respective catalog. A catalog shows all formats in the current document by default. You can set which formats you want to see in the catalog. Catalogs also help in applying and managing the formats.

FrameMaker marks the used formats in a catalog. The unused formats are unmarked. This usage information is not updated as soon as you apply the formats in the document. Clicking Refresh Catalog in the catalog, updates the usage information. The latest usage information is also updated when opening a document.

Note: Formats in use in the current document are marked in the catalog. Whereas the format applied to your current selection is shown in the status bar.

Display formats

You can configure the formats that are visible in a catalog and their order too.

  1. Open a (paragraph, character, or table) catalog and click Options.

  2. Select one of the following:

    • Show All, to see all available formats.

    • Show used before unused, to see used formats before unused formats in the catalog.

    • Show only used formats, to hide unused formats in the catalog, but retain them in the template.

    • Show only unused formats, to hide used formats in the catalog, but retain them in the template.

    • Delete all unused formats, to delete all unused formats from the template, without warning or confirmation.

    • Customized List, to customize which formats you see and in what order you see them.

  3. Format being used in the current document are marked in the catalog. While editing the document, the usage status might not get updated automatically. To refresh the list click Refresh Catalog.

Note: The display options you set are workspace properties and are applicable to FrameMaker documents opened on your machine.

Delete formats

Formats can be deleted from respective catalogs.

  • Open the catalog if not already open.

    • Paragraph catalog from Format > Paragraphs > Paragraph Catalog.

    • Character catalog from Format > Characters > Character Catalog.

    • Table catalog from Table > Format > Table Catalog.

  • Click Delete.

  • In the Delete Formats from Catalog window, select a format and delete it.

  • Click OK to delete formats from document or close the window to undo the operation.

Fonts

Get familiar with fonts in FrameMaker, change bars, language and pair kern, Japanese and western fonts.

Replace fonts using the Fonts pod

You can use the Fonts pod to identify all the fonts used in an open document or all open documents. The pod list area lists all the fonts used in a document. You can replace any font used in a document using the fonts pod including missing fonts. The missing fonts are indicated by a red cross sign.

Fonts pod lists all the fonts used in open documents.
Identify the fonts used in a document using Fonts pod

A. Display only missing fonts or all fonts used in a document. B. Replace font to display the Replace Fonts pod. C. Select all open documents or currently open document. D. Refresh the list of fonts displayed in the pod list area. E. Missing fonts indicated by a red cross sign.

To replace a missing font:

  1. Select a font from the list and click the Replace icon.

  2. From the Replace Font pod, select the new font from the Replace With list box and click Apply.

    Replace fonts pod lists all the paragraphs in a document that use a selected font.
    Replace a font using the Replace Font pod

    A. Name of the selected font. B. Replace With list box lists all the fonts installed on your system. C. Locations list displays all the paragraphs in the document that use the selected font. D. Double-clicking any item in the list takes you to the location in the document that uses the selected font.

Manual font changes

Format changes you make using the Format menu commands take effect immediately.

When changing font properties, keep in mind the following:

  • To remove other style properties, choose Plain.

  • If you change the font properties of selected text, those properties are retained when you later update the properties of the entire paragraph.

  • You can change the font properties of text created with the Text Line tool as well as paragraph text.

  • Do not use the Courier® font when Adobe® Type Manager® is turned off or not installed. If you do use Courier without ATM, FrameMaker products do not accurately display the Courier font.

  • If a font has more than one weight—for example, Helvetica® Condensed Bold and Helvetica Condensed Black—the Format > Style submenu lists only Bold. To choose other weights, use the Font properties of the Paragraph Designer or use the Character Designer instead.

Font changes using the designers

To change the default font properties of an entire paragraph, use the Paragraph Designer. The font families and styles available depend on which fonts are installed.

To change specific text within a paragraph, select the text and use the Character Designer.

You’ve probably seen many of the settings in other word processors, but a few can be new to you.

Numeric Underlining

To use a single offset and thickness for an underline regardless of the character’s font or size, choose Numeric Underlining. Regular and numeric underlining does not affect tab characters. If you want the tab space to be underlined, format that tab stop so that it uses a nonbreaking space as a leader.

Numeric and regular underlining
Numeric and regular underlining of text

Change Bar

To display a change bar next to text, select Change Bar.

Color

To display the text in a different color, choose a color from the Color pop-up menu. If you define your own colors, they appear in the pop-up menu.

Spread

To add or subtract space between characters, enter a percentage for Spread. Spread—also called tracking—is expressed as a percentage of an em space. Normal spread is 0%.

-10% spread (top), 0% spread (center), 10% spread (bottom)
Add or subtract space between characters using Spread

Stretch

To set the width of the character shapes, enter a percentage for Stretch.

Capitalization

To display all characters in uppercase but use slightly smaller capital letters for text that was in lowercase, choose Small Caps.

Using a designer to apply a capitalization style to text changes only the appearance of the text (for example, makes lowercase text appear in uppercase letters). To permanently change the text itself, use the Capitalization dialog box to replace selected text with text that is all uppercase, all lowercase, or initial caps.

Language

To change the language associated with the text, choose from the Language pop-up menu. The language you choose affects the text in system variables as well as both spell-checking and hyphenation. Also, changing the language to None prevents the selected text from being spell-checked.

Pair Kern

To adjust the space between two characters in the same word, select Pair Kern. The kerning pairs that have been defined depend on the font.

Kerning pairs turned on and off
Adjust the space between two characters in the same word using Pair Kern

Tsume

To move a Japanese character closer to the characters next to it, select Tsume. The amount of space a variable-width character, such as a parenthesis, can move is determined by the metrics for that character.

Adjust superscripted, subscripted, and small cap text

Adjustments to the properties of subscript, superscript (including footnote references), and small cap text apply to all such text in the document.

  1. In the Text Options dialog box, specify a size, offset, and stretch percentage.

    When calculating the size and offset, FrameMaker multiplies the percentage you enter by the point size of the affected characters. For example, a 40% superscript offset value raises a 10-point character 4 points.

    The stretch percentage is the amount that characters are condensed or expanded.

  2. Click Apply.

Condense and expand characters

You can achieve some effects by stretching characters.

Text unchanged (top) and condensed 75% (bottom)
Condensed and expanded characters

  1. Depending on whether you are changing the entire paragraph or specific text in the paragraph, choose one of the following:

    • Font from the Properties pop-up menu in the Paragraph Designer.

    • Character Designer.

  2. Enter a percentage in the Stretch box. A value of 100% means that the width of characters is as defined for the font. A value less than 100% condenses the width; a value greater than 100% expands the width.

  3. Click Apply.

    Tip: In Japanese documents, use a stretch value greater than 100 to simulate heitai (horizontally stretched characters). Use a stretch value less than 100 and increase the point size of text to simulate chotai (vertically stretched characters).

You can also change the width of a text line by dragging to stretch the text.

  1. Select the text line you want to change, and then drag one of its handles until the text is stretched to the shape you want. Dragging a corner handle changes the point size as well as the character width. You can also select a grouped object that includes a text line.

Create or change combined fonts of Japanese and Western characters

In addition to containing the full Japanese syllabaria, Japanese fonts include a set of Western characters to facilitate entering non-Japanese characters and numbers. You can define your own combined font—a font that uses a specified Western font with a specified Japanese font.

If you’re working on a system that supports Japanese text and if combined fonts are included as part of a template, they are available to you automatically. (The specified fonts must be installed.) If your system supports the typing of Japanese text in documents and dialog boxes, combined fonts appear at the top of the font lists along with regular Western and Japanese ones.

FrameMaker supports Japanese single-byte, half-width katakana characters in combined fonts. Changes to the combined fonts apply to the entire document.

  1. In the Combined Fonts dialog box, do one of the following:

    • To create a new combined font, enter a name in the Combined Font Name box.

    • To change a combined font, select its name from the Combined Fonts list.

  2. Do the following:

    • To specify the Japanese font, choose from the pop-up menu of font families in the Asian Text area.

    • To specify the Western font, choose from the pop-up menu of font families in the Western Text area.

    • To adjust the relative size and baseline offset of the Western text, enter values for Size and Offset. The size and offset of the Western text are percentages of the Asian point size. Use a negative offset to move the text below the baseline.

  3. Click Add or Change.

  4. Click Done.

Note: You can turn off the Allow Bolded And Obliqued Styles setting in the Asian Text area of the Edit Combined Fonts dialog box so that bolding or italicizing the Western font does not automatically enbold or italicize the Asian text.
  1. To copy a set of combined fonts, choose File > Import > Formats and select Combined Fonts.

Background color

Learn how to highlight sections of a document by setting the background color for text or entire paragraph.

You can highlight sections of a document by setting the background color of the parts of the document in the following scenarios:

Set background color of text within a paragraph

Use this method to set a background color for some of the text in a paragraph.

  1. Select the text in a paragraph.

  2. Open the Character Designer.

  3. In the Background color drop-down list, choose a color and click Apply.

The background color is set for only the selected text in the paragraph.

Set background color of entire paragraph text

  1. Place the cursor anywhere within the paragraph.

  2. Open the Paragraph Designer and go to the Font tab.

  3. In the Background color drop-down list, choose a color and click Apply.

The background color is set for all the text in the paragraph.

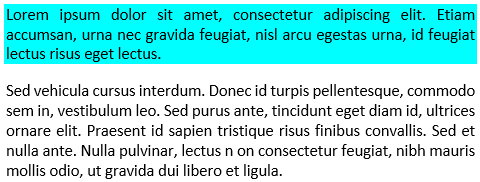
Set background color of a paragraph box

  1. Place the cursor anywhere within the paragraph.

  2. Open the Paragraph Designer and go to the Advanced tab.

  3. In the Pgf Box drop-down list, choose a color and click Apply.

The background color is set for the entire box that surrounds a paragraph.

When you set the background color of the text in paragraph, the color spans the text of the paragraph. However, in the case of a paragraph box, the text spans the entire real estate of the paragraph from the left margin to the right margin.

Indentation, alignment, and spacing

Learn about indentation, alignment, and spacing in Adobe FrameMaker. Understand tab stops, and placement in Japanese documents.

Change paragraph alignment

The alignment property of a paragraph determines how the paragraph is positioned between the left and right indents, not between the edges of the text column.

  1. Do one of the following:

    • To use the ruler, drag the indent symbol to a new location on the ruler.

      A. First indent B. Left indent C.Right indent
      Changing the paragraph alignment using the indent symbol

      Tip: To align an indent with a ruler marking, turn on the snap grid (use Graphics > Arrange > Snap). When you drag an indent symbol, it snaps to locations corresponding to the snap grid.
    • To use an indent value, display the Basic properties of the Paragraph Designer. Enter the indents you want in the First, Left, and Right boxes, and then click Apply.

    • Choose an alignment from the Alignment pop-up menu on the formatting bar or in the Basic properties of the Paragraph Designer.

      Note: If you use Shift+Enter or Shift+Return to insert a forced return within a fully justified paragraph, the line that ends with the forced return is not justified.

Change tab stops

If you press Tab and the insertion point doesn’t move, a tab stop hasn’t been defined.

You can choose from four types of tab stops—left, center, right, and decimal.


Left, center, right, and decimal tab stops

A. Left tab stop B. Center tab stop C. Right tab stop D. Decimal tab stop

You can also specify a pattern of characters—a leader—to fill the space between a tab and the character following it. Typically, a leader is a series of periods. Tab leaders are useful in tables of contents that have a wide gap between columns.

Change tabs in formatting bar

  1. Display the Paragraph Format toolbar. Only the tab stops common to all the selected paragraphs appear on the top ruler.

  2. Do one of the following:

    • To add a tab stop, click a tab stop symbol from Paragraph Format toolbar and click the desired position below the top ruler.

    • To move a tab stop, drag it to a new position.

    Tip: To align tab stops with ruler markings, turn on the snap grid (Graphics > Arrange > Snap). When you drag a tab symbol, it snaps to locations corresponding to the snap grid.
    • To add multiple tab stops at regular intervals, on the top ruler, double-click the existing tab stop that you want to duplicate. Enter the interval between tabs in the Repeat Every box and click Edit.

    • To change a tab stop, double-click it, enter a new tab position in the New Position box, and choose a different alignment. The position is the distance from the left edge of the column to the tab stop. Then click Edit. You can also drag a new tab stop on top of an existing one on the ruler to replace it.

    • To delete a tab stop, drag it off the bottom of the top ruler.

    • To delete all tab stops, double-click a tab stop and click Delete All.

Change tabs in Paragraph Designer

  1. Display the Basic properties of the Paragraph Designer.

  2. In the Tab Stops area, create, edit, or delete, choosing the appropriate settings.

  3. Click Apply.

Define a leader or decimal tab character

  1. Double-click the tab stop on the ruler.

  2. Do one of the following:

    • In the Leader area of the dialog box, click one of the predefined tab leaders or enter your own custom leader, and then click Edit.

    • To specify a decimal character—for example, a comma when you’re working with European decimals—enter the decimal character in the Align On box in the Alignment area and click Edit.

Change paragraph and character spacing

Vertical spacing is the space between paragraphs and lines. Horizontal spacing is the space between words and characters. Spacing properties go by different names in different contexts. The space between characters is often called pair kerning; adjusting the letter spacing in a line is spread or tracking; the line spacing of a paragraph— measured from the baseline of one line to the baseline of the next—includes its leading.

Adjust vertical spacing

When adjusting vertical spacing, keep in mind the following:

  • If a paragraph falls at the top of a column, FrameMaker ignores the Space Above setting. If the paragraph falls at the bottom of a column, FrameMaker ignores the Space Below setting.

  • When an anchored frame is positioned below the current line and its anchor symbol appears in the last line of a paragraph, the space below the paragraph usually appears between the frame and the next paragraph. If the frame is anchored in a straddle paragraph, the space below is discarded. If the frame is a straddle frame but is not anchored in a straddle paragraph, the space below appears between the anchor symbol and the frame.

  • In a multicolumn layout, you can also adjust vertical spacing in columns by vertically justifying, or feathering, the text in them.

Several properties affect the vertical spacing of a paragraph: the space above the paragraph, the space below the paragraph, and the line spacing.

  1. Display the Basic properties of the Paragraph Designer and do one of the following:

    • Specify values for Space Above and Space Below. The space between paragraphs is determined by the Space Below setting of the first paragraph or the Space Above setting of the second paragraph, whichever is larger.

    • Choose a type of line spacing from the Line Spacing pop-up menu, or enter a value in the box.

  2. To allow extra space between lines to accommodate superscripts, subscripts, rubi text, and larger font sizes that appear in the paragraph, turn off Fixed.

  3. Click Apply.

Adjust horizontal spacing

As FrameMaker fills a line of text, it adjusts the space between characters according to kerning and tracking properties. The spacing between words is based on the following values, which are stored as part of the paragraph format:

  • The minimum spacing is the smallest space allowed between words.

  • The maximum spacing is the largest space allowed between words before FrameMaker tries to hyphenate words or add space between letters in justified paragraphs.

  • The optimum spacing is what FrameMaker tries to achieve.

These values are expressed as a percentage of the standard space character for the default font of a paragraph. Values below 100% create tighter word spacing with a more justified look; values above 100% create looser spacing, with a more ragged right edge.

  1. To adjust the space between words, click a paragraph or select several paragraphs whose spacing you want to change.

  2. Display the Advanced properties of the Paragraph Designer and specify the minimum, optimum, and maximum space to allow between words.

  3. Click Apply.

    Note: Lines of text in a justified paragraph can have more than the maximum space between words if FrameMaker can’t fit a word on a line and can’t hyphenate it. To avoid this, add extra space between characters in justified text by choosing Allow Automatic Letter Spacing in the Word Spacing area.
  4. To apply pair kerning or spread, in the Character Designer, choose Pair Kern option or fill in the Spread field.

Adjust spacing in Japanese documents

If your system supports the typing of Japanese text in documents and dialog boxes, you can adjust the following spacing properties:

  • Special group of properties in the Paragraph Designer that controls some aspects of Japanese character spacing.

  • Size, spacing, and alignment of rubi text throughout a document.

  • Spacing of variable-width Japanese characters through selection of the Tsume font property.

Adjust the space around characters and punctuation

  1. In the Paragraph Designer, display the Asian properties.

  2. Do the following:

    • To adjust the space between Japanese characters and Western ones, use the upper group of boxes; to adjust the space between Japanese characters, use the lower group of boxes. Enter minimum, maximum, and optimum percentages.

    • To determine the space between characters and special punctuation characters (yakumono), choose from the Punctuation pop-up menu. Squeeze As Necessary means that space around punctuation is reduced only when special punctuation handling (kinsoku shori) occurs. Never Squeeze means that no space adjustment is made around punctuation. Always Squeeze means that space is always reduced around punctuation.

    • To achieve a monospaced look in Japanese text, choose Never Squeeze from the Punctuation pop-up menu and turn off Tsume.

Adjust rubi text size, placement, and spacing

Rubi text is made up of small characters (usually kana) appearing above other text, called oyamoji. Your settings affect rubi text throughout a document.

  1. In the Format > Document > Rubi Properties dialog box, choose a value from the Size pop-up menu or enter a value in the box. The value you enter can be a percentage of the point size of the underlying oyamoji, a point size, or any other unit of measurement, including Q units.

  2. Do the following:

    • To let rubi text overhang non-oyamoji text, click Let Rubi Overhang Surrounding Hiragana.

    • To remove preceding or trailing space when rubi text appears at the start or end of a line, click Align All Characters At Line Boundaries.

  3. Click an option in the Rubi Alignment For Japanese Oyamoji or the Rubi Alignment For Other Oyamoji area. The illustrations in the dialog box show how rubi text is spaced and aligned when it’s above Japanese or non-Japanese characters and when its length is less than or greater than the underlying text.

  4. Click Set.

Lists and autonumbering

Learn how to create lists, mark auto numbering, use symbols in Adobe FrameMaker. Understand book component numbering, Japanese numbering options, RTL numbering options.

You create numbered and bulleted lists by using paragraph formats that have an autonumber format defined. As you add autonumbered paragraphs to your document, FrameMaker numbers them appropriately and renumbers existing autonumbered paragraphs if necessary.

Autonumbered paragraphs are numbered consecutively in a text flow. If your document contains several text flows, autonumbered paragraphs in each flow are independent of the others.

You define autonumbering in the Numbering properties of the Paragraph Designer. An autonumber format does not have to specify paragraph numbering. When used without building blocks, it is handy for inserting automatic text or symbols. An autonumber format can include a series label, a counter, tabs, and any additional text you need.

Series label

Series labels identify different types of autonumber series within the same text flow. For example, to number figures independently of tables or headings, you specify a different series for each formatting item ((headings, figures, and tables).

On the other hand, table and figure numbers must all be in the same series to be based on section numbers.

Counter

A counter is a placeholder (building block) that FrameMaker replaces with a number or letter in the autonumber. For example, the counter <n+> increments the paragraph’s number by 1; if the paragraph is the second in a series, FrameMaker replaces <n+> with the number 2. You can use multiple counters in a format.

You can also add chapter <$chapnum> and volume <$volnum> building blocks in a format.

Tabs, text, and punctuation

An autonumber format can also include tabs, text, bullets, spaces, or punctuation.

Format text as numbered lists

Creating a numbered list sometimes involves formatting the first item in the list with a paragraph format that resets the counter to 1, and then formatting the remaining items with a different format that increments the counter. For example, perhaps you apply a Step1 format to the first item in a list and then StepNext to the rest. The template also sometimes defines formats that let you apply a single format to all items in a numbered list.

  1. Display the Numbering properties of the Paragraph Designer and enter a series label in the Autonumber Format box if you need more than one autonumber series in the document.

    A series label consists of any single printable character followed by a colon (for example, S:). If you use a series label, it must appear at the beginning of the format.

  2. Enter any text you want to have appear automatically with the autonumber format. You can enter tabs or counters from the Building Blocks scroll list. When you select an item, it appears at the insertion point in the Autonumber Format box.

  3. Select a Character Format for the autonumber in the Character Format scroll list. If you don’t specify a format, the autonumber appears in the paragraph’s default font.

  4. Choose a position for the autonumber from the Position pop-up menu. Autonumbers at the end of paragraphs are rare except in equation formats.

  5. Click Apply.

  6. If you inserted a tab (\t) in step 2, set a corresponding tab stop for the paragraph format.

Format text as bulleted lists

In addition to the regular bullet symbol found in all text fonts, you can use any character in any installed font, including a dingbat font such as Zapf Dingbats®.

  1. Click in a single paragraph or select adjacent paragraphs that you want to make into a bulleted list.

  2. Display the Numbering properties of the Paragraph Designer and click the bullet and tab symbols (\b and \t) in the Building Blocks scroll list.

  3. Click Apply.

  4. If you inserted a tab (\t) in step 1, set a corresponding tab stop for the paragraph format.

Specify a special bullet symbol

Before specifying a special bullet symbol, create a character format that uses the font of the bullet symbol you want to use. For example, to use 9-point Zapf Dingbats, create a character format using that font. Give the format a descriptive name such as BulletFont.

  1. Display the Numbering properties of the Paragraph Designer and enter the character corresponding to the bullet symbol you want in the Autonumber Format box.

    For example, if you want a Zapf Dingbats square bullet, enter a lowercase n, which appears as ■ in that font. To find the character that corresponds to the bullet symbol you want, see the character set for that font.

  2. Click the tab symbol (\t) in the Building Blocks scroll list or enter spaces.

    Note: You sometimes must use special codes to enter characters such as nonbreaking spaces or em spaces.
  3. In the Character Format scroll list, click the bullet character format that you created.

  4. Click Apply.

Remove autonumbering or a bullet from a paragraph

  1. Turn off Autonumber Format in the Numbering properties of the Paragraph Designer. Click the option twice to turn off the setting; clicking it only once changes it to As Is.

  2. Click Apply.

Counters in autonumber formats

A counter consists of angle brackets (< >) that surround a display style and an increment value. The Custom Autonumbering feature supports the Unicode text encoding standard.


Counter for autonumber format

A. Display style B. Increment value

To indicate the display style, use a counter with one of the following letters.

For this numbering style

Use

Numeric (1, 2, 3, …)

n

Lowercase Roman (i, ii, iii, iv, …)

r

Uppercase Roman (I, II, III, IV, …)

R

Lowercase alphabetic (a, b, c, …, aa)

a

Uppercase alphabetic (A, B, C, …, AA)

A

To indicate how an autonumber is incremented, use a counter with an increment value, as shown in the following examples.

To

Use

Keep the value the same

<n>

Set the value to 1 or to any other number you enter after the equal sign

<n=1>

Increase the value of the counter by 1

<n+>

Keep the value the same but not display it

< >

Reset to zero (or any other number) but not display it

< =0>

By default, each counter is initially set to zero. The counter can maintain its current value, be incremented by 1, or be reset to a different value. For example, use <n=1> in the format that resets numbering to 1 at the beginning of a new set of numbered steps.

To keep the value the same but not display it, place a blank space between the angle brackets. If you leave out the blank space, the angle brackets appear as part of the autonumber format.

Base autonumbering on book component numbers

You can insert <$volnum>, <$chapnum>, <$sectionnum>, or <$subsectionnum> building blocks in paragraph formats. The book component numbers are determined by the settings in the Numbering Properties dialog box.

Example

Autonumber format

Volume 3

Chapter 3

Volume <$volnum>

Chapter <$chapnum>

The following table illustrates how you can combine the chapter building block with other building blocks:

Example

Autonumber format

Section 1.1

Section 1.1.1

Figure 1-1

Table 1-1

S:Section <$chapnum>.<n+><=0>

S:Section <$chapnum>.<n>.<n+>

F:Figure <$chapnum>-<n+>

T:Table <$chapnum>-<n+>

Base autonumbering on section numbers

Table and figure numbers must all be in the same series for autonumbering in sections, as shown in the following table:

Section number

Figure number

Table number

Section 1

1.1

1.2

Figure 1-1

Figure 1-2

Table 1-1

Table 1-2

Section 2

2.1

2.2

Figure 2-1

Figure 2-2

Table 2-1

Table 2-2

To achieve this type of numbering, construct autonumber formats in a single series using the same series label for each format. The following table shows possible autonumber formats. The formats are presented in a table so that you can clearly see the position of each counter in the string. Counter position determines how the counter is incremented.

Paragraph format

Autonumber format

SectionTitle

H:Section

<$chapnum>

< =0>

< =0>

< =0>

Head1

H:

<$chapnum>

.<n+>

< >

< >

FigureTitle

H:Figure

<$chapnum>

< >

-<n+>

< >

TableTitle

H:Table

<$chapnum>

< >

< >

-<n+>

Whenever a paragraph tagged SectionTitle occurs, the section number is incremented by 1, and the remaining counter values are reset to zero. Each <n+> counter in the remaining formats refer to a different type of item, so they’re incremented independently.

The < > counters keep FrameMaker from resetting values back to zero.

Use multiple counters in an autonumber format

An autonumber format can contain more than one counter. For example, perhaps autonumbers for a series of section and subsection titles each contain two counters.

These counters

In this format

Would appear as

<$chapnum>.<n=0>

Head1

1.0

<$chapnum>.<n+>

Head2

1.1

<$chapnum>.<n+>

Head2

1.2

<$chapnum>.<n=0>

Head1

2.0

The counters in each format are independent of each other. The position of a counter in the string determines how it’s displayed and incremented. When incrementing a counter, FrameMaker bases its value on the corresponding counter in the previous autonumber paragraph in the same flow.

The following example shows multiple counters in section titles and subtitles. The counter before the period is incremented independently from the counter after the period.

Example

Autonumber format

Tag

1.0 Getting started

1.1 Installing

1.2 Backing up

1.2.1 Errors

1.3 Entering data

<n+>.<n=0>\t

<n>.<n+>\t

<n>.<n+>\t

<n>.<n>.<n+>\t

<n>.<n+>\t

Head1

Head2

Head2

Head3

Head2

The following example demonstrates outline style autonumber formats.

Example

Autonumber format

Tag

I Getting started

A Installing

B Backing up

II Entering data

A Opening a file

B Saving a file

<R+>< =0>\t

< ><A+>\t

< ><A+>\t

<R+>< =0>\t

< ><A+>\t

< ><A+>\t

Head1

Head2

Head2

Head1

Head2

Head2

The autonumber in the heading Opening a file is reset to A; the second counter in the previous paragraph’s format resets the numbering to zero without displaying it, so <A+> increments the counter to 1 or A.

The < > counter in the Head2 format keeps the value of the first counter the same but doesn’t display it. If the < > counter is not in that position, the <A+> in the Head2 format refers to the first counter (not the second), and FrameMaker produces the following result:

Incorrect outline style autonumber format
Example of incorrect outline style autonumber format

Reset a series

Some numbering series—such as a list of numbered steps—start at 1 every time they are used. You can reset such a series in two ways.

The first example shows how to restart series numbering by using the <n=1> building block for the first step in the series, and then using <n+> for subsequent steps.

Example

Autonumber format

Tag

Step 1. Unpack it.

Step 2. Back it up.

Step 3. Run setup.

Step 1. Save your file.

S:Step <n=1>.\t

S:Step <n+>.\t

S:Step <n+>.\t

S:Step <n=1>.\t

Step1

StepNext

StepNext

Step1

The second example shows another way to reset the counter so that you don’t have to use a unique format to start a numbered list. Instead, a paragraph that introduces the list uses a format that resets the counter.

Example

Autonumber format

Tag

To install the software:

Step 1. Unpack it.

Step 2. Back it up.

Step 3. Run setup.

S:< =0>

S:Step <n+>.\t

S:Step <n+>.\t

S:Step <n+>.\t

StepIntro

Step

Step

Step

The < =0> counter in the StepIntro format resets the S series to zero but doesn’t display the number.

If a counter is incremented, any omitted counters in the series to the right of it are reset to zero. For example, the following autonumber formats are equivalent:

S:<n+>< =0>\t

S:<n+>\t

About Japanese numbering options

The following counters in autonumber formats are allowed in Japanese text and with Japanese fonts.

Building block

Meaning


Characters, in this order

<zenkaku a>

Fixed-width lowercase Roman alphabet


Fixed-width lowercase Roman alphabets

<zenkaku A>

Fixed-width uppercase Roman alphabet


Fixed-width uppercase Roman alphabets

<zenkaku n>

Fixed-width Arabic numbers


Fixed-width Arabic numbers

<kanji kazu>

Standard kanji numbering, where double-digit numbers are made up from the traditional kanji characters for ten, one hundred, and so on


Standard kanji numbering

<kanji n>

Numbers used for street addresses, phone numbers, postal codes, and so on, where double-digit numbers are made up from the kanji characters for zero through nine


Numbers used for street addresses, phone numbers, postalcodes, and more

<daiji>

Numbers used in financial or banking contexts made up of old-style kanji numerals


Numbers used in financial or banking contexts made up of old-style kanji numerals

<hira gojuon>

Hiragana characters in the standard order


Hiragana characters in the standard order

<kata gojuon>

Katakana characters in the standard order


Katakana characters in the standard order

<hira iroha>

Hiragana characters in the literary order (rare)


Hiragana characters in the literary order

<kata iroha>

Katakana characters in the literary order (rare)


Katakana characters in the literary order

About RTL numbering options

The following counters in autonumber formats are allowed in RTL languages such as Arabic, Hebrew, and Farsi. For details on the formats, see Counters in autonumber formats.

For the Farsi language script

  • <Farsi n>

  • <Farsi n=1>

  • <Farsi n+>

  • <Farsi a>

  • <Farsi a=1>

  • <Farsi a+>

For the Hebrew language script

  • <Hebrew n>

  • <Hebrew n=1>

  • <Hebrew n+>

  • <Hebrew a>

  • <Hebrew a=1>

  • <Hebrew a+>

For the Arabic language script

  • <Alif Ba Ta n>

  • <Alif Ba Ta n=1>

  • <Alif Ba Ta n+>

  • <Abjad n>

  • <Abjad n=1>

  • <Abjad n+>

  • <Indic n>

  • <Indic n=1>

  • <Indic n+>


April 29, 2020

Legal Notices | Online Privacy Policy