Table position and spacing

Specify table position and spacing

Learn how to specify table position and spacing in FrameMaker.

Normally, a table appears below the line of text containing the anchor symbol. However, you can force a table to start at the top of a page or column, or you can let the table float.

If a text column where a floating table is anchored is too small to contain the table, a floating table moves to the first text column that can contain it. However, the line of text containing the table’s anchor symbol does not move. If the table moves to the next text column, text fills the space below the line containing the anchor symbol.

The space between a table and the paragraph above it is determined by the table’s space above setting or the paragraph’s space below setting, whichever is larger. The space between a table and the paragraph below it is determined by the table’s space below setting or the paragraph’s space above setting, whichever is larger. When the table is at the top or bottom of a column, the above or below setting is ignored.

  1. Click in the table you want to change, and choose Table > Format > Table Designer.

  2. In the Basic properties of the Table Designer, do one or more of the following:

    • Enter indent values in the Left and Right boxes.

    • Enter spacing values in the Above and Below boxes.

    • Specify alignment from the Alignment pop-up menu.

    • Specify placement from the Start pop-up menu.

  3. Click Apply.

Tip: If you want a table to start at the top of a page with no text preceding it, anchor it on the previous page and set the table to float. If you want it to always float, make its orphan setting a large number such as 200.

If the anchor symbol for a top-of-column table appears below a paragraph that straddles columns, the table appears in the next column but just below the straddle paragraph, instead of at the top of the column.
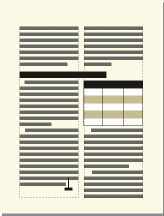
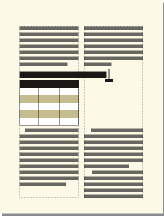
A top-of-column table anchored below a straddle
Specify table position and spacing in FrameMaker

Straddle or unstraddle tables and cells

Know how to straddle or un-straddle tables and cells in FrameMaker.

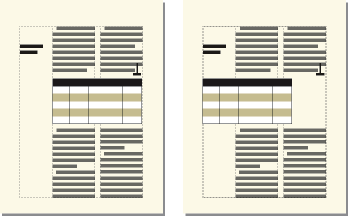
Tables can straddle columns in multicolumn layouts, and their positions are sometimes affected by straddle paragraphs. Straddling does not affect the structure of a table and is not a format rule override.

Straddle a table

  1. Do one of the following:

    • Anchor the table in a straddle paragraph. A table anchored in a straddle paragraph, whatever the table’s width, always straddles the full width of the text frame.

    • In case of structured documents, anchor the table in a paragraph element that’s formatted to straddle the columns. If the table is wide enough, it straddles the full column width. If it is not wide enough, the plane of the table nevertheless straddles the full width.

      A table anchored in a straddle paragraph
      Anchoring a table in a straddle paragraph in FrameMaker

    • Extend the table width into a second column of the body area. If you want the table to straddle both the side-head area and the body area, extend it into the side-head area as well.

      Straddling all columns and straddling side-head area
      Straddling a table to all columns or side-head area in FrameMaker

Unstraddle a table

  • To unstraddle a table that’s anchored in a straddle paragraph or paragraph element, move the anchor to a nonstraddle paragraph or nonstraddle element.

  • To unstraddle a table that’s anchored in an unstraddled paragraph or paragraph element, resize the column widths of the table to fit in the text column.

Straddle or unstraddle cells

If you straddle cells that have contents, the contents of those cells also merge, creating a separate paragraph for each merged cell.

  • Do one of the following:

    • Select the cells you want to straddle, and choose Table > Straddle.

    • Select the cells you want to unstraddle, and choose Table > Unstraddle. The contents of the straddle cell appear in the upper left new cell, not back in the original cells.

    Important: The contents of an anchored frame or a disconnected text frame are not part of a document’s main structured flow, so they are not normally exported to SGML. If you plan to export to SGML, work with your application developer to avoid losing data in the table.

Rotate cells and tables

Know how to rotate cells and tables, insert a rotated table in a page of un-rotated text in FrameMaker.

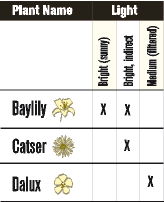
When you rotate a cell in a table, you can type in it just as you do in any other cell.

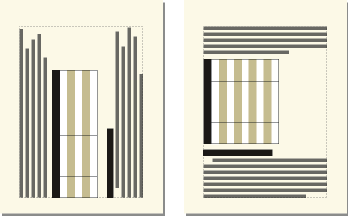
You can also rotate an entire table by placing the table in an anchored frame that is rotated. A rotated table can be in an anchored frame on a page of unrotated text or on a rotated page (one that uses a rotated master page). Place the table on a rotated page instead of rotating the table itself if you want background items (such as headers or footers) or body text to be rotated with the table. You cannot edit a table in a rotated page.

Note: For structured documents, check with your developer to see if the application is set up for rotated tables.

Rotating a cell or a page with a table does not affect the structure of a table, and it is not a format rule override.

Note: For structured documents, a rotated table in an anchored frame is not part of a document’s main structured flow and is not normally exported to SGML. If you plan to export to SGML, consider rotating the page rather than just the table. If you must rotate just the table, work with your application developer to avoid losing data in the table.
Table on a rotated page (left), rotated table on a regular page (right)
Table on a rotated page or rotating a table on a regular page

Rotated cells
Rotating cells in a table

Rotate cells

  1. Select the cells you want to rotate, and choose Graphics > Rotate.

    Note: If you are working in Structured FrameMaker's Author View, you can right-click the table cell and choose Table > Rotate.
  2. Specify the orientation you want for the cells and click Rotate.

Tip: As you type in a rotated cell, the cell height increases and the text doesn’t wrap. You can limit the height of rotated cells so that text wraps when it reaches the limit.

Insert a rotated table in a page of unrotated text

  1. Insert an anchored frame, and draw a text frame in it.

  2. Insert the table in the text frame.

  3. Select the text frame, choose Graphics > Rotate, and rotate the text frame counterclockwise. You can adjust the size of the text frame or the anchored frame to view the entire table.

Insert a rotated table in a page of unrotated text (structured documents)

  1. Click in the text where you want to anchor the table.

  2. Select a graphic element for empty anchored frames in the Elements catalog and click Insert.

  3. Choose Below Current Line from the Anchoring Position pop-up menu, set the width and height of the frame, and click New Frame. Try to set the size of the frame to be slightly larger than the size of the table.

  4. Draw a text frame in the anchored frame. Select View > Toolbars > Graphics Toolbar and click the Place A Text Frame tool Place A Text Frame tool in FrameMaker in the Tools pod. Drag to draw the frame and click Set in the dialog box that appears.

  5. Click in the text frame and use Table > Insert Table to insert an unstructured table.

  6. Choose Graphics > Rotate and rotate the text frame. You can adjust the size of the text frame or the anchored frame to view the entire table.

Create a rotated table on a page with other rotated text

  • Create a rotated master page and apply it to the body page where the table appears.

    If document editing causes the table to move to a different page, you’ll need to reapply master pages.

Edit a rotated table

Unrotate the text frame, edit the table, and then rotate it back when you’re finished.

Insert page breaks in a table

Learn how to insert page breaks in a table, set the minimum number of rows in FrameMaker.

If all the rows of a table don’t fit in a text column, some of the rows move to the next page or column. You can control how the table breaks between pages or columns. For example, you can set the minimum number of rows that can appear on a page or column, or specify that two rows always appear together on the same page or column. You can also force a break at any row in a table.

When you insert a table, the minimum number of rows in a column or on a page is determined by the table format. You can change this number in the Table Designer.

Keeping two rows together and forcing a page break are not part of the table format; they are custom settings, which you make on a case-by-case basis. If you apply a different format to the table, these settings are not overwritten.

Set the minimum number of rows on a page or in a column

If a table doesn’t fit on one page or in one column, the location of the page break is based on the number of orphan rows allowed for the table. The orphan row property determines the minimum number of body rows that must be kept together on a page or in a column.

Note: When working with structured documents, changes to page breaks do not affect the structure of a table and are not format rule overrides.
  1. Click in the table you want to change, and choose Table > Format > Table Designer.

  2. In the Basic properties of the Table Designer, enter the number of rows in the Orphan Rows box. The number can range from 1 and 255.

  3. Click Apply.

Tip: Specifying a large orphan row setting, such as 99, prevents a table from breaking across columns or pages.

Keep rows together

  1. Select the row you want to keep together with the next or previous row, and choose Table > Format > Row Format.

  2. In the Keep With area, choose Next Row or Previous Row, and click Set.

Add or remove a page break in a table

Just as you can have a table or paragraph always start at the top of a page or column, you can do the same with a specific row in a table. Later, you can remove the page break if you want to.

  1. Click in the row you want to change, and choose Table > Format > Row Format.

  2. Do one of the following:

    • To force the row to the top of the next column, choose Top Of Column or one of the Top Of Page options from the Start Row pop-up menu.

    • To remove a page break, choose Anywhere from the Start Row pop-up menu.

  3. Click Set.


April 29, 2020

Legal Notices | Online Privacy Policy