Know how to work with table rows and columns in Adobe FrameMaker.
You can add, delete, copy, move, or resize rows, and columns to a table using FrameMaker's table commands, copy and paste via the clipboard or by drag and drop.
You can sort table rows and columns by numbers or letters. You can sort by date or time, as long as the information is entered in the table as text.
In this topic:
Add a row or column
Click in a table cell next to where you want to add the row or column.
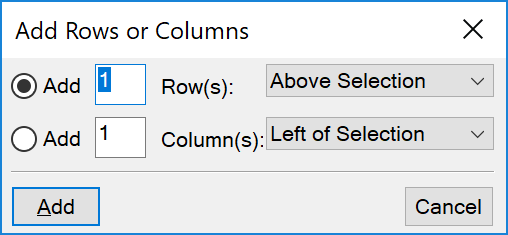
Choose . The Add Rows or Columns dialog is displayed.
Add Rows or Columns dialog
Specify the number of rows or columns you want to add and where you want to insert them.
Click Add.
The new rows or columns have the same properties as the current row or column.
Add a row using the Element Catalog (structured documents)
Click where you want to add the row in the Structure View, select a row element in the Elements catalog, and click Insert.
Add a row below the current one
Press
ctrl+enter.The new row has the same properties as the previous row.
If the insertion point is in the last cell of the last row, press
tabto create a new row at the end of the table.
Delete a row or column
Select the rows or columns you want to delete, making sure that you select entire rows or columns. If you don’t, the contents of the selected cells are deleted without a prompt for a decision.
Press Delete, click Remove Cells From Table, and click Clear.
Copy or move rows or columns
Use the menu:
Select the rows or columns, and do one of the following:
If you are copying them, choose .
If you are moving them, choose , click Remove Cells from Table, and then click Cut.
Click next to where you want to insert the rows or columns, and choose . You can insert them next to the current row or column, or you can replace the current row or column.
If you overwrite the rows or columns in a table, the cells on the clipboard replace the current rows or columns according to the following rules:
If the number of rows or columns on the clipboard is equal to the number of selected rows or columns, they are replaced exactly.
If the number on the clipboard is greater than the number you select to replace, only the number of rows or columns that fit are pasted.
If the number on the clipboard is less than the number you select to replace, the clipboard contents are repeated so that they fill the rows or columns.
Using drag-and-drop:
Select one or more rows or columns to move.
Drag the rows or columns to the location where you want to move them.
To copy the rows or columns, keep the
ctrlkey pressed as you drag them.Drop the rows or columns to move or copy.
When you drag-and-drop a row, the dragged row replaces the row below. Similarly, when you drag-and-drop a column, the dragged column replaces the column to the right.
To retain the row (below) or column (to the right), keep the
shiftkey pressed as you drag-and-drop.
Reorder rows or columns
Select the rows or columns to reorder in the table.
Hold down the
shiftkey and drag-and-drop the rows or columns to the required alternate location in the table.
Resize a column by dragging
To change a column width, select a cell in that column and drag its handle until the column is the size you want. Select several columns to resize them together.
To move the border between two columns so one column grows wider and the other narrower,
alt-drag a selection handle. The overall width of the table doesn’t change.
Specify a precise column width
Select cells in the columns you want to resize (if you’re resizing a single column, just click in it), and choose or right-click and choose Resize Columns.
Note: If you are working in Structured FrameMaker's Author/Simplified XML View, you can right-click the table cell and choose .Do one of the following:
To specify a value for the width, click To Width and enter the value.
To set the width to a percentage of the original width, click By Scaling and enter a percentage.
To make the column the same width as another column in the table, click To Width of Column Number and enter the column number.
To make the widths equal parts of a total, click To Equal Widths Totaling and enter the total width.
To specify a total width while still keeping the columns’ proportions the same, click By Scaling to Widths Totaling and enter the total width.
To set the width to match the widest paragraph or frame in the selected cells, click To Width Of Selected Cells’ Contents and enter a maximum width.
Click Resize.
Copy and paste a column width
Click in the column whose width you want to copy.
Choose .
Click in the column you want to change and choose . Only the column width is pasted; the contents of the cells remain unchanged.
Adjust the height of a row
The height of a row changes automatically to fit the cell’s contents, but you can increase the height further if you want.
Click in the row that has the height you want to increase, and choose .
Enter values for the minimum and maximum row height and then click Set.
Make all rows the same height
Determine the height of the tallest row in a table: Hold down
alt+shiftwhile drawing a selection border around the row.Note the height, which appears in the status bar.
Select the entire table, and choose .
Specify this value for the minimum row height and click Set.