Learn how to use the Preferences dialog to change various FrameMaker settings.
Use the Preferences dialog () to change FrameMaker settings. The settings are categorized under the following sections:
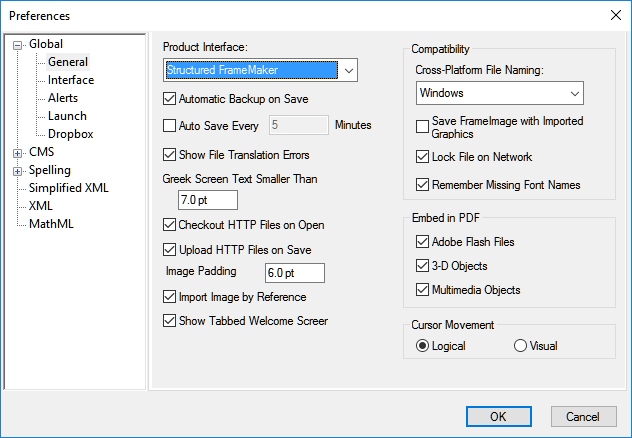
Global: This section allows you to configure settings for product interface, tooltips, warning and alert messages, pods, startup scripts, and Dropbox integration.
CMS (Content Management System): This section allows you to configure settings for working with the supported CMSs.
Spelling: The section allows you to configure settings for the supported dictionaries and spell checking options.
Simplified XML: This section allows you to enable or disable the Simplified XML view and its related options.
XML: This section allows you to configure the look and feel of the XML View.
MathML: This section allows you to configure MathML installation path, license information, and other related options.
The settings in the Preferences dialog are explained below.
In this topic:
Global > General
The following settings are available in this section:
Setting |
Description |
|---|---|
Product Interface |
By default, FrameMaker opens in Structured FrameMaker authoring mode. If you want to switch to unstructured FrameMaker authoring mode, choose FrameMaker from the list of options and restart FrameMaker. For more information, see Choose an authoring mode. |
Automatic Backup on Save |
Select this option to create a backup file every time you save a document. For more information, see Back up and save automatically. |
Auto Save Every |
Select this option and specify the time in minutes to auto-save file at the specified time intervals. For more information, see Back up and save automatically. |
Show File Translation Errors |
Select this option to show error messages while importing a document from some other format such as Word. |
Greek Screen Text Smaller Than |
Select this option to show small text as gray bars. When text is in a point size smaller than the size you specify, the text appears on the screen as a gray bar. For more information, see Faster page display. |
Checkout HTTP Files on Open |
Select this option if you want to check out a file from a WebDAV server while opening the file. |
Upload HTTP Files on Save |
Select this option if you want to check in a file only once when you close the file. |
Image Padding |
Specify the default padding (space) value for an image and its containing anchored frame. When you insert an image, FrameMaker adds a gap (padding) between the image and the anchored frame. The default value is 6.0 pt. |
Import Image by Reference |
Select this option to set import images by reference as the default way of importing images. |
Show Tabbed Welcome Screen |
Select this option to show the Welcome Screen as a tabbed document. If you do not select this option, then you will see the Welcome Screen on launching FrameMaker. However, when you open or create a document, the Welcome Screen is closed. You can then open the Welcome Screen from the Workspace switcher menu. |
| Compatibility | |
Cross-Platform File Naming |
Choose your primary platform – Mac, Windows, or UNIX. If you save a file that does not conform to the file naming standards of the selected platform, FrameMaker raises an alert. |
Save FrameImage With Imported Graphics |
When you copy a graphic into a FrameMaker document, the FrameMaker document stores the graphic data in one or more facets. Each facet contains data in a specific graphic format. FrameMaker uses facets to display and print graphics. Select this option to save an image’s data in the form of facet with the imported graphic. |
Lock Files on Network |
Select this option to lock a file while it is open. This prevents other users from changing the file. For more information, see Open a document in use. |
Remember Missing Font Names |
When you select this option, FrameMaker preserves the names of unavailable fonts used in the document. The original fonts reappear when you open the document on a computer that has the fonts installed, even if you save the document with substitute fonts. For more information, see Troubleshooting unavailable fonts. |
| Embed in PDF | |
Adobe Flash File |
Select this option to generate the PDF with embedded Adobe Flash files used in the document. |
3-D Objects |
Select this option to generate the PDF with embedded 3-D object files used in the document. |
Multimedia Objects |
Select this option to generate the PDF with embedded multimedia object (like MP3, MP4, AVI) files used in the document. |
| Cursor Movement | |
Logical/Visual |
Select the cursor movement to be logical or visual while you are working in a right-to-left enabled document. For more information, see Caret location and movement. |
Global > Interface
The following settings are available in this section.
Setting |
Description |
|---|---|
Tooltips Appearance |
Select the appearance of the tooltip. The possible options are Normal, Fast, and Hidden. |
Pods |
|
Auto-Collapse Iconic Pods |
Select this option to automatically collapse a pod to an icon, when the focus shifts away from the pod. If you do not select this option, then you must click on the pod icon to collapse it. |
| Auto-Collapse Hidden Pods | Select to hide all docked pods permanently. |
Hide Pods on Close |
Select this option to hide pods when they are closed. This way, the pods remain hidden from the interface, but they remain active in the system memory. When this option is not selected, the pod is closed and removed from system memory. |
Display Menu Path in Command Search |
Select this option to show the menu path of a command in the Command Search. For more information, see Command Search. |
Dialogs |
|
Use Windows File Browser |
Select this option to use the native Windows file browse dialog while opening or saving files. |
Documents |
|
Open Documents as Tabs |
Select this option to display open documents in separate tabs. If not selected, then documents are opened in separate windows. |
Hide Single Tabs in Documents |
When documents are shown in separate window, then the filename is not displayed in a tab. |
Prevent Document Tabbing While Dragging |
Select this option to prevent document tabbing while dragging. |
Open Composite Documents as Tabs |
Select this option to open composite documents as tabs. |
Open Documents on Drag Drop |
Select this option to open documents when they are dragged and dropped onto the document window. |
| Icons | |
Grayscale/Colored |
Select the Grayscale option if you want to use grayscale icons in FrameMaker's user interface, otherwise choose Colored. |
| Structure View | |
Auto-Expand Corresponding to Cursor Location in Document Window |
Select this option to synchronize the cursor location in the document window with element selection in Structure View. For example, if you place your cursor anywhere in the document window, then the corresponding element in the Structure View is automatically highlighted. Similarly, if you select an element in the Structure View, the corresponding text in the document window gets selected. |
Global > Alerts
The following settings are available in this section.
Setting |
Description |
|---|---|
Show Warnings While Cleaning History |
Select this option to show a warning message while performing any history clearing operation. You can further limit this warning message to appear only once for each kind of operation or for all operations. |
File Contains Unresolved Cross-References |
Select this option if you want to show alerts when unresolved cross-references are found in the document. |
Opening an Old Release Document |
Select this option if you want to show alerts when opening a document from an older release of FrameMaker. |
Opening an Old Release Book |
Select this option if you want to show alerts when opening a book file from an older release of FrameMaker. |
File Containing Unavailable Fonts |
Select this option if you want to show alerts when the fonts used in the document are not available on the system where the document is being opened. |
Dictionary Provider Mismatch |
Select this option if you want to show alerts when the dictionary service provider in the document does not match that on the system where the document is being opened. Note: The
dictionary service provider can be set from .
|
File Unsupported in Mode |
Select this option if you want to show alerts when a structured file is opened in unstructured mode. |
File Unsupported in View |
Select this option if you want to show alerts when a file is opened in an unsupported view. |
Automatically Switch to Asian Composer |
Select this option to automatically switch to Asian Composer mode. For more information, see Asian language support. |
Show Alerts in Session Restore |
Select this option if you want to show alerts on restoring an earlier session. This could happen when you relaunch FrameMaker after a crash. |
Show Contextual Tips |
Select this option to show contextual tips related to the operation that you are performing in FrameMaker. For more information, see Contextual tips. |
Global > Launch
The following settings are available in this section.
Setting |
Description |
|---|---|
Load Adobe Fonts on Startup |
This option loads Adobe fonts when FrameMaker starts.
Adobe fonts are stored in the |
Delay Load Clients |
When you select this option, none of the clients such MathFlow and PDF import comments are loaded on startup. This option improves FrameMaker’s launch time, but some of the client applications are not available immediately after launching FrameMaker. |
Delay Load Language Providers |
Select this option to delay launch of all language service providers until FrameMaker is launched. When selected, this option loads only the English language dictionary services on startup. Other dictionary service providers are loaded after launching FrameMaker. |
Don’t Load Startup Scripts |
Specify a list of scripts that you do not want FrameMaker to launch on startup. For example, by default S1000D utilities and menu scripts are specified in this list. If you remove the S1000D scripts from this list, they are executed and you will see S1000D menu option. |
Global > Dropbox
The following settings are available in this section.
Setting |
Description |
|---|---|
Currently Selected Dropbox Folder |
Specify a folder location to set as the default location to store files from Dropbox. |
Delete Files from Dropbox After Copying Locally |
Select this option to delete files from the disk after the files are uploaded to the Dropbox folder. |
Create Folder Structure for Dependencies While Uploading or Downloading |
Select this option to define a folder structure to push all dependent files into Dropbox folder. |
CMS > Documentum
The following settings are available in this section.
Setting |
Description |
|---|---|
| On File Upload | |
Overwrite Existing Object and Save As |
Select this option to specify the versioning mechanism. You can choose to overwrite an existing version of the file and set its version number to be same, next major, or next minor. |
Show Hidden Objects |
Select this option to show files that are marked as hidden in the Documentum repository. The hidden files are also shown in the Repository Manager window. |
Show Private Cabinet |
Select this option to show the private cabinets contained in the Documentum repository. The private cabinets are shown in the Repository Manager window. |
DFS SDK Path |
Browse to and select the path of the Documentum Foundation Services (DFS) SDK on your system. |
Custom Attributes |
Specify any custom attribute that you want to use from Documentum. For more information, see Add custom CMS attributes. |
CMS > DitaExchange
The following settings are available in this section.
Setting |
Description |
|---|---|
On File Upload |
|
Overwrite Existing Object and Save As |
Select this option to specify the versioning mechanism. You can choose to overwrite an existing version of the file and set its version number to next major or next minor. |
CMS > Adobe Experience Manager
The following settings are available in this section.
Setting |
Description |
|---|---|
Close File on Checkin |
Select this option to close a file when it is checked back into AEM. |
Open File on Checkout |
Select this option to open a file when it is checked out from AEM. |
Enable Auto-Checkout |
Select this option to automatically checkout a file on opening or saving. You can also choose to show a prompt when the associated operation is performed by the user. For more details, see Enable auto-checkout of files. |
Proxy Type |
Select the server protocol that is used by your AEM server. Possible options are HTTP and HTTPS. |
Server/Port |
Specify the AEM server’s IP address or domain name and the port on which it is listening. |
Spelling > Dictionary
Use these preferences to specify Proximity or Hunspell dictionaries for Spelling, Hyphenation, and Thesaurus for various languages. For German language variants, you can choose to use the Duden dictionary.
Spelling > Spelling Options
The following settings are available in this section.
Setting |
Description |
|---|---|
Auto Spell Check |
Spell check the words in a document as you type. If a word is misspelt, a red squiggly appears below the word. |
Find |
|
Repeat Word |
Select this option if you want the Spelling Checker to find any repeated words in your document. |
Unusual Hyphenation |
Select this option if you want the Spelling Checker to find any unusual hyphenations in your document. |
Unusual Capitalization |
Select this option if you want the Spelling Checker to find any unusual capitalization (like GReen) in your document. |
Two in a Row |
Select this option and specify characters that should be flagged by the Spelling Checker if they are found in continuation. |
Straight Quotes |
Select this option if you want the Spelling Checker to find any straight quotes in your document. |
Extra Spaces |
Select this option if you want the Spelling Checker to find extra spaces in-between two words. |
Space Before |
Select this option and specify characters that should be flagged by the Spelling Checker if a space is found before them. |
Space After |
Select this option and specify characters that should be flagged by the Spelling Checker if a space is found after them. |
Get Default |
Click this button to revert the Spelling Options to its default selection. |
Ignore |
|
Single Character Words |
Select this option to ignore any single character word to be flagged by the Spelling Checker. |
Words That Are All Uppercase |
Select this option to ignore words that are written in uppercase to be flagged by the Spelling Checker. |
Words Containing |
Select this option and specify characters, if found in a word, should not be flagged by the Spelling Checker. |
Roman Numerals (NA for Hunspell) |
Select this option to ignore any Roman Numerals be flagged by the Spelling Checker. |
Words With Digits |
Select this option to ignore any word containing digits be flagged by the Spelling Checker. |
Simplified XML
The following settings are available in this section.
Setting |
Description |
|---|---|
Enable Simplified XML View |
Select this option to enable the Simplified XML View for your structured documents. For more information, see Simplified XML. |
| Dialog With Alerts | |
Alert Before Inserting at the Next Valid Location |
Select this option to show an alert when you try to insert an element not valid at the current location. |
Show Alert When Typing at Invalid Location |
Select this option to show an alert when you try to type or insert content at a location where direct typing is not allowed. |
Show Alert When Deleting Objects not Available in the Quick Element Toolbar |
Select this option to show an alert when you try to delete an object that cannot be inserted by using the Quick Element Toolbar. |
XML
The following settings are available in this section.
Setting |
Description |
|---|---|
Syntax Colors |
Select the colors for displaying attributes, comments, entities, element names, and other objects in XML View. |
Display Line Numbers |
Select this option to display the line numbers in XML View. |
Word Wrap |
Select this option to wrap word in XML View. |
Font Family |
Select the font family to use to render XML code in the XML View. |
MathML
The following settings are available in this section.
Setting |
Description |
|---|---|
MathFlow |
|
Installation Path |
Browse to and select the install path of MathFlow on your system. |
License File Path |
Browse to and select the path of MathFlow license file on your system. |
Editor Type |
Select the type of MathFlow editor you want to use. Possible options are Style editor and Structure editor. For more information, see Create equations using MathML. |
MathFlow Settings |
|
DPI |
MathML equations are inserted in your document in the form of an image. Specify the DPIs for the MathML equation images. |
Embed Inline |
Select this option to embed the equation image inline with the enclosing paragraph. |
| Export as PNF (for PDF) | Select this option to render MathML equations as PNG graphics in the PDF output. By default this option is not selected. |
Apply Paragraph Style |
Select this option to apply the formatting of the enclosing paragraph on the MathML equation. |
Font Size |
Specify the font size in pixels for the MathML equation. The default font size is set to 14px. |
Alert |
|
Show Trial License Alert |
Select this option to show an alert if you are using a trial license of MathFlow. |