Add text to graphics
You can add single lines of text or text frames to a graphic.

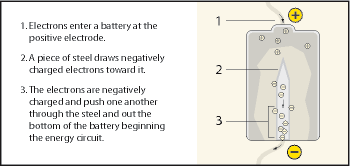
A. Text line B. Text frame
A text line is a single line of text that FrameMaker treats independently from other text. Text lines grow or shrink in length as you edit them, but they don’t wrap to the next line. You typically use text lines for single-line callouts and for text you want to resize in the same way that you resize other objects.
You can assign character formats and a spell-checking language to text lines. However, text lines can’t have paragraph formats, and they can’t contain anchored frames, markers, variables, cross-references, or conditional text.
Unlike a text line, a text frame can contain more than one line of text. You use text frames for multiline callouts, paragraphs of text, and any other text you want FrameMaker to wrap automatically from line to line. When graphics overlap text in a text frame, you can run the text around the graphics.
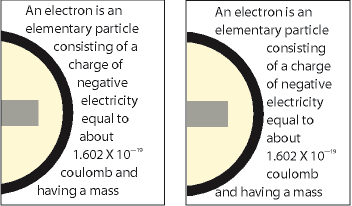
tip: When you resize a text frame created with the Text Frame tool  , the font size remains the same. However, when you resize a text line created with the Text Line tool
  , the font height and width change proportionally.
Font changes using the designers
Indentation, alignment, and spacing
Add a text line to a graphic
1)Click the Text Line tool . The pointer changes to a crossed I-beam  when you move it to the document window. The small horizontal line across the pointer indicates the baseline position of the text.
2)Click in the document to place an insertion point, and then type the text. FrameMaker uses the last character format you typed or selected in the document.
The text line is left aligned on its alignment point (where you clicked).
1)To create several text lines, press Return at the end of one text line to create another. You can then select the text lines independently and move them as needed.
tip: To change the character format of text in a text line, use the font commands on the Format menu or the Character Designer. To change the font of several text lines at the same time, select the text lines as objects and change their format.
The text direction (LTR or RTL) of a text line inherits the direction of the document. However, you can choose to change the text direction of the text line within the document. To change the direction of the text in a text line:
1)Do one of the following:
Graphics > Object Properties > Text Line.
Graphics > Object Style Designer > Text Line.
2)In the Direction drop-down list, change the direction of the text line.
Add a text frame
1)Click the Text Frame tool .
2)Drag diagonally where you want to add the text frame.
3)Specify the number of columns and the gap between them, and then click Set.
4)Double-click in the text frame to place an insertion point in it, and then type the text.
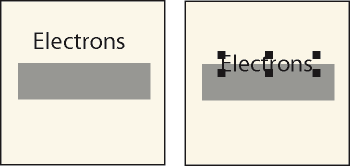
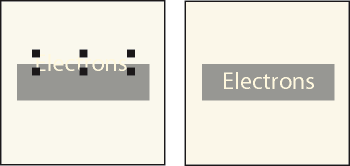
Fix text frames that overflow
When the text you type overflows the text frame, the insertion point moves below the bottom of the frame and the new text doesn’t appear. The bottom border of the text frame appears as a solid line when borders are visible.
Overflowing text frame
You can enlarge the frame so the text fits, or you can connect the flow of the text frame to another frame (see Disconnect text frames). You can also decrease the font size of the text.
1)Control-click the text frame to select it.
2)Drag a handle to enlarge the frame.
Create reverse text in a text frame
You can create reverse text (text that appears in a light color on a dark background) for special emphasis. The reverse text can be in a text frame or a text line.
1)Set the desired fill pattern and color of the text frame.
2)Set the text frame’s pen pattern to None.
3)Change the color of the text with the Character Designer or the Paragraph Designer.
4)If necessary, change the indentation and alignment of the text with the Paragraph Designer.
Create a reverse text line over an object
1)Draw an object to act as the background for the text. Generally, it’s best to use a nearly black fill pattern for the object.
2)Outside the background object, add a text line and type its text.
3)Control-click the text line to select it.
4)Move the text line so part of it disappears into the background object.
Draw object and text line and then move line part of the way.
5)Choose a light color from the Color pop-up menu on the Tools pod. The text appears partially cut out of the background object.
If the text doesn’t appear in front of the object, choose Graphics > Bring to Front. If you still have trouble, make sure that the current color view of the document shows the text line’s color as Cutout.
6)Move the text line so all its letters appear cut out of the background object.
Choose a light color and then move the text line all the way.
Add a title to an illustration
You can include a text line or text frame in a graphic as a title. You can also use a paragraph above or below an anchored frame as a title for the frame’s graphic. However, you may find it easier to use table commands instead.
Single-cell table with table title below
You can also use multicell tables to achieve various effects with graphics and text. For example, the next example is a two-cell table. The first cell contains several autonumbered paragraphs; the second cell contains the figure.
One-row table containing two cells
Use the guidelines provided here for setting up the paragraph formats, table formats, and anchored frames you’ll need if you want to use single-cell tables and their titles for illustrations and their captions.
1)Use the Table > Insert Table command to create a single-cell table wide enough for your figure.
2)Use the Table > Table Designer command to specify the location of the title (see Add or remove a table title).
3)Type the text of the title.
4)Format the table title.
5)Store the format for the table title in the Paragraph Catalog (see Create a paragraph format).
6)Change the cell’s paragraph format to turn off fixed line spacing so that the size of an anchored frame can affect the paragraph’s line spacing.
7)Create an anchored frame in the cell, anchored at the insertion point (see Create anchored frames). If necessary, the cell grows vertically to accommodate the frame’s height.
8)Put the graphic in the anchored frame and resize the frame.
9)If the frame is wider than the cell, change the column’s width. You can select the table cell and drag a handle to change the width, or you can use the Table > Resize Columns command (see Resize rows and columns).
10)Store the table format in the Table Catalog (see Create, edit, and delete table formats).
11)The next time you add a table for a figure and its title, either use the Table > Insert Table command or copy and paste the table.
Run text around graphics
You can make the text in a text frame run around a graphic that overlaps the text. (However, text will not run around a text line or an equation.) When a graphic is placed directly on a page or in an unanchored frame, the text can follow the contours of the graphic, or it can align vertically at the edge of an imaginary box bounding the graphic.
Text run around contour and run around bounding box
You can also run text around anchored frames—for example, to set a small graphic or a drop cap at the beginning of a paragraph.
When text in a text frame runs around a graphic, FrameMaker does not feather text in that frame.
1)Draw or place the graphic on a page. When you place the graphic on a master page, it appears as a background graphic on all associated body pages. You can then make the text on all the associated body pages run around the graphic.
Make sure that you click in the page margin before importing or pasting the graphic. Otherwise, the document contains an insertion point, which will cause the graphic to be placed in an anchored frame.
2)Select the graphic. If the graphic is made up of several objects, select all the objects.
3)If you want to run text around the contour of an imported graphic, make sure the graphic is behind the text frame. To do so, select the graphic and choose Graphics > Send to Back.
4)If the graphic’s runaround properties aren’t set as you want them, choose Graphics > Runaround Properties, and do one of the following:
•To make text run around the graphic, click a runaround style and enter a gap.
•To prevent text from running around the graphic, click Don’t Run Around.
note: If the Style setting is As Is when you display the Runaround Properties dialog box, you selected several graphics that have different runaround properties.
5)Click Set.
tip: If the settings don’t produce exactly the results you want, add an object (with a pen and fill pattern of None) near the graphic to create the desired contour for the text to run around.