Control the flow of text
A flow’s basic properties are its Autoconnect setting and its flow tag. In a document with one flow or parallel flows, Autoconnect is usually on to tell FrameMaker to add a new page whenever the flow’s text frames are full. The new page takes the column layout of the appropriate master page (left or right), and the text frames on the new page are automatically connected to the text frames on the original pages.
When working on a document with nonparallel, multiple flows, you usually turn off Autoconnect. This allows you to add a new, disconnected body page wherever you want, and to control the connections between it and existing pages. If Autoconnect is off, and if the flow contains more text than it can hold in its text frames, the text overflows at the end of the last text frame in the flow. The bottom border of an overflowing text frame appears as a solid line when borders are visible.
Overflowing text frame

If you try to type in an overflowing text frame, you hear a beep. Overflowing text is not deleted; it is hidden from view. As soon as you connect the overflowing text frame to another text frame, the hidden text reappears in the next text frame.
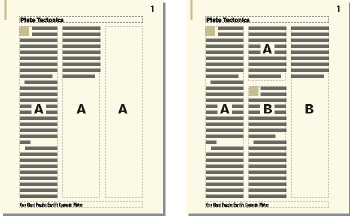
If you need to assign a flow tag (for example, when creating side-by-side text flows), you can do so at any time. (In a new, blank document, the main flow is tagged A.) You need to assign a tag only once for a flow. After that, connecting a text frame to the flow assigns the tag to the text frame. If you change the flow tag or the Autoconnect setting in one text frame in a flow, the change is made to the entire flow.
Change a flow’s tag or Autoconnect setting
You normally change flow tags and the Autoconnect setting on master pages. If two text frames are connected, you must disconnect them before you can change one of their flow tags.
1)Click in a text frame in the flow.
2)Choose Format > Customize Layout > Customize Text Frame.
3)Enter a tag for the flow in the Flow Tag text box. You should keep flow tags short so that they do not obscure other information in the Tag area of the status bar. You cannot assign a tag that is already used on the current page.
note: If you want two text frames on a page to have the same flow tag, connect the text frames.
4)If you want FrameMaker to add a new page when you fill the last column on a page, select Autoconnect.
5)Click Set.
Add a new, disconnected page
In documents with one main flow or two parallel flows, you normally don’t add disconnected body pages; you let FrameMaker add connected pages automatically when necessary. In a multiflow document in which Autoconnect is off, or in other specialized documents, you can add new, disconnected body pages. When the text reaches the end of a text frame, you add a new page and connect the text frames.
1)From a body page, choose Special > Add Disconnected Pages.
2)Choose the location and number of pages you want to add.
3)Choose a master page from the Use Master Page pop-up menu and click Add.
Delete disconnected pages
When you delete disconnected pages in a multiflow document, FrameMaker also deletes the pages’ contents.
1)Click in a page you want to delete and choose Special > Delete Pages.
2)Specify the first and last disconnected pages you want to delete and click Delete. If you want to delete only one page, enter its page number in both text boxes.
Connect text frames
When two text frames are connected, the text flows from the end of the first text frame to the beginning of the second. You can connect a text frame on a master page to any other text frame on the same master page, and you can connect a text frame on a body page to any text frame on any body page. You can also connect a text frame in the middle of a flow.
When you connect two text frames, FrameMaker assigns the first text frame’s flow tag to the second frame. If the first text frame is untagged, the second frame’s tag is used. That way, all connected text frames belong to the same flow and have the same tag. If the first text frame contains overflowing text, the text flows into the second frame when you make the connection.
1)Select the two text frames in the order in which you want text to flow. To select the text frames, Control-click the text frames.
If the text frames are on different pages, the first frame is deselected when you select the second one, but FrameMaker keeps track of the first selection.
note: To add a text frame to the middle of a flow, first select the text frame you want to add, and then select the frame that should follow it.
2)Choose Format > Customize Layout > Connect Text Frames. If the first text frame you selected isn’t on a page that’s currently visible, an alert message asks whether you want to connect to that frame.
Disconnect text frames
You disconnect text frames when you want to create separate flows—for example, to place an article in a specific location in a newsletter, or to create a pull-quote. If you need to start a new flow in the middle of a column, you can split the text frame that contains the column in two, and then disconnect the two text frames.
You can disconnect a text frame from the preceding text frame, the following one, or both. You can also remove a text frame from the middle of a flow.
Disconnecting text frames does not affect existing text in the frames. To move text to a different text frame, cut and paste it after disconnecting the frames.
note: When you disconnect text frames on the same body page, FrameMaker creates separate flows with no flow tags. When you disconnect text frames on different body pages, FrameMaker creates separate flows with the same flow tag. In either case, if you’re creating a newsletter-type document where Autoconnect is off for each flow, the flow tags do not matter. FrameMaker does not create new pages automatically and, thus, there is no need to make text frame connections.
1)Select the text frame you want to disconnect by Control-clicking the text frame.
2)Choose Format > Customize Layout, and then choose Disconnect Previous, Disconnect Next, or Disconnect Both.
Remove a text frame from the middle of a flow
1)Select the text frame immediately preceding the one you want to remove. To do this, Control-click the text frame.
2)Select the text frame immediately following the text frame you want to remove.
3)Choose Format > Customize Layout > Connect Text Frames. If the first text frame you selected isn’t on a page that’s currently visible, an alert message asks whether you want to connect to that frame.
Split or unsplit text frames
You can split a text frame in two, and then disconnect the two text frames to start a new flow. For example, you may want a new article with its own flow to start in the middle of a text frame.
The second of three text frames is split, disconnected from the first text frame, and retagged.
Split text frames
1)Click in the line above where you want to split the text frame and choose Format > Customize Layout > Split Text Frame. FrameMaker splits the text frame below the line that contains the insertion point, creating two separate but connected text frames.
2)Select the bottom text frame by Control-clicking the text frame.
3)Disconnect the text frame from the previous one by choosing Format > Customize Layout > Disconnect Previous. If the flow was tagged, FrameMaker removes the flow tag. If Autoconnect was on before you disconnected the text frames, it is now off for both text frames.
4)Resize the text frames as necessary.
Unsplit text frames
•If you haven’t made any other changes since splitting the text frame, choose Edit > Undo.
•If you made another change but you have not yet disconnected the two text frames, delete the lower frame and then resize the remaining text frame to the size of the original unsplit frame.
•If you have already disconnected the two frames, cut the text from the second text frame and paste it at the end of the first text frame. Then delete the second text frame and resize the first one to the size of the original unsplit frame. If you need to turn Autoconnect back on or reassign a flow tag for the text flow, use Format > Customize Layout > Customize Text Frame.
Cross-reference a disconnected text frame
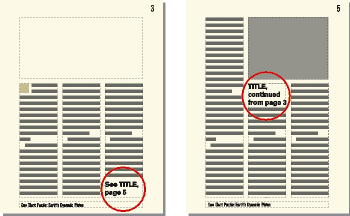
When an article in a newsletter or magazine continues from one page to another, you can use cross-references to tell the reader where to turn to continue reading and to indicate where the end of the article is continued from.
Indicate where the flow continues, and where it is continued from.
1)Resize the two text frames to make room for the cross-references. Drag the bottom of the first text frame upward and the top of the continuation text frame downward.
2)Draw a small text frame below the text frame on the first page, and another above the text frame on the continuation page. Don’t connect either text frame to any other text frame.
3)Insert a cross-reference in the empty text frame on the first page, referring to the continuation page of the article.
4)Insert a cross-reference in the empty text frame on the continuation page, referring to the first page of the article.
Tracking a text flow
In a document with many flows, it’s easy to lose sight of where a flow continues. You can zoom out to see more of a text flow or move from one text frame in a flow to the next.
1)Zoom out to 25% and adjust the window size to see as many pages as necessary.
2)Click in the flow you want to check and choose Edit > Select All In Flow. The flow is highlighted, showing how it traverses the pages of the document.
3)To move through a flow’s text flow’s text frames, do one of the following:
•To display the next connected text frame, click in the last line of a text frame and press the Down Arrow key.
•To display the preceding connected text frame, click in the first line of a text frame and press the Up Arrow key.