Fonts
Replace fonts using the Fonts pod
You can use the Fonts pod to identify all the fonts used in an open document or all open documents. The pod list area lists all the fonts used in a document. You can replace any font used in a document using the fonts pod including missing fonts. The missing fonts are indicated by a red cross sign.
Fonts pod lists all the fonts used in open documents.
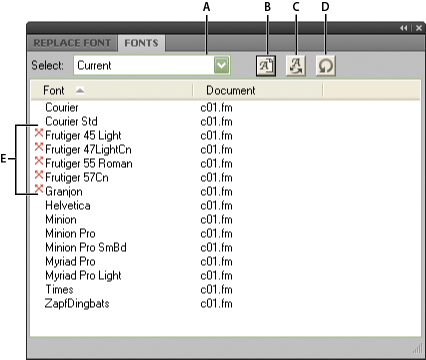
A. Select all open documents or currently open document. B. Display only missing fonts or all fonts used in a document. C. Replace font to display the Replace Fonts pod. D. Refresh the list of fonts displayed in the pod list area. E. Missing fonts indicated by a red cross sign.
To replace a missing font:
1)Select a font from the list and click the Replace icon.
2)From the Replace Font pod, select the new font from the Replace With list box and click Apply.
Replace fonts pod lists all the paragraphs in a document that use a selected font.
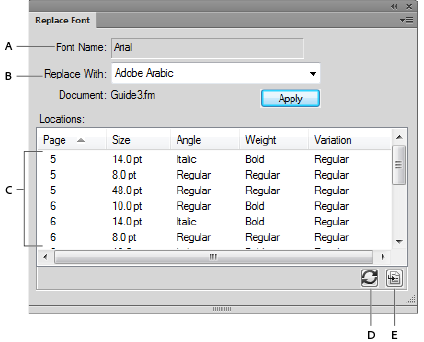
A. Name of the selected font. B. Replace With list box lists all the fonts installed on your system. C. Locations list displays all the paragraphs in the document that use the selected font. D. Refresh the locations list. E. Go To Location takes you to the location in the document that uses the selected font.
Manual font changes
Format changes you make using the Format menu commands take effect immediately.
When changing font properties, keep in mind the following:
•To remove other style properties, choose Plain.
•If you change the font properties of selected text, those properties are retained when you later update the properties of the entire paragraph.
•You can change the font properties of text created with the Text Line tool as well as paragraph text.
•Do not use the Courier® font when Adobe® Type Manager® is turned off or not installed. If you do use Courier without ATM, FrameMaker products do not accurately display the Courier font.
•If a font has more than one weight—for example, Helvetica® Condensed Bold and Helvetica Condensed Black—the Format > Style submenu lists only Bold. To choose other weights, use the Default Font properties of the Paragraph Designer or use the Character Designer instead.
Font changes using the designers
To change the default font properties of an entire paragraph, use the Paragraph Designer. The font families and styles available depend on which fonts are installed.
To change specific text within a paragraph, select the text and use the Character Designer.
You’ve probably seen many of the settings in other word processors, but a few can be new to you.
Numeric Underlining
To use a single offset and thickness for an underline regardless of the character’s font or size, choose Numeric Underlining. Regular and numeric underlining does not affect tab characters. If you want the tab space to be underlined, format that tab stop so that it uses a nonbreaking space as a leader.
Numeric and regular underlining

Change Bar
To display a change bar next to text, select Change Bar.
Color
To display the text in a different color, choose a color from the Color pop-up menu. If you define your own colors, they appear in the pop-up menu.
Spread
To add or subtract space between characters, enter a percentage for Spread. Spread—also called tracking—is expressed as a percentage of an em space. Normal spread is 0%.
-10% spread (top), 0% spread (center), 10% spread (bottom)

Stretch
To set the width of the character shapes, enter a percentage for Stretch.
Capitalization
To display all characters in uppercase but use slightly smaller capital letters for text that was in lowercase, choose Small Caps.
Using a designer to apply a capitalization style to text changes only the appearance of the text (for example, makes lowercase text appear in uppercase letters). To permanently change the text itself, use the Capitalization dialog box to replace selected text with text that is all uppercase, all lowercase, or initial caps.
Language
To change the language associated with the text, choose from the Language pop-up menu. The language you choose affects the text in system variables as well as both spell-checking and hyphenation. Also, changing the language to None prevents the selected text from being spell-checked.
Pair Kern
To adjust the space between two characters in the same word, select Pair Kern. The kerning pairs that have been defined depend on the font.
Kerning pairs turned on and off

Tsume
To move a Japanese character closer to the characters next to it, select Tsume. The amount of space a variable-width character, such as a parenthesis, can move is determined by the metrics for that character.
Adjust superscripted, subscripted, and small cap text
Adjustments to the properties of subscript, superscript (including footnote references), and small cap text apply to all such text in the document.
1)In the Text Options dialog box, specify a size, offset, and stretch percentage.
When calculating the size and offset, FrameMaker multiplies the percentage you enter by the point size of the affected characters. For example, a 40% superscript offset value raises a 10-point character 4 points.
The stretch percentage is the amount that characters are condensed or expanded.
2)Click Apply.
Condense and expand characters
You can achieve some effects by stretching characters.
Text unchanged (top) and condensed 75% (bottom)

1)Depending on whether you are changing the entire paragraph or specific text in the paragraph, choose one of the following:
•Default Font from the Properties pop-up menu in the Paragraph Designer.
•Character Designer.
2)Enter a percentage in the Stretch box. A value of 100% means that the width of characters is as defined for the font. A value less than 100% condenses the width; a value greater than 100% expands the width.
3)Click Apply To Selection.
tip: In Japanese documents, use a stretch value greater than 100 to simulate heitai (horizontally stretched characters). Use a stretch value less than 100 and increase the point size of text to simulate chotai (vertically stretched characters).
You can also change the width of a text line by dragging to stretch the text.
1)Select the text line you want to change, and then drag one of its handles until the text is stretched to the shape you want. Dragging a corner handle changes the point size as well as the character width. You can also select a grouped object that includes a text line.
Create or change combined fonts of Japanese and Western characters
In addition to containing the full Japanese syllabaria, Japanese fonts include a set of Western characters to facilitate entering non-Japanese characters and numbers. You can define your own combined font—a font that uses a specified Western font with a specified Japanese font.
If you’re working on a system that supports Japanese text and if combined fonts are included as part of a template, they are available to you automatically. (The specified fonts must be installed.) If your system supports the typing of Japanese text in documents and dialog boxes, combined fonts appear at the top of the font lists along with regular Western and Japanese ones.
FrameMaker supports Japanese single-byte, half-width katakana characters in combined fonts. Changes to the combined fonts apply to the entire document.
1)In the Combined Fonts dialog box, do one of the following:
•To create a new combined font, enter a name in the Combined Font Name box.
•To change a combined font, select its name from the Combined Fonts list.
2)Do the following:
•To specify the Japanese font, choose from the pop-up menu of font families in the Asian Text area.
•To specify the Western font, choose from the pop-up menu of font families in the Western Text area.
•To adjust the relative size and baseline offset of the Western text, enter values for Size and Offset. The size and offset of the Western text are percentages of the Asian point size. Use a negative offset to move the text below the baseline.
3)Click Add or Change.
4)Click Done.
note: You can turn off the Allow Bolded And Obliqued Styles setting in the Asian Text area of the Edit Combined Fonts dialog box so that bolding or italicizing the Western font does not automatically enbold or italicize the Asian text.
1)To copy a set of combined fonts, choose File > Import > Formats and select Combined Fonts.