|

제작하는 동안 또는 런타임에 DataGrid 구성 요소를 가로/세로로 변형할 수 있습니다. 제작하는 동안에는 스테이지에서 구성 요소를 선택한 다음 [자유 변형 도구]나 [수정] > [변형] 명령을 사용합니다. 런타임에는
setSize()
메서드를 사용하거나
width
,
height
,
scaleX
,
scaleY
등의 해당 속성을 사용합니다. 가로 스크롤 막대가 없는 경우 열 폭이 비례에 맞춰 조절됩니다. 열 및 셀 크기가 조절되면 셀의 텍스트가 잘릴 수도 있습니다.
DataGrid 구성 요소에 스타일 사용
스타일 속성을 설정하여 DataGrid 구성 요소의 모양을 변경할 수 있습니다. DataGrid 구성 요소는 List 구성 요소의 스타일을 상속합니다. 자세한 내용은
List 구성 요소에 스타일 사용
을 참조하십시오.
개별 열 스타일 설정
DataGrid 객체에는 열이 여러 개 포함될 수 있으며 각 열에 서로 다른 셀 렌더러를 지정할 수 있습니다. DataGrid의 각 열은 DataGridColumn 객체로 표현되며 DataGridColumn 클래스에는 열의 CellRenderer를 정의할 수 있는
cellRenderer
속성이 포함됩니다.
-
새 Flash 문서(ActionScript 3.0)를 만듭니다.
-
DataGrid 구성 요소를 [라이브러리] 패널로 드래그합니다.
-
타임라인의 프레임 1에서 다음 코드를 [액션] 패널에 추가합니다. 이 코드는 세 번째 열에 긴 텍스트 문자열이 있는 DataGrid를 만듭니다. 마지막으로 열의
cellRenderer
속성을 여러 셀을 렌더링하는 셀 렌더러 이름으로 설정합니다.
/* This is a simple cell renderer example.It invokes
the MultiLineCell cell renderer to display a multiple
line text field in one of a DataGrid's columns. */

import fl.controls.DataGrid;
import fl.controls.dataGridClasses.DataGridColumn;
import fl.data.DataProvider;
import fl.controls.ScrollPolicy;

// Create a new DataGrid component instance.
var aDg:DataGrid = new DataGrid();

var aLongString:String = "An example of a cell renderer class that displays a multiple line TextField"
var myDP:Array = new Array();
myDP = [{firstName:"Winston", lastName:"Elstad", note:aLongString, item:100},
    {firstName:"Ric", lastName:"Dietrich", note:aLongString, item:101},
    {firstName:"Ewing", lastName:"Canepa", note:aLongString, item:102},
    {firstName:"Kevin", lastName:"Wade", note:aLongString, item:103},
    {firstName:"Kimberly", lastName:"Dietrich", note:aLongString, item:104},
    {firstName:"AJ", lastName:"Bilow", note:aLongString, item:105},
    {firstName:"Chuck", lastName:"Yushan", note:aLongString, item:106},
    {firstName:"John", lastName:"Roo", note:aLongString, item:107},
];

// Assign the data provider to the DataGrid to populate it.
// Note: This has to be done before applying the cellRenderers.
aDg.dataProvider = new DataProvider(myDP);

/* Set some basic grid properties.
Note: The data grid's row height should reflect
the number of lines you expect to show in the multiline cell.
The cell renderer wil size to the row height.
About 40 for 2 lines or 60 for 3 lines.*/

aDg.columns = ["firstName", "lastName", "note", "item"];
aDg.setSize(430,190);
aDg.move(40,40);
aDg.rowHeight = 40;// Allows for 2 lines of text at default text size.
aDg.columns[0].width = 70;
aDg.columns[1].width = 70;
aDg.columns[2].width = 230;
aDg.columns[3].width = 60;
aDg.resizableColumns = true;
aDg.verticalScrollPolicy = ScrollPolicy.AUTO;
addChild(aDg);
// Assign cellRenderers.
var col3:DataGridColumn = new DataGridColumn();
col3 = aDg.getColumnAt(2);
col3.cellRenderer = MultiLineCell;
-
FLA 파일을 MultiLineGrid.fla로 저장합니다.
-
새 ActionScript 파일을 만듭니다.
-
다음 ActionScript 코드를 [스크립트] 윈도우에 복사합니다.
package {


    import fl.controls.listClasses.CellRenderer;

    public class MultiLineCell extends CellRenderer
    {

        public function MultiLineCell()
        {
            textField.wordWrap = true;
            textField.autoSize = "left";
        }
        override protected function drawLayout():void {
            textField.width = this.width;
            super.drawLayout();
        }
    }
}
-
MultiLineGrid.fla를 저장한 폴더에 ActionScript 파일을 MultiLineCell.as로 저장합니다.
-
MultiLineGrid.fla 응용 프로그램으로 돌아와 [컨트롤] > [무비 테스트]를 선택합니다.
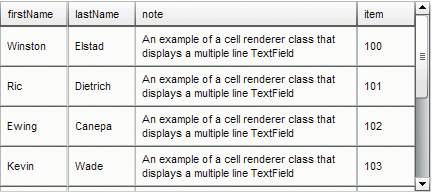
DataGrid는 다음과 비슷해야 합니다.

MultiLineGrid.fla 응용 프로그램의 DataGrid
머리글 스타일 설정
headerTextFormat
스타일을 사용하여 머리글 행의 텍스트 스타일을 설정할 수 있습니다. 다음 예제에서는 TextFormat 객체를 사용하여
headerTextFormat
스타일을 Arial 글꼴, 빨강 색상, 글꼴 크기 14 및 기울임체로 설정합니다.
-
새 Flash 파일(ActionScript 3.0) 문서를 만듭니다.
-
DataGrid 구성 요소를 스테이지로 드래그하고 인스턴스 이름을
aDg
로 지정합니다.
-
[액션] 패널을 열고 기본 타임라인에서 프레임 1을 선택한 후 다음 코드를 입력합니다.
import fl.data.DataProvider;
import fl.controls.dataGridClasses.DataGridColumn;

var myDP:Array = new Array();
myDP = [{FirstName:"Winston", LastName:"Elstad"},
    {FirstName:"Ric", LastName:"Dietrich"},
    {FirstName:"Ewing", LastName:"Canepa"},
    {FirstName:"Kevin", LastName:"Wade"},
    {FirstName:"Kimberly", LastName:"Dietrich"},
    {FirstName:"AJ", LastName:"Bilow"},
    {FirstName:"Chuck", LastName:"Yushan"},
    {FirstName:"John", LastName:"Roo"},
];

// Assign the data provider to the DataGrid to populate it.
// Note: This has to be done before applying the cellRenderers.
aDg.dataProvider = new DataProvider(myDP);
aDg.setSize(160,190);
aDg.move(40,40);
aDg.columns[0].width = 80;
aDg.columns[1].width = 80;
var tf:TextFormat = new TextFormat();
tf.size = 14;
tf.color = 0xff0000;
tf.italic = true;
tf.font = "Arial"
aDg.setStyle("headerTextFormat", tf);
-
[컨트롤] > [무비 테스트]를 선택하여 응용 프로그램을 실행합니다.
DataGrid 구성 요소에 스킨 사용
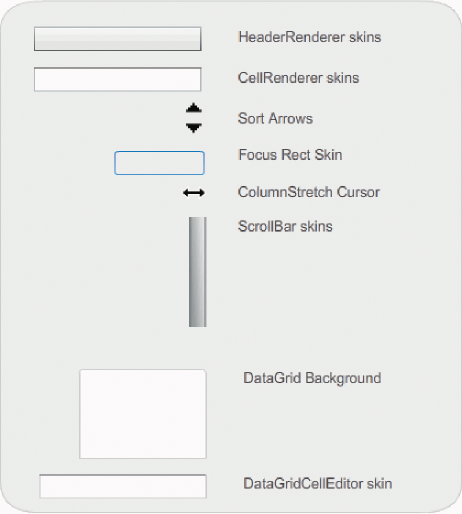
DataGrid 구성 요소는 다음과 같은 스킨을 사용하여 시각적 상태를 표현합니다.

DataGrid 스킨
CellRenderer 스킨은 DataGrid의 본문 셀에 사용되며 HeaderRenderer 스킨은 머리글 행에 사용됩니다. 다음 절차에서는 머리글 행의 배경색을 변경하지만 동일한 절차를 사용하여 CellRenderer 스킨을 편집하면 DataGrid 본문 셀의 배경색도 변경할 수 있습니다.
-
새 Flash 문서(ActionScript 3.0)를 만듭니다.
-
DataGrid 구성 요소를 스테이지로 드래그하고 인스턴스 이름을
aDg
로 지정합니다.
-
DataGrid 구성 요소를 두 번 클릭하여 해당 스킨 팔레트를 엽니다.
-
확대/축소 컨트롤을 400%로 설정하여 아이콘을 편집하기 쉽게 확대합니다.
-
HeaderRenderer 스킨을 두 번 클릭하여 HeaderRenderer 스킨 팔레트를 엽니다.
-
Up_Skin을 두 번 클릭하여 심볼 편집 모드로 엽니다. 그런 다음 배경을 클릭하여 선택하고 속성 관리자에 [채움 색상] 선택기를 표시합니다.
-
[채움 색상] 선택기로 #00CC00 색상을 선택하여 HeaderRenderer 스킨의 배경에 적용합니다.
-
스테이지 위의 편집 막대 왼쪽에 있는 [뒤로] 버튼을 클릭하여 문서 편집 모드로 돌아갑니다.
-
타임라인의 프레임 1에서 다음 코드를 [액션] 패널에 추가하여 DataGrid에 데이터를 추가합니다.
import fl.data.DataProvider;

bldRosterGrid(aDg);
var aRoster:Array = new Array();
aRoster = [
        {Name:"Wilma Carter",Home: "Redlands, CA"},
        {Name:"Sue Pennypacker",Home: "Athens, GA"},
        {Name:"Jill Smithfield",Home: "Spokane, WA"},
        {Name:"Shirley Goth", Home: "Carson, NV"},
        {Name:"Jennifer Dunbar",Home: "Seaside, CA"}
];
aDg.dataProvider = new DataProvider(aRoster);
function bldRosterGrid(dg:DataGrid){
    dg.setSize(400, 130);
    dg.columns = ["Name", "Home"];
    dg.move(50,50);
    dg.columns[0].width = 120;
    dg.columns[1].width = 120;
};
-
[컨트롤] > [무비 테스트]를 선택하여 응용 프로그램을 테스트합니다.
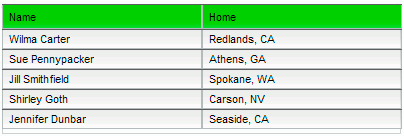
다음 그림과 같이 머리글 행의 배경이 녹색인 DataGrid가 나타나야 합니다.

머리글 행 배경이 사용자 정의된 DataGrid
|
|
|
