|

After you create a LiveCycle application, you can add assets,
such as forms, processes, images, and schemas. You can also add
folders to better organize assets in your LiveCycle application.
For the purposes of this tutorial, you will create one folder named Images and
import an image into it.
Create a folder in a LiveCycle applicationIn the Applications
view, ensure that your LiveCycle application is expanded.
Right-click FirstApp/1.0, and select New > Folder.
The New Folder dialog box appears.
In the Folder name box, type Images to
replace the default text, and then click Finish.
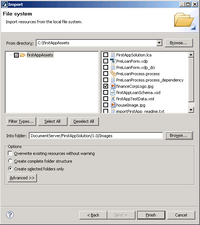
Add an asset to the folder in the LiveCycle applicationSelect File > Import. The Import wizard appears.
Click General > File System and click Next.
Beside the From Directory list, click Browse. The
Import From Directory dialog box appears.
Navigate to and select the folder that you extracted the
tutorial assets into and click OK. For example, select firstAppAssets.(See Downloading and extracting the tutorial assets.)
In the right pane, select check box beside the financeCorpLogo.jpg file.
Beside the Into Folder box, click Browse. The Import
Into Folder dialog box appears.
Click livecycleserver > FirstApp > 1.0 > Images and
click OK.
Ensure that the Create selected folders only option
is selected. The Import wizard looks like this illustration.
Click Finish.
The financeCorpLogo.jpg
file is imported into your LiveCycle application. The imported asset
appears with a plus sign on it, as shown in this illustration:
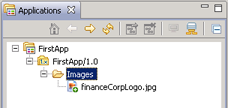 Imported image in Applications view.  From Windows Explorer, you can import an asset
by dragging it into the LiveCycle application version or a folder
in the Applications view. You have created a folder and
imported an asset to it.
|
|
|