|

When you create or edit assets in a LiveCycle application,
you are modifying a copy on your computer. Check in the assets if
you want to deploy it on the LiveCycle server or share it with other
developers working on the same LiveCycle application. To edit an
asset, check out the asset. Checkout is important for these reasons:
Notifies other developers working on the same LiveCycle
application that an asset is being edited.
Prevents other developers from modifying the same asset and
potentially overwriting each other’s changes. The asset that is
checked out becomes locked, which prevents others from modifying
it.
These commands are used during this tutorial to manage your assets:
- Check In:
- Uploads the last saved copy of your asset to the repository
on the LiveCycle server. When an asset is first added to a LiveCycle
application, it is available only to the user that added the asset.
To make the asset available to other users, ensure you save the
changes, and then check in the asset.
- Check Out:
- Locks the asset for you to edit. Only one person can check
out an asset. Check out an asset before you edit it. When an asset
is checked out, a check mark appears on the lower-right corner of
the asset icon. A green check mark indicates that you checked out
the asset; a red check mark indicates that another user checked
out the asset.
- Revert:
- You can roll back to discard changes to an asset that is
checked out. Discarding changes to an asset is useful if you want
a copy of the last checked-in version of the asset. This command
also checks in the asset; therefore, check out the asset to continue
editing it.
After you check out an asset, select File >
Open (or double-click the asset in the Applications view) and an
editor opens. If you try to edit an asset that is not checked out,
Workbench prompts you to check out the asset for editing.
Check in an asset In the Applications view, right-click financeCorp.jpg and
select Check In. In the Applications view, right-click financeCorp.jpg and
select Check In.
Previously, the financeCorp.jpg file
appeared with a plus sign on it. The plus sign disappears after
you check in the file, as shown in this illustration.
 Checked in asset in Applications view. Check out an asset In the Applications view, right-click financeCorpLogo.jpg and
select Check Out. Previously, the financeCorp.jpg file
appeared without a check mark on it. After you check out the file,
it appears with a green check mark on the lower-right corner, as
shown in this illustration. You can only edit assets after you check
it out.
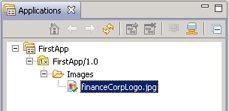 Checked out asset in Applications view. Revert an assetIn the Applications view, right-click financeCorpLogo.jpg and
select Revert. A Confirm Revert dialog box appears.
Click Yes.
You have checked in, checked
out, and reverted an asset. The Revert command discards changes,
copies the last checked-in version to your computer, and checks
in the asset.
|
|
|

