|

A LiveCycle application (sometimes referred to simply
as application) is a container for organizing assets as a collection.
Assets include processes, forms, images, schemas, or files that
you want to store with your LiveCycle application. A LiveCycle application
provides a convenient way for you to export and import all related
assets as a unit. Storing assets as a unit ensures that the LiveCycle application
has everything it requires to function when it is moved from one LiveCycle
server to another.
LiveCycle applications and assets are stored locally on your
computer. When you connect to a LiveCycle server for the first time,
no LiveCycle applications appear in the Applications view. After
you create a LiveCycle application, it appears in the Applications
view. The name of a LiveCycle application must be unique for each LiveCycle
server. Each LiveCycle application can have multiple versions, which allow
you to work on incremental changes to the LiveCycle application.
To get started, you will create an application in Workbench.
Create a LiveCycle applicationLog in to Workbench.
Select the Applications view.
Select File > New > Application.
The New Application wizard appears.
In the Application name box, replace the default text
by typing FirstApp.
(Optional) In the Description box, type a description
for the new application, such as Preliminary Loan Approval application.
Click Finish. If a message is returned indicating
that an existing application has the same name, append a string
to your application’s name to make it unique.
In the Applications view, a child folder appears to represent
the version 1.0, or application version.
You
have created a LiveCycle application. The Applications view looks
like this illustration:
Note: Application versions
appear with a naming convention of [application name]/[major version].[minor
version].
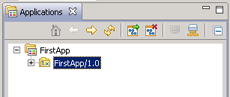 Application view in Workbench.
|
|
|

