This sample is a simple purchase order application simulating the process of putting an order. The focus of this sample is to demonstrate the development experience with the new developing tools with LiveCycle ES2. These developing tools intend to provide typical approach of model-driven development. The sample shows how to use model-driven development by using Data Model, Guide, and Forms. By creating the Data Model, developers can easily generate Guides and Forms as input and output to collect and present data.
The process starts by creating a data model to map the purchase order and customer entities. The sample then walks through building a Guide based on the model for collecting data with vivid user experience. Next, create a form and process based on that model for showing and processing the data of the model. Hence user can get a general idea of how these tools can work together to ease the development work.
Log in to LiveCycle Administration Console (http://hostname:port/adminui).
Click Services > Applications and Services > Application Management.
Click the LiveCycle Applications(9.x) tab and click Import.
Click Browse to locate the sample LiveCycle ES2 archive (LCA) file Adobe-Samples-Application-PurchaseOrder.lca, and then click Preview.
Select Deploy assets to runtime when import is complete and click Import.
Configuring the sample
Note: Before configuring and running this sample, it is necessary to deploy and run the Sample Setup Utility.
Configure Email Service
Log in to Workbench ES2.
Select Window > Show View > Components to open Components View.
In the Components View, select Components > Email > Active Services > EmailService:1.0. Right-click EmailService:1.0 and select Edit Service Configuration.
Set following fields according to your actual email SMTP server and POP server.
SMTP Host: The hostname or IP address of the SMTP server SMTP Port Number: SMTP server port number, 25 by default SMTP Authenticate: Whether your SMTP server requires authentication SMTP User: User name used for sending email SMTP Password: Password of above user SMTP Transport Security: default is None (also depends on the setting of your email server) POP3/IMAP Host: the URL or IP address of the POP3 server POP3/IMAP Port Number: 110 (also depends on the setting of your email server) POP3/IMAP User: the email address of the sender POP3/IMAP Password: the sender's password POP3/IMAP: default is pop3 (also depends on the setting of your email server) Receive Transport Security: default is None (also depends on the setting of your email server)
Click OK.
Configure the service
One process in this sample is referenced by the data model via web service interface; therefore the next step is to configure that service after deployment.
Log in to Workbench ES2.
If Samples - Purchase Order does not show in the Applications view, click File > Get Application.... Choose Samples - Purchase Order > Samples - Purchase Order /1.0 from the application list to import the application to the Workbench.
In the Applications View, click Samples - Purchase Order > Samples - Purchase Order /1.0 >DataModels> OrderDataModel.
To check out the data model, right-click OrderDataModel and select Check Out and, to edit the process, right-click OrderDataModel again and select Open. Workbench switches to Data Model perspective. Alternatively, select Window > Open Perspective > Data Model to open it.
Select Window > Show View > Services to open Services View.
Select Window > Show View > Properties to open Properties View.
In the Services view, there is a service named Products. Click the Products service, and the properties of this service shows in the Properties view.
In the Properties view select the Annotations tab and select ActionScriptGeneration in the annotation group. Double-click the value of item WSDL to edit it, change the placeholder [lcserverhost:8080] to the actual hostname and port number where the sample is deployed.
To save the changes, select File > Save.
For the updated data model to take effect in form, double-click the Samples - Purchase Order > Samples - Purchase Order /1.0 > Forms > ShoppingForm. LiveCycle Designer prompts that the data model has changed and requires update. Select Yes to update it and then save the form.
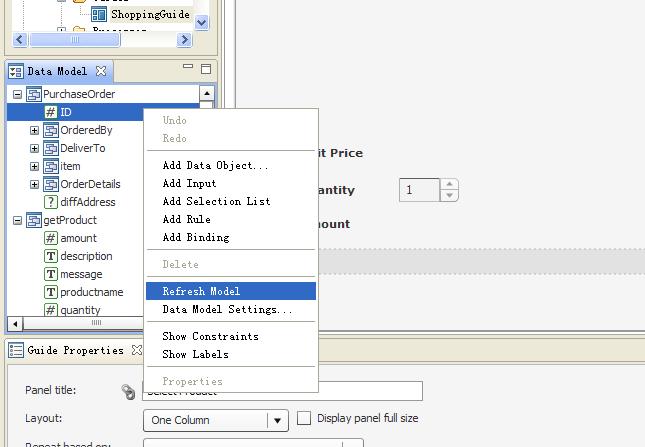
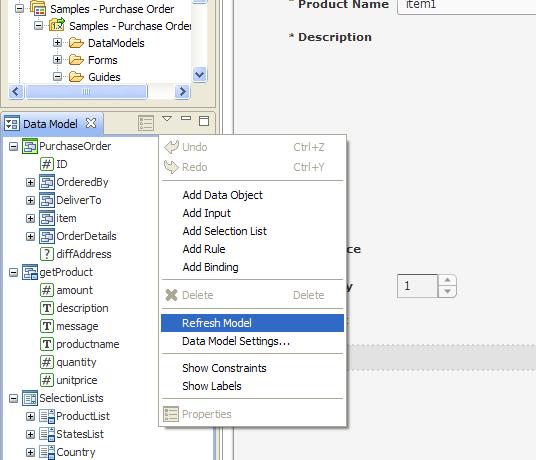
To make the updated data model take effect in Guide, double-click the Samples - Purchase Order > Samples - Purchase Order /1.0 > Guides > ShoppingGuide. In the DataModel view, right-click and in the pop-up menu select Refresh Model and then save the guide. If the perspective is not automatically switched to Guide Perspective in Workbench, click main menu Window > Open Perspective... Select Guide Design to open Guide Design perspective.
Troubleshooting: If starting this process in Workspace failed:
Ensure the service "Products" is modified with the actual WSDL url of the LiveCycle server host, as described in step 8.
Ensure that both the form and the Guide are refreshed after changing the data model.
Ensure the hostname accessed is the same as the hostname set in step 8. For security reasons, a guide is not allowed to access a host other than the originating host.
If you have already applied Service Pack 1 to LiveCycle ES2 Workbench, locate the Refresh Model option using the following diagram:
In the Applications View, click Samples - Purchase Order > Samples - Purchase Order /1.0, right-click Purchase Order/1.0 and select Check In. Right-click Purchase Order /1.0 and select Deploy.
Running the sample
Place an Order
Log in to Workspace ES2 (http://hostname:port/workspace/) using the following credentials: [User = atanaka, Password = password].
Click Start Process > Samples > PurchaseOrder-startpoint. The Flex style Guide form loads.
Select product from the drop-down list and change the quantity, notice the description, unit price, and amount have changed accordingly. Click Next.
In the second section, fill in the customer information. Those fields with marked with "*" marks are required fields. Provide a valid email address in this form.
To use a different address for delivery, check the checkbox Shipping Address is different and select Next and a new section shows. Otherwise click Complete button.
If you chose to use a different address, fill out the deliver information which is similar with the customer information. Then click the Complete button to submit.
Confirm the Purchase Order
Wait for a To Do task to appear in Workspace. Click To Do to open the To Do list.
There is a task assigned with name Order Confirmation. Click to open it. A PDF form shows the purchase order information for confirmation.
Ensure that the information is correct and click Confirm Order button.
Shipment Notice
After confirming the purchase order, check email against the email account completed in step 4 in the Configure Email Server. There is a shipment notice email indicating that the items ordered have been delivered.
Open the attachment in the email. It is a PDF file containing both the order information and the shipment information to notice that the product ordered is delivered.
Troubleshooting: If no email is received:
Ensure that the email service is configured correctly
Ensure that you input a valid email address when placing the order.
Next steps
After running this sample, open the application and learn about how the Data Model, the Guide, and the process are developed and how they work together. Try modifying the model to bind with database or change the service to call remote web service.
The development process of this sample is as following:
Create the Data Model
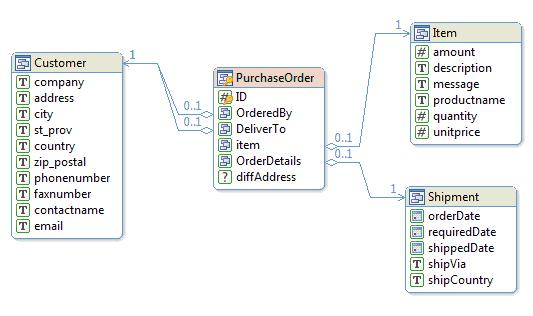
The Data Model, DataModels [OrderDataModel], is the domain model to hold the data structure for the application. It was created at the very beginning. You can create entities and their properties by drag-and-drop using an intuitive GUI interface. The Data Model reflects the relationship between the entities used in the application. You can see that PurchaseOrder is the root object and it has Product, Customer and Order aggregated to it.
This Data Model is the base of other steps in this sample, it maps to the 'Model' of well-known MVC pattern. Data Model in LiveCycle ES2 intends to be used with back-end database to abstract the access to database data. See the Data Model document for more information.
Create the process
The process 'Processes\Products' is the one that aims to simulate the web service to get product information from back-end database or some other data source. It takes product name and quantity as input parameter, and returns the result with the product description and unit price of the product. For example, when user selects "Adobe Acrobat 9 Classroom in a Book", the service queries the database and returns the description and the unit price.
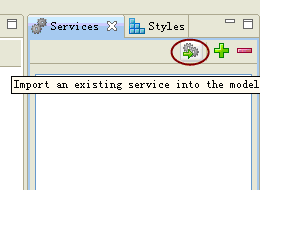
This process then was mapped to a service in the Data Model created above. To create a service "Product", import the process 'Processes\Products' in DataModel perspective, service view. This service is used in The Guide below uses this service.
Create the Guide and Form
The Guide and Form act as Views in the MVC pattern. They are the interface for collecting and presenting data of the model. In ES2, it is easy to bind Guide/Form with Data Model. When creating a Guide or form, specify the Data Model to bind with it. Then the entities in the model are available to be put in the Guide/Form as fields. A benefit of using Data Model with Guide is the ability to define constraints and value expression in model rather than the Guide. Resulting in less repeating of the constraint or value calculation when using multiple Guides.
Legal disclaimer
Any references to company names, company logos and user names in sample material or sample forms included in this documentation and/or software are for demonstration purposes only and are not intended to refer to any actual organization or persons.
LiveCycle ES2 Product Sample - Purchase Order -
02/11/2011 4:46 PM
LiveCycle ES2 (9.0.0.2) - September 2010
[an error occurred while processing this directive]