This sample demonstrates a simple workflow that can be applied to manufacturers. The sample also demonstrates how you can leverage multiple LiveCycle ES2 modules in a human-centric business process.
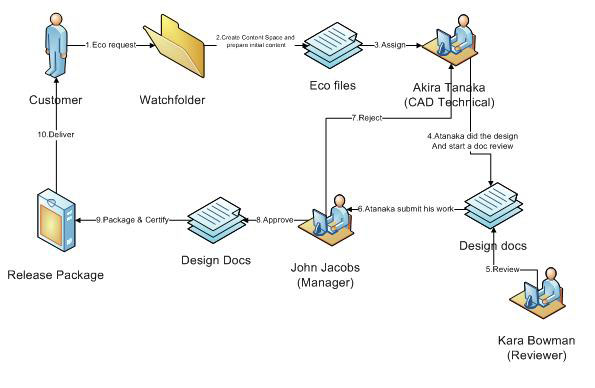
The following illustration details the process:
The customer submits an ECO request. In the sample, this step is mimicked by dropping an ECO file into a watchfolder.
The sample process is then triggered, it first creates a directory in the Content Space, and stores the ECO file there.
The sample process then assigns the design task to an engineer, who is Akira Tanaka in this sample.
Akira Tanaka opens Workspace and sees the task. Akira uses AutoCAD to design the product according to customer’s ECO. When complete, uploads the design to the Contentspace. The design file in AutoCAD format is converted into PDF once uploaded. Akira continues with a peer review with a peer engineer, Kara Bowman, on the generated PDF.
Kara Bowman finds the review task using Workspace. While reviewing the PDF file, Kara adds some comments. Once complete, Kara saves the PDF and completes the review task.
Akira Tanaka is notified that the review is done. Akira makes some additional changes on the design according to Kara comments and uploads the new design to Contentspace to replace the existing version. Akira can start a new review, which repeats steps 5 and 6, or Akira can complete the assigned task from step 3. Once task is complete, the process assigns a task to John Jacobs, who is a manager, for approval.
John Jacob sees the approval task in Workspace. John would like additional changes with the design. John rejects the design, and the process returns back to step 3.
After several iterations, John Jacobs is finally OK with the design. John then approves it in the Workspace.
The sample process then packages up the final design files and certifies it to make a release package.
The release package is delivered to the customer through email.
Note: These instructions assume that LiveCycle ES2 is installed on the C: drive on Microsoft Windows. If you have installed to a different location, substitute the directory where you installed LiveCycle ES2.
Check to see if the following folders exist on the server when LiveCycle is install, if they do exist, delete them before proceeding.
Log in to LiveCycle Administration Console (http://[hostname]:[port]/adminui).
Click Services > Applications and Services > Application Management.
Click the LiveCycleApplications(9.x) tab and click Import.
Click Browse to locate the sample LiveCycle ES2 archive (LCA) file Adobe-Samples-Application-ManufacturingECOtoRelease.lca, and then click Preview.
Select Deploy assets to runtime when import is complete and click Import.
Configuring the sample
Note: Before configuring and running this sample, it is necessary to deploy and run the Sample Setup Utility .
Configure Windows 2008 x64 Enterprise Server to run PDFG:
Note: Skip this step if you are not using Windows 2008 x64 Enterprise Server for LiveCycle ES2)
To run this sample successfully on Windows 2008 x64 Server, ensure that PDF Generator is enabled. The following steps are required to enable PDFG on a Windows 2008 x64 Enterprise Server. If PDF Generator is configured during LiveCycle installation, you can skip this step. Check with your system administrator to find out if PDF Generator is configured.
Create at least two users with Administrative privileges in the Windows O/S, say, "PDFGUser1" and "PDFGUser2". Windows 2008 x64 server needs at least two users to run the conversion processes in parallel (multi-threaded mode).
Disable UAC for these users: to turn UAC off, go to Control Panel > User Accounts > Turn User Account Control on or off. Ensure that Use User Account Control (UAC) to help protect your computer is not selected and click OK. Restart the computer for the settings to take effect.
Add the users to User Accounts for PDF Generator: Log in to the LiveCycle Administration Console. Navigate to Home > Services > LiveCycle PDF Generator ES2 > User Accounts and add a PDFGUser providing valid credentials. This change requires an application server restart.
Run Acrobat_for_PDFG_Configuration.bat command at directory C:\Adobe\Adobe LiveCycle ES2\pdfg_config (or where you installed LiveCycle ES2). This command copies dynamic library files used by PDF Generator to the LiveCycle ES2 installation.
Run the SystemReadinessTool: Open a command window and change directory to: <LiveCycle_Install_Dir>\pdfg_srt. Issue the command: SystemReadinessTool .vbs <outputDir>, <outputDir> is an arbitrary directory to place the generated reports. After the command has finished, review the SRT Report HTML file at the <outputDir>. Ensure that there are no Error Messages or Warning Messages related to the Application you plan to convert. For example, if you want to convert Microsoft Excel files, ensure that the row with Microsoft Excel has a green check sign. And also make sure the row with PDFMaker DLL is registered is OK as well.
Check the status of Global Policy Set:
Log in to the LiveCycle Administration Console (http://hostname:port/adminui).
Click Home > Services > LiveCycle Rights Management ES2 > Policies.
In the tab Policy Sets, click Global Policy Set.
Click the tab Policies, check the status of the policy Restrict to All Principals, if it is disabled, select the check box of Restrict to All Principals, click Enable, then click OK in the page Enable Policy.
Configure Email Server:
Log in to the LiveCycle Administration Console (http://hostname:port/adminui).
Click Home > Services > Applications and Services >Service Management.
Select Foundation from the Category list and click Filter.
Click EmailService:1.0, click Configuration tab and configure the following properties:
SMTP Host: The hostname or IP address of the SMTP server
SMTP Port Number: SMTP server port number, 25 by default
SMTP Authenticate: if necessary by your SMTP host, select the check box
SMTP User: the email address of the sender, if SMTP Authenticate is checked
SMTP Password: the sender’s password
SMTP Transport Security: default is None(also depends on the setting of your email server)
POP3/IMAP host: the url or ip-address of the SMTP server
POP3/IMAP Port Number: 110(also depends on the setting of your email server)
POP3/IMAP User: the email address of the sender
POP3/IMAP Password:the sender’s password
POP3/IMAP: default is pop3(also depends on the setting of your email server)
ReceiveTransport Security: default is None(also depends on the setting of your email server)
Click Save.
Configure Watch Folder
Log in to LiveCycle Administration Console (http://hostname:port/adminui).
Select Home > Services > Applications and Services > Service Management.
In the Category list, select Samples - Manufacturing ECO to Release and click Filter.
Click Samples - Manufacturing ECO to Release /Processes/Initiate ECO: 1.0, then click ManufacturingECOtoRelease - startpoint.
Find the “*Path” variable in the page. This variable is the value for the watch folder, the following is the default value for the systems
Scroll down to the end of the page, under Input Parameters Mappings, do the following:
In the fromEmail list, select Literal and, in the adjacent text field. Enter the email address which is available in the email server that you configured in the step Configure Email Server.
In the inEcoDocument list, select Variable and, in the adjacent text field, enter *.doc, so that this sample processes any file with .doc as extension.
Click Update.
Configure Credentials
In the following steps, you need a two credential file:
generic Reader Extensions credential - available for download from http://www.adobe.com/go/reader_ext_cert. The zip file includes a .pfx file and a text file with the password. Save on your local machine.
Log in to LiveCycle Administration Console (http://[hostname]:[port]/adminui).
Click Home > Settings > Trust Store Management > Local Credentials.
Click Import and, on the Import Credential page, specify this information:
Reassign LiveCycle Contentspace role to sample users
There is a known issue when running the sample in contentspace, to avoid this issue, do this step temporarily. Finish the following steps to reassign the Contentspace user role to Kara Bowman, Sarah Rose, and John Jacobs. Reassign the Contentspace Administrator role to Akira Tanaka.
Log in to LiveCycle Administration Console (http://[hostname]:[port]/adminui).
Click Home > Settings > User Management > Users and Groups.
In the domain list, select SampleOrganization, PublicationsGroup, and click Find.
Four sample users are displayed. Click Akira Tanaka, you can edit this user now, then click tab Role Assignments, select LiveCycle Contentspace Administrator. Click Unassign above, and then click Save to save this change. The four sample users display again.
Click Akira Tanaka, and then click tab Role Assignments, click Find Roles, select LiveCycle Contentspace Administrator, and click OK, then click Save to save this change.
The four sample users display again. Click Kara Bowman, you can edit this user now, then click tab Role Assignments. Select LiveCycle Contentspace User, and click Unassign above. Click Save to save this change.
Click Kara Bowman, and then click tab Role Assignments, click Find Roles, select LiveCycle Contentspace User, and click OK, then click Save to save this change.
Repeat the steps 6 and 7, you can also reassign LiveCycle Contentrole to Sarah Rose and John Jacobs.
Running the sample
Read the description of the use case in the Overview before you run this sample.
Customer files an ECO request
Drop the eco.doc file into the watch folder, the default is C:/tmp/LCSamples/WatchedFolder/ManufacturingECOtoRelease/input for Windows and /tmp/LCSamples/WatchedFolder/ManufacturingECOtoRelease/input for Unix. A sample Eco.doc is provided, it can be found in the collateral directory of the provided Adobe-Samples-Application- ManufacturingECOtoRelease.zip. The sample process picks up the doc and stores it in the content space and then assigns a task to an engineer (Akira Tanaka).
The design engineer (Akira Tanaka) designs the product according to the ECO and initiates a review task
The engineer (Akira Tanaka) gets the assignment. Akira logs in to Workspace to find the task and then uses AutoCAD to do the design (the design is provided as a collateral file).
After the design is done, log in to LiveCycle Contentspace ES2 (http://hostname:port/contentspace), using the following user:
User = atanaka
Password = password
Go to Contentspace My Home >Manufacturing ECO,. There are two subspaces: Drawings and ECOs. Click Drawings to open the space, and then click Add Content. The Add Content Dialog appears. Click Browse to locate the design file, 3Ddrawing_sample.model, provided as in the collateral folder in Adobe-Samples-Application- ManufacturingECOtoRelease.zip. Click OK to upload content.
Navigate to Manufacturing ECO, a new subspace Reviews is created, click Reviews to open the space, a PDF file named 3Ddrawing_sample.pdf displays. Click the icon Initiate Shared Review below the PDF file to open the Initiate Shared Review wizard,. Click Search, and choose Kara Bowman in the list. Click Add to List(the one above), then click Next to go to the step Select Review Options. Click Next to go to the step Summary, the information about this review displays. Click Finish to start this review.
Note: If the subspace Reviews was not created as expected, check the following:
Try to relogin contentspace.
Ensure that PDF Generator works as expected on your server.
Ensure that the Contentspace event notification is turned on, see your LiveCycle administrator to confirm.
Then you can upload the 3D file again to repeat this step.
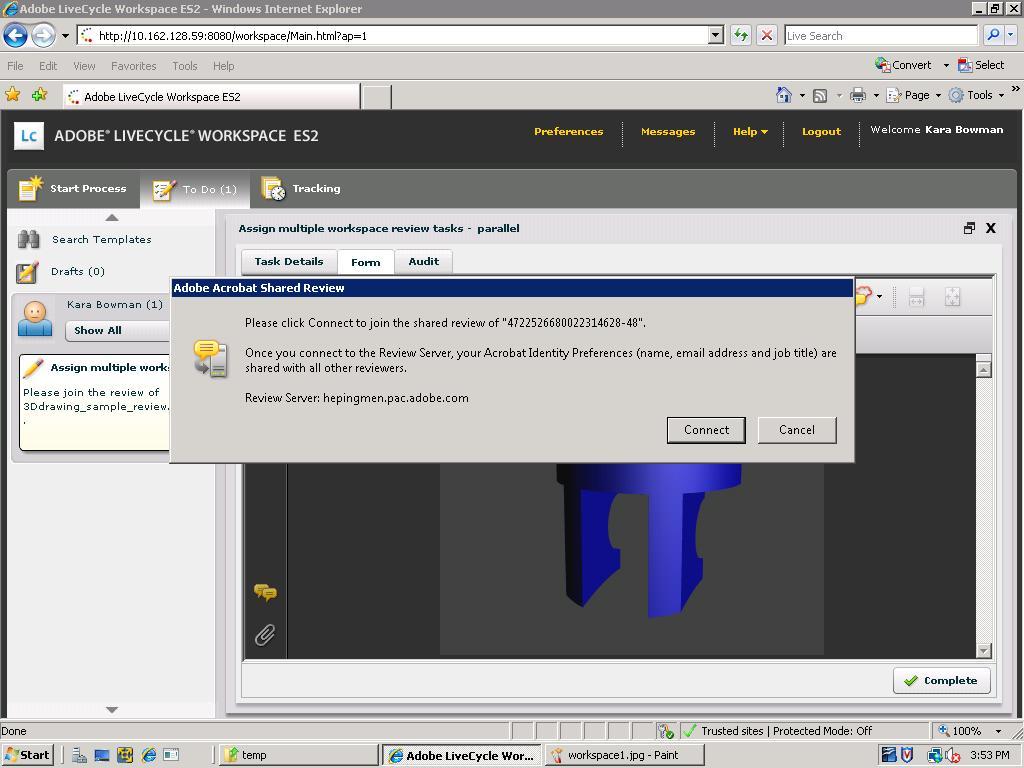
Reviewer (Kara Bowman) reviews the design
Log in to LiveCycle Workspace ES2 (http://[hostname]:[port]/workspace), using the following user:
User =kbowman
Password = password
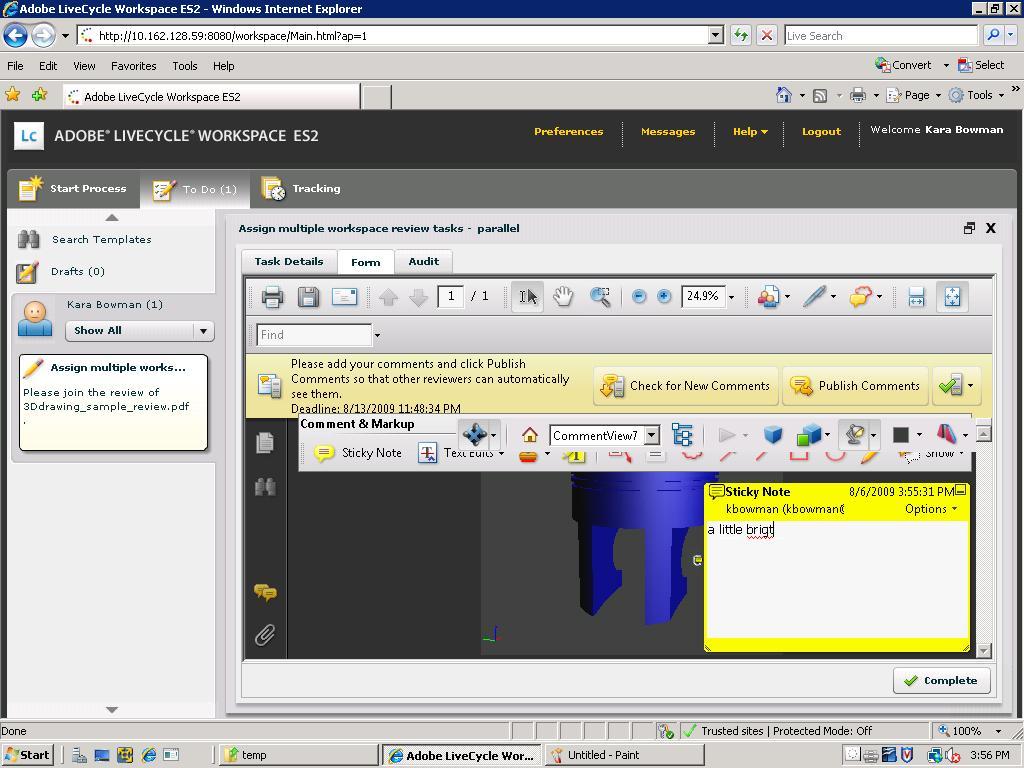
Find the To-Do item and click it to open the application as shown in the following picture.
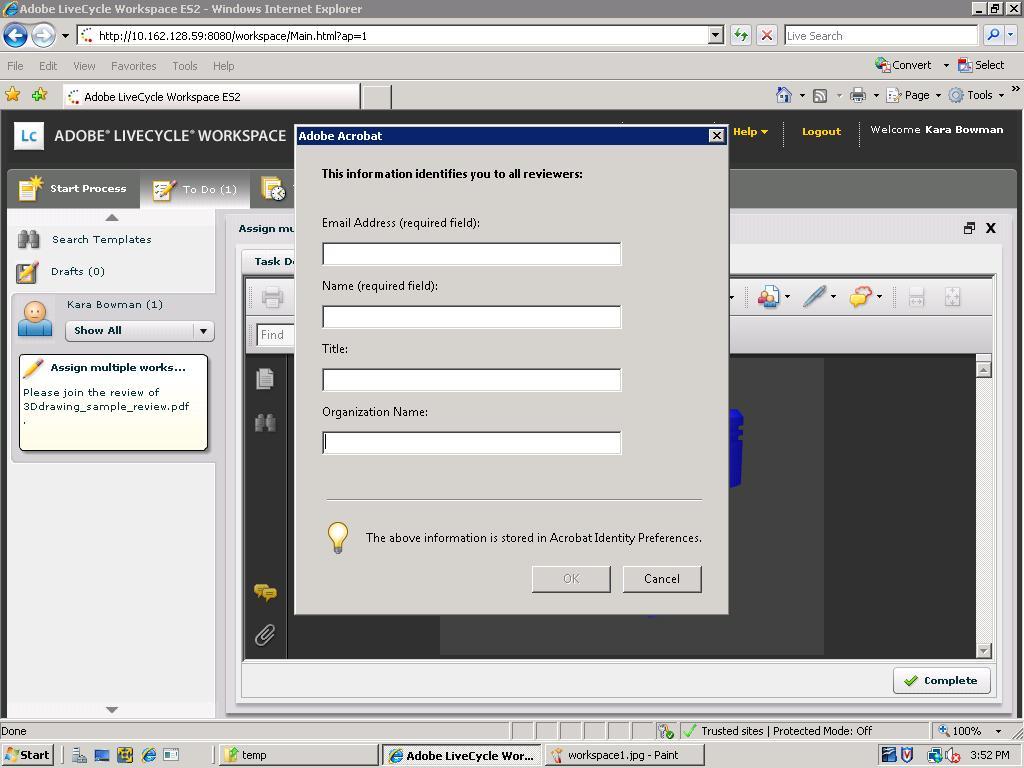
Note: This information is stored in your version of Acrobat, open your Acrobat, select Edit > Preferences, in the left side bar, select Identity. This information is used with comments, reviews, and digital signatures. To run this sample, set these values to the ones listed above. The reviewer’s profile then set to the sample user kbowman’s profile. To use another sample user as the reviewer, but the reviewer profile is still kbowman, open Acrobat and edit the identity.
Click OK.
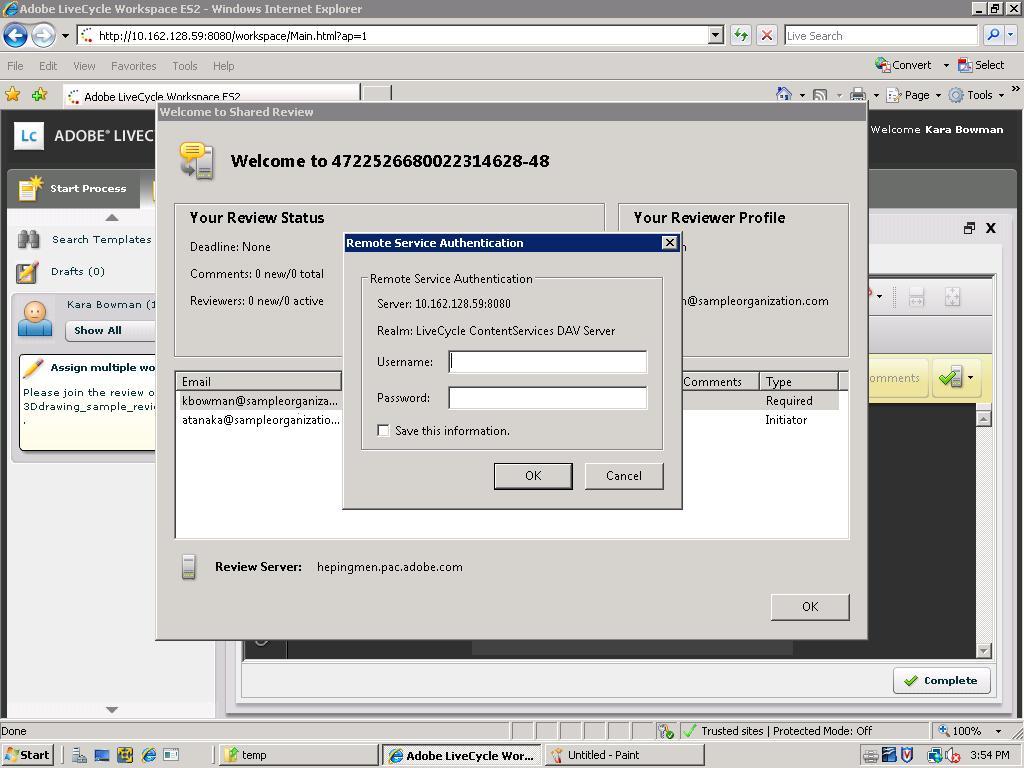
In the Remote Service Authentication dialog, enter Username as “kbowman”, and enter Password as “password”, and then click OK to finish the authentication. Click OK to close the dialog Welcome to Shared Review. The document for review displays Workspace as the following figure shows. You can add Sticky Note or other types of comments.
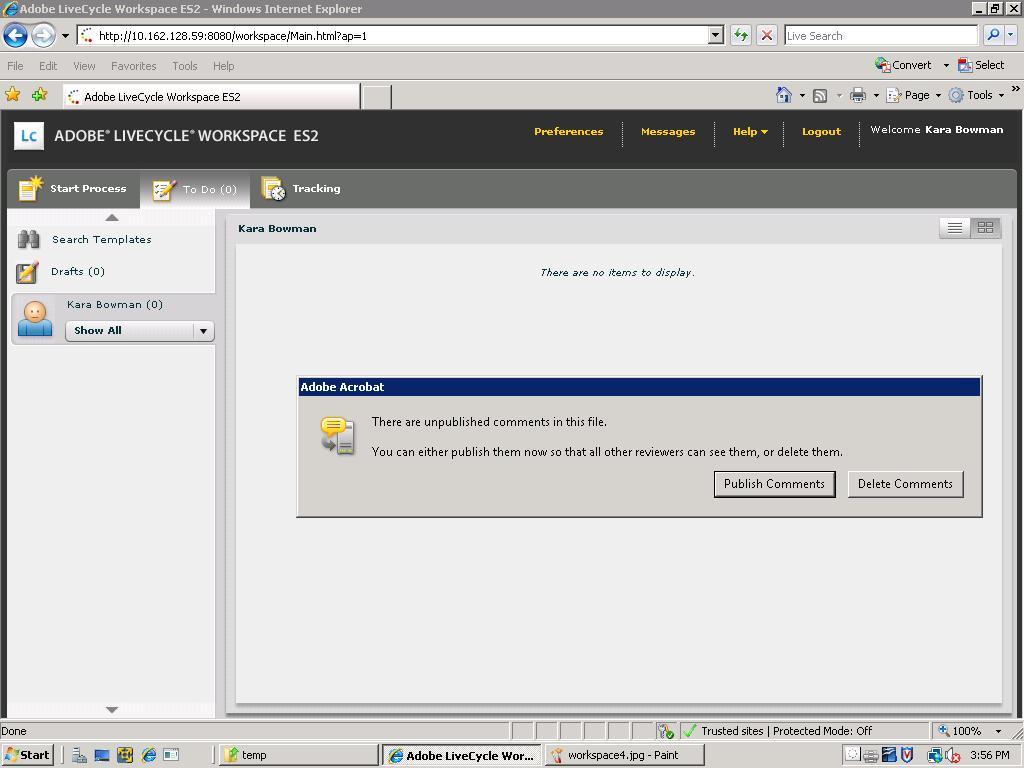
Click Complete to finish the review.
Click Publish Comments to publish the comments for this review. The review from Kara Bowman has finished now, and the comments saved in the review server.
Design Engineer(Akira Tanaka) completes the ECO task
The design engineer (Akira Tanaka) gets the review back and changes the design according to the comments. Akira is ready to deliver the design for approval.
Log in to LiveCycle Workspace ES2 (http://[hostname]:[port]/workspace), using the following user:
User = atanaka
Password = password
Find the To-Do item Assign Task and click it to open the application. Click Attachments, attach three files here, they are both located at the folder collateral in the zip file Adobe-Samples-Application- ManufacturingECOtoRelease.zip. Click Browse to locate the file 3Ddrawing_sample.pdf, click OK to add it to the list. Repeat the steps to add drawing1.JPG and drawing2.JPG to the list.
Note: These three files are mandatory, ensure that they are added.
Click Form in the toolbar, and click Ready For Delivery, then the task has finished. The design is delivered to manager (John Jacobs) for approval.
Manager (John Jacobs) approves the ECO task
Log in to LiveCycle Workspace ES2 (http://[hostname]:[port]/workspace), using the following user:
User = jjacobs
Password = password
Find the To-Do item and click it to open the application.
If you choose deliver, the drawings are packaged and delivered to the customer. You receive an email in the email account which represents for the customer that configured in the step Configure Watch Folder.
Note: To open the attachment in the email, you need Acrobat Pro 9.0 or later installed on your machine.
If you choose decline, repeat the step CAD Technical(Akira Tanaka) completes the ECO task.
Next steps
Try making the following changes to the process:
Add multiusers to join in the shared review.
Use a different policy for the document.
Use a different certificate.
Change the navigator used in the Assembler service use Flash Builder.
The release package delivered to the customer is not protected. To enhance security, you can try to use additional LiveCycle services to protect and certify the final package.
Legal disclaimer
Any references to company names, company logos and user names in sample material or sample forms included in this documentation and/or software are for demonstration purposes only and are not intended to refer to any actual organization or persons.
LiveCycle ES2 Product Sample - Manufacturing ECO to Release -
02/11/2011 5:34 PM
LiveCycle ES2 (9.0.0.2) - September 2010
[an error occurred while processing this directive]