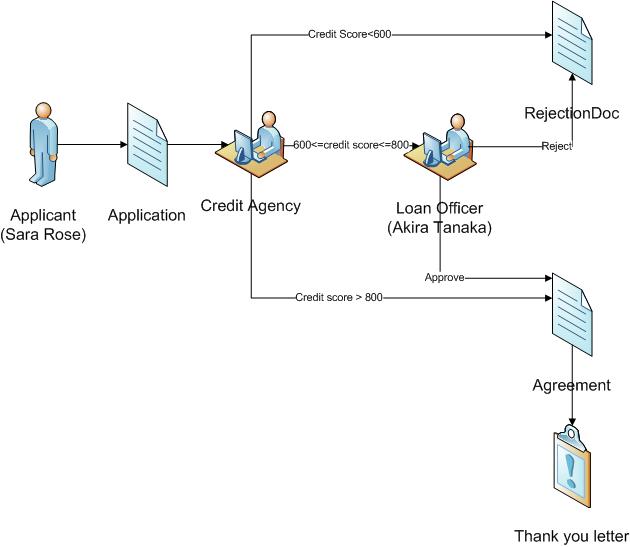
The End-To-End Mortgage Application sample demonstrates how you can leverage multiple LiveCycle ES3 modules in a human-centric business process. It also demonstrates the use of events and subprocesses to construct a complex business workflow. In this sample, a consumer submits a mortgage application form in Adobe® LiveCycle® Workspace 10. The back-end LiveCycle ES3 process extracts the information from the application form and sends it to a credit-check agency. The agency the provides a credit score and sends the result back via email. Once this is complete, the main process processes the application based on the range of the credit score.
If the score is over 800, the process generates the agreement with a 2D barcode for the applicant to sign. Once the signed agreement is returned, the main process processes a scanned TIFF image of the agreement and a thank-you letter generated.
If the score is from 600 through 800, a loan officer reviews the form and make a decision about the next step..
If the score is lower than 600, the process generates a rejection letter. These processes are communicated through process events.
Download the sample certificate for Adobe® LiveCycle® LiveCycle Reader Extensions 10. This certificate is available at: http://www.adobe.com/go/reader_ext_cert.
Note: These instructions assume that LiveCycle ES3 is installed on the C: drive on Microsoft Windows, if you have installed to a different location, substitute the directory where you installed LiveCycle ES3.
Check to see if the following folders exist on the server when LiveCycle is install, if they do exist, delete them before proceeding.
Log in to LiveCycle Administration Console (http://[hostname]:[port]/adminui).
Click Services > Applications and Services > Application Management.
Click the LiveCycleApplications(9.x) tab and click Import.
Click Browse to locate the sample LiveCycle ES3 archive (LCA) file Adobe-Samples-Application-EndToEndMortgageApplication.lca, and then click Preview.
Select Deploy assets to runtime when import is complete and click Import.
Configuring the sample
Note: Before configuring and running this sample, it is necessary to deploy and run the Sample Setup Utility .
Configure Security
The sample users need to be assigned INVOKE privileges to access the process:
Log in to LiveCycle Administration Console (http://[hostname]:[port]/adminui).
Click Services > Applications and Services > Service Management.
In the Category drop down list, select Samples - EndToEnd Mortgage Application and click Filter button.
Click Samples - EndToEnd Mortgage Application/Processes/End-To-End Mortgage Application: 1.0 and then click the Security tab. From the tool bar at bottom of the page, click Add Principal and select All Principals in domain SampleOrganization, PublicationsGroup.
In next page, check the check-box besides INVOKE_PERM and click the Add button.
Note: If your LiveCycle server is upgraded from 8.2.x, there might be multiple sample user groups with similar name, ensure All Principals in domain SampleOrganization,PublicationsGroup is selected.
Configure Credentials
In the following steps, you need two credential files:
generic Reader Extensions credential - available for download from http://www.adobe.com/go/reader_ext_cert. The zip file includes a .pfx file and a text file with the password. Save these on your local machine.
Log in to LiveCycle Administration Console (http://[hostname]:[port]/adminui).
Click Home > Settings > Trust Store Management > Local Credentials.
Click Import and, on the Import Credential page, specify this information:
Log in to LiveCycle Administration Console (http://[hostname]:[port]/adminui).
Click Home > Services > Applications and Services >Service Management.
Select Foundation from the Category list and click Filter.
Click EmailService:1.0, click the Configuration tab and configure the following properties:
SMTP Host: the URL or IP address of the SMTP server
SMTP Port Number: 25 (also depends on the setting of your email server)
SMTP Authenticate: if required by your SMTP host, select the check box
SMTP User: the email address of the sender, if SMTP Authenticate is selected
SMTP Password: the sender's password
SMTP Transport Security: default is None (also depends on the setting of your email server)
POP3/IMAP Host: the URL or IP address of the SMTP server
POP3/IMAP Port Number: 110 (also depends on the setting of your email server)
POP3/IMAP User: the email address of the sender
POP3/IMAP Password: the sender's password
POP3/IMAP: default is pop3 (also depends on the setting of your email server)
Receive Transport Security: default is None (also depends on the setting of your email server)
Click Save.
Set up the Generate Credit Check process:
Configure Credential
Log in to Adobe® LiveCycle® Workbench 10.
If Samples - EndToEnd Mortgage Application does not show in the Applications view, click File > Get Application..., and choose Samples - EndToEnd Mortgage Application > Samples - EndToEnd Mortgage Application/1.0 from the application list to import the application to Workbench.
In the Applications view, click Samples -EndToEndMortgage Application > Samples -EndToEndMortgage Application/1.0 > Processes> Subprocess > Generate Credit Check. To check out the process, right-click Generate Credit Check and select Check Out. To edit the process, right-click Generate Credit Check and select Open.
Double-click the Certify Form activity to open its properties sheet. Click Common > CertifyingCredential > Alias. Select JOHNJACOBS in the list.
Double-click the Apply Usage Rights activity to open its properties sheet. Click Input > Credential Alias. Select SAMPLEREADEREXTENSIONSCREDENTIAL in the list.
To save the process, select File > Save.
Configure Email Address
Log in to Workbench.
In the Applications view, click Samples -EndToEndMortgage Application> EndToEndMortgage Application /1.0 > Processes > Subprocess >Generate Credit Check. To check out the process, right-click Generate Credit Check and select Check Out. To edit the process, right-click Generate Credit Check and select Open.
Click Window > Show Views > Variables to enable LiveCycle ES3 Variables View. Double-click the variable backEndLiveCycleEmail, change the Default Value (the value should be an available email address on the email server that configured in the step Configure Email Server), and click Save.
Double-click the variable creditCheckAgencyEmail, change the Default Value (the value should be an available email address on the email server that configured in the step Configure Email Server), and click Save.
To save the process, select File > Save.
Set up the Receive Credit Check process
This step is optional.
The path of the WatchFolder startpoint is C:\tmp\LCSamples\WatchedFolder\EndToEndMortgageApplication-ReceiveCreditCheck by default for Windows, and :/tmp/LCSamples/WatchedFolder/EndToEndMortgageApplication-ReceiveCreditCheck for Unix. If you want to change this path, especially if you are using UNIX, complete the following steps:
Log in to Workbench.
In the Applications view, click Samples -EndToEnd Mortgage Application > Samples -EndToEndMortgage Application/1.0 > Processes > Subprocesses > Receive Credit Check. To check out the process, right-click Receive Credit Check and select Check Out. To edit the process, right-click Receive Credit Check and select Open.
Click the startpoint Receive Credit Check - startpoint, and in Process Properties > General > Path, you can enter (for example):
Setup the End-to-End Mortgage Application process:
This step is optional.
Log in to Workbench.
In the Applications view, click Samples -EndToEndMortgage Application> EndToEndMortgage Application /1.0 > Processes >End-To-End Mortgage Application. To check out the process, right-click End-To-End Mortgage Application and select Check Out. To edit the process, right-click End-To-End Mortgage Application and select Open.
Click Window > Show Views > Variables to enable LiveCycle ES3 Variables View. Edit the variables thankYouLetterFilePath, loanRejectionFilePath, and loanAgreementFilePath. The default values are:
The path of the WatchFolder startpoint is C:\tmp\LCSamples\WatchedFolder\EndToEndMortgageApplication-ReceiveAgreement by default for Windows, and /tmp/LCSamples/WatchedFolder/EndToEndMortgageApplication-ReceiveCreditCheck for Unix. If you want to change this path, especially if you are using UNIX, complete the following steps:
Log in to Workbench.
In the Applications view, click Samples -EndToEndMortgage Application > Samples -EndToEndMortgage Application/1.0 > Processes> Subprocesses > Receive Agreement. To check out the process, right-click Receive Agreement and select Check Out. To edit the process, right-click ReceiveAgreement and select Open.
Click the startpoint Receive Agreement - startpoint, and in Process Properties > General > Path, you can enter (for example):
In the Applications view of Workbench, click Samples -EndToEndMortgage Application>Samples -EndToEndMortgage Application/1.0. To check in the application, right-click Samples -EndToEndMortgage Application/1.0 and select Check In. To deploy the process, right-click Samples -EndToEndMortgage Application/1.0 and select Deploy.
Running the sample
User files a mortgage application
Log in to Workspace (http://[hostname]:[port]/workspace/) using the following credentials:
User = srose
Password = password
Click Start Process > Samples > End-To-End Mortgage Application - startpoint, fill the form and click Complete to submit it. An email will be sent to CreditAgency automatically for credit checking, CreditAgency's email is defined by creditCheckAgencyEmail variable. (configured earlier in step Configure Email Address).
Credit Agency checks the applicant's credit and returns a credit score
Now you are the clerk from the Credit Agency.
Check email (defined by creditCheckAgencyEmail) and save the attached PDF file to a local directory. Note: it may take a couple of minutes for the email to arrive.
Open the saved PDF file and enter a credit score, for examples, 700, and save the file.
Return the score to the bank by copying the saved PDF file to C:\tmp\LCSamples\WatchFolder\EndToEndMortgageApplication-ReceiveCreditCheck\input for Windows, and /tmp/LCSamples/WatchFolder/EndToEndMortgageApplication-ReceiveCreditCheck/input for Unix. In reality, the CreditAgency should be able to email back the credit score and the process continues. In this sample, the email addresses are not real and the application will not be able to deployed, therefore we use the watchfolder to mimic this step.
Troubleshooting: If you don't receive the email, Check the following:
Ensure the email service is setup correctly
Ensure the "Generate Credit Check" process is configured with correct backEndLiveCycleEmail and creditCheckAgencyEmail.
Bank continues to process the loan application
Depends on the credit score, pick the appropriate step to continue
If the credit score is below 600, the application should be rejected. A rejection letter will be generated, you can find the letter at C:\tmp\LCSamplesOutput\EndToEnd-LoanRejection.pdf for Windows and /tmp/LCSamples/Output/EndToEnd-LoanRejection.pdf for Unix.The process is then completed.
If the credit score is between 600 and 800, continue with step 2.
If the credit score is over 800, the process will generate an agreement with a 2D barcode for the applicant to sign. Proceed to step 3.
Loan Officer reviews the application.
Log in Workspaces Akira Tanaka(username/password: atanaka/password).There will be a task titled as "Loan Approver" in the to-do list, open task. The mortgage application form shows.
If Akira Tanaka chooses to reject the application, a reject letter will be generated. You can find the letter at C:\tmp\LCSamples\Output\EndToEnd-LoanRejection.pdf for Windows and /tmp/LCSamples/Output/EndToEnd-LoanRejection.pdf for Unix, and the process ends.
If Akira Tanaka chooses to approve the application, proceed to step 3.
An agreement is saved to the output file that is configured in the step "Configuring the Sample," by default C:\tmp\LCSamples\Output\EndToEnd-LoanAgreement.pdf for Windows and /tmp/LCSamples/Output/EndToEnd-LoanAgreement.pdf for Unix.
To simulate the fax and scan operations, use Adobe Acrobat Pro to open the EndToEnd-LoanAgreement.pdf file and then save it as TIFF file. If you don't have Adobe Acrobat Pro installed, you can use the Tiff file provided in the zip file.
Copy the TIFF files to the watched folder configured in the step "To Set up the Receive Agreement process", default is : C:\tmp\LCSamples\WatchedFolder\EndToEndMortgageApplication-ReceiveAgreement\input for Windows and /tmp/LCSamples/WatchedFolder/EndToEndMortgageApplication-ReceiveAgreement/input for Unix. A PDF document of a thank-you letter will be generate and put into the output directory, by default it is C:\tmp\LCSamples\Output\EndToEnd-ThankYouLetter.pdf for Windows and /tmp/LCSamples/Output/EndToEnd-ThankYouLetter.pdf for Unix . The process is then completed.
Troubleshooting: If you don't see the generated Thank You letter
check with your LiveCycle administrator to make sure PDF Generator service is configured.
Next steps
If you have EMC Documentum Content Server or IBM FileNet P8 Content Manager, try to replace the file operations with Content Repository Connector operations to the archive application form and its related documents, such as credit-check result, final agreement, and approval or rejection letter into an ECM system. You can also create links between those supporting materials to the application form by using Content Repository Connector operations.
Legal disclaimer
Any references to company names, company logos and user names in sample material or sample forms included in this documentation and/or software are for demonstration purposes only and are not intended to refer to any actual organization or persons.