|

Text objects present read-only text
that users cannot edit. You can use text objects to do these tasks:
Label an area in the form
Provide instructions for filling out the form
Include a header and footer
After you add a text object to the form design, you can define
these properties:
In addition, you can insert placeholders, such as floating text
fields, and the values of run-time properties, such as page count,
current page, and current date/time, into text objects.
The text object has the Make Fixed-Sized Text Objects Auto-fit
While Editing option (Tools > Options > Workspace) selected
by default. Therefore, the object automatically resizes at design
time to accommodate the text you enter and the property settings
you change, such as margins, borders, and font type and size.
To type characters into a text objectYou can type characters
into the object after you add the object to the form.
By default, the Make Fixed-Size Text Objects Auto-Fit While Editing
option on the Workspace panel of the Tools > Options dialog is
selected. This option allows the width and height of text objects
to expand as you type characters. To expand only either the width
or height of a text object, deselect Make Fixed-Size Text Objects
Auto-Fit While Editing and then select the appropriate Expand To
Fit option on the Layout palette.
Select Edit and ensure that the Lock Text and Lock Static
Objects commands are not selected.
Double-click the text object and type the characters you
want to add.
To insert a floating text field into a text objectYou can embed a floating text
field in a text object. Floating text fields support the merging
of different text values within text objects. For example, you could embed
a floating text field to generate a customer name in the salutation
of a form letter.
A floating text field does not have a caption and can be edited
as if it were a single character of text. The properties of the
floating text field must be defined separately in addition to the
properties of the text object.
Note: When merging floating fields with data, keep
in mind that floating fields cannot span pages.
In the text object, place the cursor where you want the
floating text field to be merged.
Select Insert > Floating Field.
Select the floating text field and edit its properties.
To insert the value of a run-time property into a text objectYou can insert the values of run-time
properties into a text object. When the form is viewed, the actual
value is inserted automatically.
The inserted value can have a different font, font size, and
font style than the text object.
In the text object, place the cursor where you want the
value of the run-time property to be merged.
Select Insert > [run-time property value].
To insert the current page number of the finished form, select
Current Page Number.
To insert the total number of pages making up the finished,
select Number of Pages.
To insert the current date/time, select Current Date/Time.
To insert the value of the locale setting for the application
processing the form, select Viewer Locale.
To insert the name of the application processing the form,
select Viewer Name.
To insert the version number of the application processing
the form, select Viewer Version.
Select the run-time property value and edit its properties.
To merge text objectsWhen
you import a PDF file into Designer, depending on the import options
you choose, title and instruction text may be broken up into multiple
text objects. This import behavior makes the text difficult to edit
because individual words or individual letters may be broken into
separate text objects. If you need to edit the text, you can merge
text objects together to make the text easier to update.
Select the text objects that you want to merge.
If
you also select an object of a different type, it will not be included
in the merged object.
Select Layout > Merge Selected Text Objects.
All
selected text objects combine into a single object.
To create a caption by merging a text object and a field objectYou can create a caption for a field
object that does not have a caption by merging it with a text object.
For example, if you have a text object above a text field whose
caption is set to none, you can merge the two objects to create
one field. The text from the text object becomes the caption for
the text field.
Before you perform this task, you must ensure the following settings
are in effect:
The field object can be one of the following objects:
Check Box
Date/Time Field
Decimal Field
Signature Field
Drop-down List
Image Field
List Box
Numeric Field
Password Field
Radio Button
Text Field
You can merge only one text object to one field object.
Select the text object that you want to become the caption
for the field object.
Ctrl+click or Shift+click to select the field object that
you want to merge with the text object.
The field object must
have its caption set to none in the Layout palette or the caption
must be empty.
Select Layout > Merge as Caption.
The new object’s
caption becomes the text from the text object. The new object's
size and position matches the total boundaries of the merged objects.
You
may have to edit the font of the caption and the value after you
merge the objects.
To insert language-specific numbers in text or captionsMost regions of the world use a numbering
system that is often called Roman or European (1, 2, 3, ...). However,
the numbering system in Arabic is different; it is derived from
Hindi or Indic numbers.
Although Arabic letters are written from right-to-left, numbers
in Arabic are written from left-to-right. This numbering system
is often called Arabic-Indic.
You can insert language-specific numbers in text or captions
if your locale, such as Arabic (Egypt), supports it. The following
locales support this feature:
Arabic (all except Algeria, Morocco, and Tunisia)
Thai (Thailand Traditional)
The options described in this Help topic are available only if
support for the appropriate language is enabled through Microsoft
Office Language Settings.
Select the text.
Right-click and ensure the language-specific Use Digits command
is selected.
If this menu item is not there, ensure the locale
set for this object supports this feature.
Type the numbers.
This example is of a caption that
shows three types of language-specific numbers.
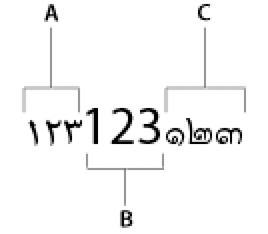 A. Arabic (Egypt) B. English (USA) C. Thai (Thailand Traditional)
To allow page breaks within a text objectThe Allow Page Break
Within Content option is enabled for a text object if the parent
subform allows page breaks. This option is deselected by default.
Here are a few things to consider when allowing page breaks within
a text object:
The Allow Page Break Within Content option is enabled
for a text object only when the parent object allows page breaks.
Page breaks are not supported in rotated text objects.
The Allow Page Breaks Within Content option is disabled for
floating fields. Instead, select the Allow Page Break Within Content
option for the text object referencing the floating field.
A page break is not allowed when an object that can accept
a page break is positioned beside an object that cannot.
When the Make Fixed-Size Text Objects Auto-Fit While Editing
option (in Tools > Options > Workspace) or the Expand to Fit
options (in the Layout palette) are deselected, the boilerplate
text does not expand at design time, which means that page breaks
are prevented.
To allow page breaks within a text object In the
Object palette, click the Draw tab and select Allow Page Breaks
Within Content. In the
Object palette, click the Draw tab and select Allow Page Breaks
Within Content.
To keep a text object with the next object in the formThe Keep with
Next option is enabled for a text field if the parent object allows page
breaks and is a flowed container.
The Keep With Next option is disabled for floating fields. Instead,
select the Keep With Next option for the text object referencing
the floating field.
In the Object palette, click the Draw tab and select
Keep With Next.
|
|
|