Learn how to create PDF/A- and PDF/X-compliant PDFs, define PDF viewing options and page sizes, create tagged PDF for better accessibility, and convert all colors to RGB for online PDFs with Adobe FrameMaker.
In the General tab of the PDF Publish Settings dialog, you can customize settings such as PDF presets, viewing options, page size, optimization, tagging, and more.
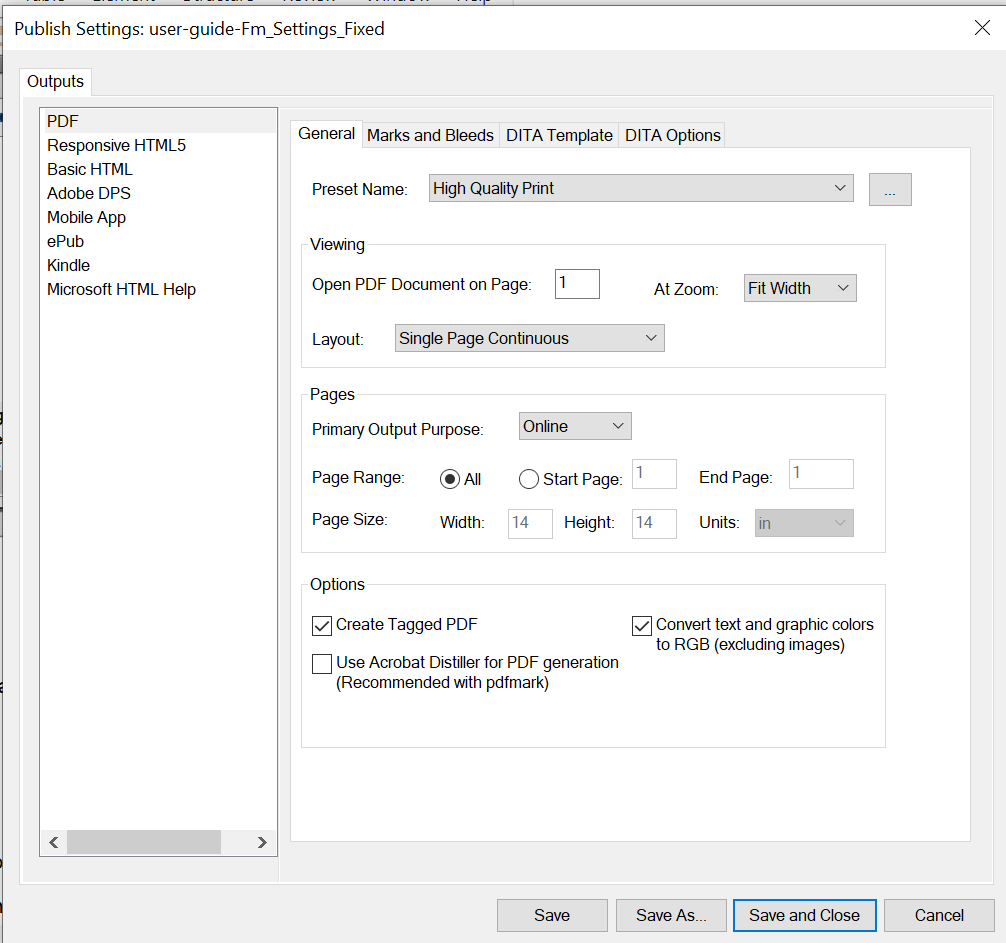
Settings available in the General tab is explained below:
- Preset Name
The PDF publish settings are mostly derived from the pre-configured or your custom .joboptions file. The .joboptions file is created using Acrobat Distiller. The Preset Name drop-down list picks up all pre-configured .joboptions from the default C:\ProgramData\Adobe\Adobe PDF\Settings location. You can also add your own custom .joboptions file by clicking the browse icon next to the Preset Name drop-down list and selecting the desired .joboptions file.
Note: When you click the browse icon, the location of the currently selected preset is opened by default.FrameMaker also provides some additional presets that you can use to generate the PDF output. These presets are not included in the default preset location. However, you can add them to the default location to start using them. The additional presets are available at the following location:
C:\Users\<username>\AppData\Roaming\Adobe\FrameMaker\16\Additional_PDF_Settings
In the above location, you will find the .joboptions for LiquidMode PDF, Mobile PDF, and other PDF standards. You need to copy the desired .joboptions file to following location:
C:\Users\<username>\AppData\Roaming\Adobe\Adobe PDF\Settings
Once the required .joboptions files are copied, they will start showing up in the Preset Name drop-down list.
For more details about the pre-configured PDF presets and their usage, see Adobe PDF presets in the Acrobat documentation.
- Open PDF Document on Page
Specify a page number to open the generated PDF at the specified page.
- At Zoom
Choose the zoom level at which the PDF is opened. You can choose to zoom in to show the entire page, zoom at width or height, or choose from 10% to 400% zoom levels.
- Layout
Choose the page layout to display the PDF. You can choose to display only a single page, two pages in a continuous flow, or any other option from the available list.
- Primary Output Purpose
Choose the primary purpose of the PDF (online or print). If you select Print, then a high-quality PDF is created that is suitable for printing. If you select the Online option, a lightweight PDF is created that loads quickly on the web. In case of the Online option, the Page Size values are not relevant and are not made available for editing.
- Page Range
Specify a page range to create PDF output for all the pages or a range of pages in the source.
- Page Size
Specify the page’s width and height for a PDF that’s created for printing purpose. You can also choose a unit of inches or millimeters for the width and height values.
- Create Tagged PDF
Tags improve the accessibility of a PDF document. FrameMaker uses a predefined mechanism to create tags based on the content. If you select this option, the PDF is created with those predefined tags. See Use the default route to create a tagged PDF for more details.
Note: If you are generating PDF using the LiquidModePDF preset, then the Create Tagged PDF option is selected by default.- Use Acrobat Distiller for PDF Generation
Select this option to use Acrobat Distiller to generate a PDF instead of direct PDF generation. This is recommended when you are using pdfmarks in your documents.
Choose to manually specify the tagging structure for your PDF by configuring it in the PDF Setup dialog. See Use the Distiller route to create a tagged PDF for more details.
- Convert Text and Graphic Colors to RGB
This option is selected by default. This option ensures that the colors that you have used to create text, shapes, and table borders are printed as is in the published PDF. The colors used in images (RGB or CYMK) are rendered as is.
Marks and bleeds are primarily meant for printing documents and a PDF with marks and bleed settings is published in CMYK. However, if you choose the Convert Text and Graphic Colors to RGB option, then even marks and bleeds are published in the RGB color space. Therefore, if you want to publish a PDF for printing (with marks and bleeds), then you must deselect this option.