Working with illustrations
In Adobe FrameMaker, you can draw rectangles, ovals, and polygons, as well as straight and curved lines. You can create complex illustrations by combining several objects, and include text in illustrations. You can also specify object properties (such as fill pattern, line width, and color), and resize, reshape, rotate, and rearrange objects.
You can place illustrations directly on the page, in anchored graphic frames that move with the text, or in unanchored graphic frames that crop the edges of the illustration.
Text frames control placement of the document text.
Graphic frames can be anchored or unanchored and control the position and appearance of graphics.
Anchored frames hold graphics related to specific text and move along with the text as you edit it.
Unanchored frames are used to crop graphics that stay in the same place on the page. You can also use unanchored frames to hold reference art. You draw unanchored graphic frames with the Graphic Frame tool on the Tools panel.
Note: Graphics placed in unanchored frames are not exported to HTML, Microsoft Word, or RTF.If you want the graphic to appear at a specific location on a page (for example, for a logo or a bleed tab), draw or import the graphic directly on the page. If you need to crop a graphic or include it as reference art on a reference page, you place it in an unanchored graphic frame.
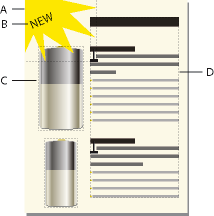
A. Graphic drawn on page B. Text line C. Anchored frame D. Text frame for document text
You can use text frames along with graphics—for example, as callouts or captions. You can also use text frames in anchored frames to create effects such as sidebars. For single lines of text in graphics, you can also use the Text Line tool.
Tools palette overview
You use the dockable Tools panel to select drawing tools and to apply properties. To display the Tools panel, choose .
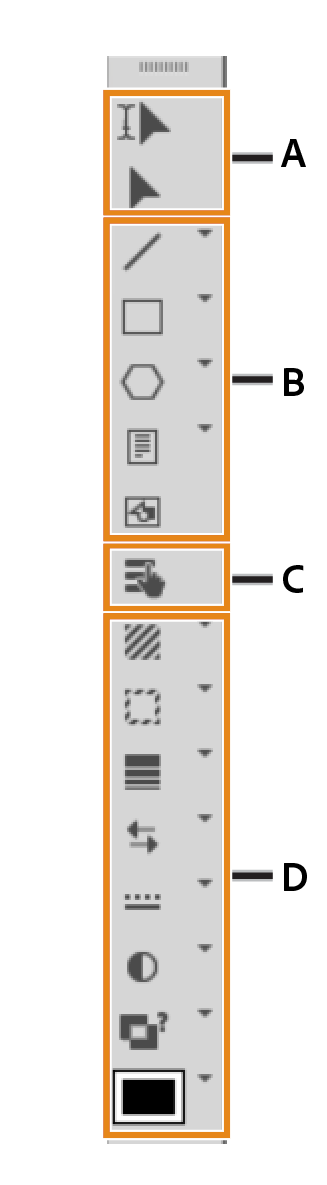
A. Selection tools B. Drawing tools C. Hotspot mode D. Drawing properties
About paths
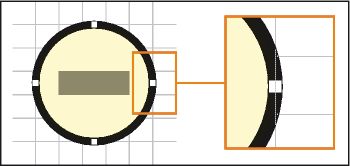
An object’s path is an imaginary line through the center of the object’s border. The path appears as an outline when you draw an object.

FrameMaker uses the path to position objects. For example, when you use the Align command to align objects, the objects are aligned along their paths, not along the outside of their borders. When the snap grid is on as you draw, FrameMaker aligns the path with the snap grid.
About graphic elements in structured documents
When working with structured documents, you use special elements to place graphics. A graphic element provides an anchored frame for holding graphic objects. The frame is anchored to a specific location in text. As you edit the text, the frame and its contents move in the document along with the text. The element appears in the document’s structure, but the graphic or equation itself is not part of the structure.
A new graphic element is either an empty anchored frame or an anchored frame with an imported graphic. When you insert the element, its format rules determine whether you see a dialog box for setting up a frame or for importing a graphic file:
For an element that is an empty anchored frame, you specify the size of the frame, its anchoring position, and some formatting properties such as alignment. You can fill in the frame by drawing, pasting, or importing graphic objects in it.
For an element that is a frame with an imported graphic, you specify the file to import. The graphic appears below the line with the anchor symbol, in a frame large enough for it.
After you’ve inserted a graphic element, you can place different contents in the frame, resize the frame, change the anchoring position, and edit the frame in other ways. These changes are not considered to be format rule overrides.
To align a graphic element in a structured document, you can either define the alignment in the document, using the Attribute panel or in the EDD (the Structured Application associated with the document). If you add a graphic element to a document and do not assign the alignment, by default, FrameMaker will center align the graphic on the document.
Scaling Images in structured documents
An image can be resized by changing either the height, width, or the scaling attributes. In a DITA topic, you can access the height, width, and scaling attributes from the Object Properties or Attributes panel.
Consider the following points while changing the image size attributes in the Object Properties dialog:
If you change the height, width, or both, then you must click the Apply button for the changes to take effect.
If you change the height, width, and scaling attributes, then the values present in the height and width attributes take precedence over the scaling attribute.
If you specify only the scaling attribute, then the height and width of the image is proportionately adjusted. Also, the values in the height and width attributes are updated according to the scaling factor.
Consider the following points while changing the image size attributes in the Attributes dialog:
If you specify a value in the height or width attribute and move the focus to any other attribute, the image is resized immediately.
To scale an image, you must delete any value present in the height and width attributes, and then specify a value in the scale attribute.
If a value is present in the height or width attribute, and you change the scale attribute, then the image would not be scaled. The value present in the height or width attribute takes precedence over the value specified in the scaling attribute.