Know how to crop and mask graphics in FrameMaker, and also work with graphics frame.
When you want to crop the edges of a graphic, place the graphic in an anchored or unanchored graphic frame. An anchored graphic frame moves with the surrounding text. An unanchored graphic frame stays wherever you place it on a page, even when the text around it moves as the result of editing.
When you want to mask an area of a graphic, particularly if the part you want to mask is in the middle of a graphic, you can cover the area with nonbordered objects.
Crop the edges of a graphic frame
Do one of the following to create a graphic frame:
To create an unanchored frame, click the Place a Graphic Frame tool on the Tools panel and then drag to draw the frame. To draw a square frame, Shift-drag.
To create an anchored frame, use .
Do one of the following to put the graphic in the frame:
Drag the graphic into the frame.
Select the graphic, choose , select the frame border, and then choose .
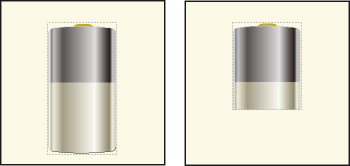
Resize the frame around the graphic.
Mask an area within a graphic frame
Put graphic objects (such as rectangles and polygons) with a white fill and pen pattern in front of the parts you want to mask.