Learn about creating index entries, inserting index markers and marker elements, create index subentries (multi-level indexes) and add cross-references and page ranges for index entries in Adobe FrameMaker.
Understand index markers in Adobe FrameMaker.
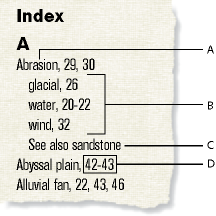
In a typical index, entries are generated from markers and are sorted alphabetically. Entries with the same text are merged into a single entry with several page references. You can add special building blocks to marker text to control the form of the index entry—for example, to specify that it’s a sub-entry or a cross-reference to another entry.
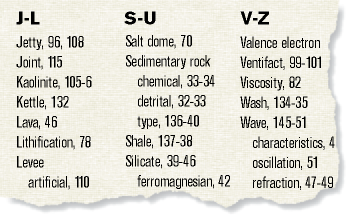
A. Main entry B. Subentries C. Cross-reference to another entry D. Page range
You can also create specialized indexes by using predefined marker types such as Subject or Author, or by using other marker types that you create.
Know how to insert an index marker in a Adobe FrameMaker document.
To create an index marker in a FrameMaker document:
Click where you want to insert the marker or select the word that you want to include in the Index marker.
Choose
.Choose a marker type from the pop‑up menu. Typically, you’ll use the Index marker type. To create several indexes for a document—for example, a subject index and an author index—use a different marker type for each.
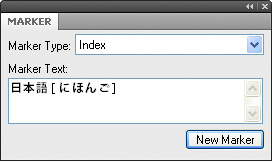
Enter the text of the index entry in the Marker pod. You can enter up to 1,023 characters (511 Japanese double-byte characters). You can also use any of the following building blocks in marker text to control the form of the index entry and its location in the index.
Building block |
Meaning |
---|---|
|
Separates levels in an entry |
|
Separates entries in a marker |
|
Specifies a special sort order for the entry |
|
Indicates the beginning of a page range |
|
Indicates the end of a page range |
|
Suppresses the page number in the entry |
|
In a marker that contains several entries,
restores the page number for an entry that follows a |
Character tag between angle brackets ( |
Changes the character format (for example, |
|
Restores the paragraph’s default font |
If you’re working in Japanese fonts, enter all
these building blocks except the brackets ([ ]
)
using single-byte characters.
Click Create. A marker symbol appears when text symbols are visible.
Know how to insert an index marker in a structured Adobe FrameMaker document.
To create an index marker in a structured document:
Click where you want to insert the marker or select the word that you want to include in the Index marker.
Select a marker element in the Elements catalog and click Insert.
You can also use Element Tag pop-up menu in the dialog box.
to insert an element. If more than one marker element is available, choose the one you want from theTo change the marker type, choose from the Marker Type pop‑up menu. Changing to another type is not a format rule override, even if the element has a type preselected.
Consult your Structured Application developer before changing a marker type. Your document may have a separate element defined for each marker type you’ll need.
You can generate an index from the predefined Index, Subject, and Author marker types. Some custom types may also be available.
Type the text of the index entry. You can enter up to 1,023 characters (511 Japanese double-byte characters). You can also use any of the following building blocks in marker text to control the form of the index entry and its location in the index.
Building block |
Meaning |
---|---|
|
Separates levels in an entry |
|
Separates entries in a marker |
|
Specifies a special sort order for the entry |
|
Indicates the beginning of a page range |
|
Indicates the end of a page range |
|
Suppresses the page number in the entry |
|
Restores the page number for an entry that
follows a |
Character tag between angle brackets ( |
Changes the character format (for example, |
|
Restores the paragraph’s default font |
Click New Marker. If text symbols are displayed, a marker symbol appears in the document window. A bubble for the marker appears in the Structure View, with a text snippet that shows the beginning of the marker’s text.
If the Attributes for New Element dialog box appears, enter attribute values for the marker element and click Insert Element.
If no marker element is available at the location you want, you might use an invalid element. After inserting the element, talk to your developer about making the element valid at this location.
Know how to create index markers fast and easy in Adobe FrameMaker.
To reduce or eliminate typing when creating index markers, do one of the following:
Insert an empty marker or marker element (with no text in it) at the beginning of the word. When you generate the index, the text to the right of the marker, up to the first following space, becomes the text of an entry.
To use text that appears in the document as the marker text, simply select the text in the document. As long as the selected word or phrase doesn’t contain a marker, it automatically appears in the Marker Text box.
Know how to combine several index subentry in one index marker in Adobe FrameMaker.
You can combine multiple index entries in one index marker.
Type several entries in the marker, using a semicolon (;) between entries, as in the following examples.
Marker text |
Result in index |
---|---|
Abrasion; Water erosion |
Abrasion 10 Water erosion 10 |
|
Abrasion 10 Erosion. See Abrasion |
In the second row of the example, the <$nopage>
building
block affects subsequent entries in the marker. To return to a single
page number, <$singlepage>
is included with
the next entry in the marker.
Know how to an index subentry in Adobe FrameMaker.
You can group several entries under one entry for a larger category of information by marking them as subentries. You can also create subentries to subentries.
Separate the entry from the subentry with a colon (:
).
For example, to create the first subentry in the illustration, enter Continental
drift:fossil evidence
.
A subentry is always preceded by the entry to which it is subordinate.
If you need two subentry levels, place a colon between the subentry
and the sub-subentry. For example, enter Continental drift:fossil
evidence:dating of
.
Know how to create a cross-reference in an index entry in Adobe FrameMaker.
Indexes often contain cross-reference entries to direct readers to related terms. This makes it unnecessary to duplicate the entries and page numbers for related terms that already appear in the index.
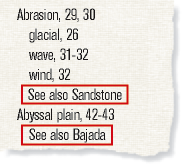
Cross-references can also appear as subentries (usually preceded with See also, as in the illustration). You can sort subentries so that they appear at the top or bottom of the list under the same main entry.
<$nopage>
at
the beginning of the marker text to prevent a page number from appearing
with this entry. For example, to create the first cross-reference
in the illustration, enter <$nopage>Abrasion. See also
Sandstone
.Know how to create page ranges for index entries in Adobe FrameMaker.
In this topic:
You can use a page range such as 36–37 to mark information that spans several pages.
You can create a page range in an entry by manually inserting two markers to indicate the range, one at the beginning of the range and the other at the end. You can also have FrameMaker create page ranges for you automatically whenever the same marker text occurs on consecutive pages of a document. For example, instead of 3, 4, 5, the entry would automatically appear as a page range (3–5).
Insert an index marker
at the beginning of the information, with <$startrange>
at
the beginning of the marker text. For example, to create the first
page number in a range, enter <$startrange>Continental
drift:fossil evidence
.
Add an index marker (or marker element, if working with a
structured document) at the end of the information, identical to
the first except that you enter <$endrange>
rather
than <$startrange>
at the beginning of the marker
text. For example, to create the second page number in a range,
enter <$endrange>Continental drift:fossil evidence
.
If both markers appear on the same page, the page range collapses to a single page number.
Display the reference page that contains the special text flow for indexes.
Type the <$autorange>
building block
at the beginning of the paragraph whose tag begins with the marker
type.
To collapse the entries generated from markers
of type Index into page ranges when possible, edit the paragraph
tag IndexIX to contain the following building blocks: <$autorange><$pagenum>
.
Know how to format text in an index entry in FrameMaker.
You can change the character format of specified text or of the page number in an entry. For example, you may want a book title to appear in italics, or you may want a particular page number to appear in bold. The character format must be stored in the Character Catalog of the index.
Create an index entry. To format part of the entry in a character format, do one of the following:
To format specific text in an entry, type the character
tag between angle brackets ( <
and >
)
before the text and type <Default Para Font>
after
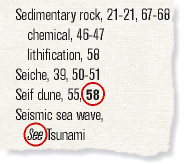
it. For example, to create the entry “Tidal Waves See Tsunami,”
you might enter this marker text: Tidal Waves <Emphasis>See
<Default Para Font> Tsunami
.
Character format
tags affect only the entry they precede. For example, <bold>fruit:strawberry
would
generate a two-line entry that shows “fruit” as bold and “strawberry”
without bold. To format both entries in bold, enter <bold>fruit:<bold>strawberry
.
To format only the page number, type the character tag between
angle brackets at the end of the marker text. For example, to create
the entry “Erosion 24,” you might enter this marker text: Erosion<Bold>
.
Learn to work with group titles in indexes. Create quick access to group titles with cross-references/hyperlinks.
In this topic:
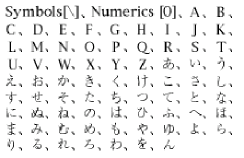
Index entries are initially grouped one letter at a time—all the As, all the Bs, and so on—using the uppercase letter as a group title. In a small index or when only a few entries appear under some letters such as X, Y, and Z , you may want to group letters differently and change the group titles.
FrameMaker inserts group titles as if they were index entries but uses a different paragraph format. It uses the labels and sort positions you specify in the GroupTitles paragraph in the special text flow.
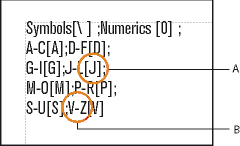
A. Sorting information B. Group title
Choose
, and display the reference page that contains the special text flow for the index.Edit the GroupTitles paragraph in the special text
flow. For example, edit the group titles (the characters between
semicolons, excluding bracketed text), or delete group titles you
don’t want. Type text between brackets ( [ ]
)
to specify where you want the group titles sorted.
For example, to collapse all entries that start with V through Z into a single group whose title sorts under V, edit the GroupTitles paragraph so that its last entry is V–Z[V].
To create an index without group titles, edit the GroupTitlesIX paragraph in the IX text flow on the IX reference page to look like this:
[\ ];[0];[A];[B];[C];[D];[E];[F];[G];[H];[I];[J];[K];[L];[M];[N];[O];[P];[Q];[R];[S];[T];[U];[V];[W];[X];[Y];[Z]
To create an index with neither a group title nor a space between entry groupings, delete all the text in the GroupTitlesIX paragraph in the IX text flow on the IX reference page, but do not delete the paragraph symbol.
Learn how you can work with index sort order, sort by letters and characters, and specify the sort order for Japanese in FrameMaker.
In this topic:
Indexes are sorted so that special symbols appear first, numbers appear second, and alphabetic characters appear last. By default, a few punctuation characters are ignored in sorting, and alphabetic characters appear in the correct sort order for the English language.
You can change where an entry appears in the index by specifying a sort order. For example, even though 486 would normally appear with other numbers in the index, you may want it to appear under F (as if it were spelled out as four eighty-six). Similarly, if you’re using a See also cross-reference in a subentry, you can ensure that it is the last one under the main entry.
Add text between brackets ([ and ]) at the end of the marker text, indicating exactly how you want the entry sorted.
Index marker text |
Result in index |
Explanation |
---|---|---|
|
Neap tides 47 1950s 10 North America 21 |
Sorts under N (for Nineteen fifties) |
|
Erosion rate 32 of soil 10 |
Ignores the word of |
see also Wind
|
Erosion see also Wind rate 16 |
Sorts as the first entry under Erosion |
See also Wind
|
Erosion rate 16 See also Wind |
Sorts as the last entry under Erosion |
You change the sort order by specifying a sort order and by editing the contents of the IgnoreCharsIX and the SortOrderIX paragraphs in the IX text flow of the IX reference page.
The SortOrderIX paragraph in the special text flow contains building blocks that control how characters are sorted in an index.
Each sort order building block represents several characters in a particular order. The following table shows the order for U.S. English. The alphabetic sort order differs slightly for other languages.
Building block |
Characters, in this order |
---|---|
|
0 1 2 3 4 5 6 7 8 9 |
|
A Á À Â Ä Ã Å a á à â ä ã å ª B b C Ç c ç D d E É È Ê Ë e é è ê ë F f ƒ Gg H h I Í Ì Î Ï i ì í î ï J j K k L l M m N Ñ n ñ O Ó Ò Ô Ö Õ Ø o ó ò ô ö õ ø º P p Q q R r S s T t U Ú Ù Û Ü u ú ù û ü V v W w X x Y Ÿ y ÿ Z z |
|
All other characters in ASCII order |
Choose
, and display the reference page that contains the special text flow for the index.Replace a building block in the SortOrderIX paragraph with the specific characters in the order you want them sorted.
Follow these rules when entering a new sort order:
If you
replace <$alphabetics>
with individual characters,
separate the letter groups with a space. (Letter groups—for
example, F f ƒ —are characters that are sorted as if they were the
same character, unless they are the only characters that differ
in the sorted text. In that case, the first character in the string
appears first.)
If you replace <$symbols>
with individual
characters, use a backslash before the angle bracket symbols ( <
> ).
Don’t press Return at the end of a line. Let FrameMaker wrap the characters automatically from line to line.
To indicate that a letter pair should be sorted as a single character, specify the letter pair between angle brackets (< >)—for example, C Ç c ç<CH><Ch><ch>. In this example, all the characters or letter pairs are in the same letter group (the letter C ). The letter pair CH is sorted after the letter C, and uppercase letter pairs are sorted before lowercase letter pairs.
To sort an index letter by letter instead of word by word:
Choose
, and display the reference page that contains the IX text flow for the index.Add a space at the beginning of the IgnoreCharsIX paragraph in the IX text flow of the IX reference page.
Sorted letter by letter |
Sorted word by word |
---|---|
Seabed Sea level Seasonal change Sea walls |
Sea level Sea walls Seabed Seasonal change |
-_–—
You
can specify other characters to be ignored—for example, comma, period,
bracket, braces, quotation and exclamation marks, currency symbols,
and other characters:-_–—,.()[]{}$?!"
To specify the characters to ignore while generating an index:
Choose
, and display the IX reference page that contains the IX text flow for the index.Edit the IgnoreCharsIX paragraph.
To sort symbols, numbers, or other characters in another location in an index:
Choose
, and display the reference page that contains the special text flow for the index.<$numerics><$alphabetics><$symbols>
Kanji characters always need a special sort order defined.
A document
that uses Japanese fonts includes the <$kana>
building
block, which controls sorting of Japanese kana (hiragana and katakana).
Building block |
Characters, in this order |
---|---|
|
Single-byte (half-width) katakana are converted
to double-byte katakana in the generated file when sorted. The sort
order of kanji is determined by its kana pronunciation (yomigana).
Because of this, the <$kana>
building block
also controls how most kanji sort.
The sort order of kanji
without yomigana and of Japanese symbols (double-byte numerics and
Roman alphabetics) is not included by default in the <$kana>
building
block. Instead, kanji is sorted by code value and appended after
characters sorted by <$kana>
.
If you want
to sort kanji without yomigana and Japanese symbols differently,
add these characters to the <$numerics>
, <$alphabetics>
,
or <$kana>
building blocks. For example, double-byte
Japanese characters could be added to the <$symbols>
building
block.
Enter its pronunciation (yomigana) in brackets in the marker text. (Double-byte bracket characters may be used.)
Learn how to generate index for a book and a document. You can also display page numbers in index in FrameMaker.
After you insert index markers in your source document, you can generate a standard index or any other index of markers. When you revise your source document, you can generate the index again to update it.
You ordinarily use predefined marker types. However, you can create your own marker types for special effects in indexes, such as displaying principal entries in bold or adding custom text to some page entries but not to others. The custom text might be the word note to follow some page numbers and figure to follow others. Scholarly indexes might use abbreviations, such as ff and passim after page numbers.
You can also generate a special-use index of references, such as an index of fonts used in a document. This type of index is not generated from markers.
To generate an index for a book:
Open the book window and select the file above where you want the generated file to appear.
Do one of the following:
Choose
.Choose
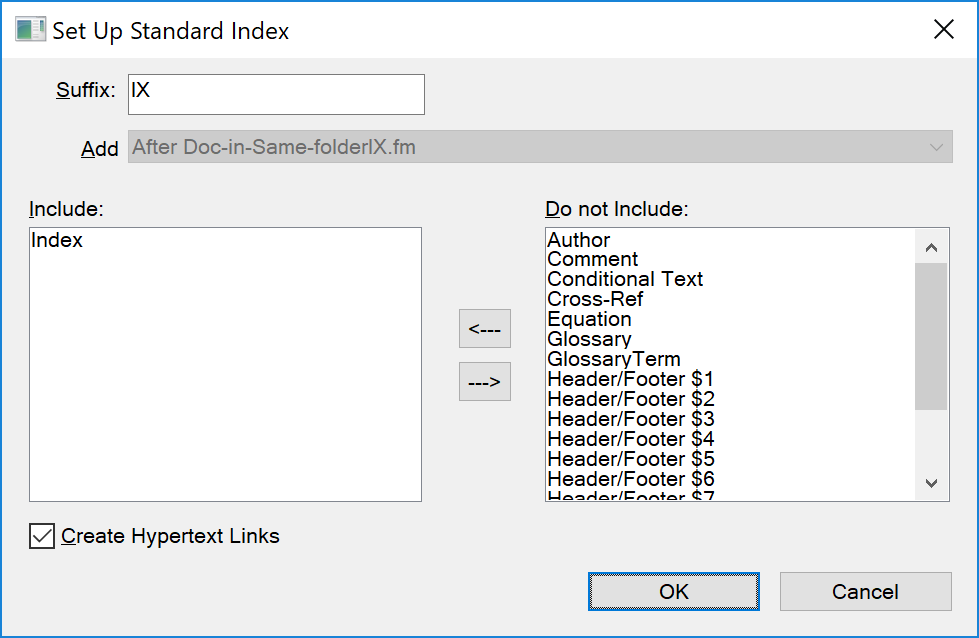
, and then choose the type of specialized index you want to create.Move the marker types you used for the entries to the Include scroll list.
To move an item between scroll lists, select the item and click an arrow button, or double-click the item.
To move all items from one scroll list to the other, Shift‑click an arrow button.
In the Add pop-up menu, specify whether the generated list appears before or after the current document.
Enter a suffix or keep the default one. The suffix indicates the type of generated file. For example, IX is the usual suffix for a standard index.
To link each entry in the generated index to its source, select Create Hypertext Links.
Click OK. FrameMaker generates the index and displays it in a separate document.
Save the index in the same folder as the source document or book. If you want to rename the generated file, use the book window to do so. FrameMaker will rename the file on the disk and update all references.
The first time you generate an index, it uses the page layout of the first nongenerated document in the book, and all entries look the same. You can avoid this unformatted look by using a template. For information on making changes to the format of an index—changes that won’t be lost when you regenerate it.
Save any open files in the book. Open files are updated only in your computer’s memory and not on the disk. If a file isn’t open, the changes are made on the disk.
Do one of the following:
Choose
.Choose
, and then choose the type of specialized index you want to create.When prompted, specify whether you want to create the generated file as a standalone document or add it to a book.
If you choose Yes to create a stand-alone document, FrameMaker will create a generated index in the original document’s folder.
If you choose No, FrameMaker adds the index to an open book, or creates a new book if necessary.
Enter a suffix or keep the default one. The suffix indicates the type of generated file. For example, IX is the usual suffix for a standard index.
To link each entry in the generated index to its source, select Create Hypertext Links.
Do one of the following:
If you are creating a stand-alone index, click OK. FrameMaker generates and displays the index.
If you are adding the index to a book, click Add, and then click Update. If a new book is created, choose
, and then save the book.The first time you generate an index, it uses the page layout of the source document or of the first nongenerated document in the book, and all entries look the same. For information on making changes to the format of an index—changes that won’t be lost when you regenerate it.
Save the index in the same folder as the source document or book.
To generate a standard index that displays page numbers in a variety of ways:
Create one or more custom marker types, and name them
in a way that indicates their intended use. For example, if you
want to distinguish index entries that refer to footnotes, you might
create a marker type called IndexNote
.
Index your source document, using the Index marker type for regular entries and your custom marker types for the others.
Generate the index. Select the Index marker type along with the custom ones.
In the index, edit the special text flow
on the reference page for the custom marker (the reference page
would be called IX) to add text after the page number or to change
character format. For example, you might change the text for IndexNoteIX as
follows to have [note] appear after the page number: <$pagenum>
[note]
.
Update the index again for your edits to take effect.
Learn to update and edit indexes, being a part of a book or a standalone document in FrameMaker.
In this topic:
An index can quickly become outdated. With an index, you typically need to make changes after you review the index for the first time. For example, some entries might not use parallel phrasing, or you may decide to change the organization of some entries.
You edit entries in an index by editing their corresponding paragraphs or markers in the source document and then regenerating the index. If you revise entries by typing directly in the index, your changes will disappear when you regenerate it.
For example, if you fix a typing error directly in an index, that error will reemerge the next time you generate because it still exists in the source marker. To permanently fix an error, you must correct it by changing the marker text in the source document and then regenerating the index.
To update an index that is part of a book:
Make changes to the source document as needed.
In the book window, choose
.Move the lists you want to update to the Generate scroll list, make sure Generate Table of Contents, Lists, and Indexes is selected, and then click Update.
To add or remove items included in an index that is part of a book:
Select the generated index in the book window.
Choose
(or Set Up Index of type).Move items between the list boxes as desired and click Set.
Click Update.
Make changes to the source document as needed.
In the source document, choose the command (such as Standard Index) from the Insert menu, and then choose Yes when prompted to create a stand-alone document.
Move items between the list boxes as desired.
Click OK.
Know how to find the source of index entries, using a link for find/change in FrameMaker.
In this topic:
When you need to revise an entry, you must trace the entry back to its source—the corresponding marker (or marker element, if working with a structured document) in the source document.
The quickest way to find the source of an index entry is to use the hypertext link on the entry in the generated file. This hypertext link can display and select the corresponding information in the source document. If you’re working with a structured document, you can select the element in the Structure View if you can see its bubble.
Another simple way to find and select a marker in the source document is through the Markers pod. The Markers pod displays marker text, the marker type, and document in which the marker is. You can sort the list on marker type to view all the index marker entries in a document. Selecting an entry in the Markers pod automatically highlights the marker in the document. Double-clicking an entry opens the Markers pod for quick editing.
Using the Markers pod makes it easier to select a specific marker if there are multiple markers at exactly the same location in a document.
To find the source of an index entry by using a link:
If you did not select Create Hypertext Links when you generated the index, select this option and regenerate.
Choose
.In the generated index, Alt-Control-click a page reference in an index.
FrameMaker opens the source document to the page that contains the corresponding marker and selects it. The marker text appears in the Markers pod.
To select a marker by using Find/Change:
In the source document (not in the generated list), choose
.Do one of the following:
If you’re working in a FrameMaker document, choose Any Marker, Marker of Type, or Marker Text from the Find pop-up menu. Enter the marker type or marker text as needed.
If you’re working in a structured FrameMaker document, choose Element from the Find pop-up menu, enter the tag of the element you want to find, and click Set.
Click Find.
Learn how to add, edit, or delete markers and marker types, copy a marker type from one document to another in FrameMaker.
In this topic:
You can create your own marker types and then use them in lists or indexes just as you would any other type of marker.
After a new marker type has been created, it can be shared with other documents and books.
To edit or delete a marker:
Select the marker (or element) you want to delete and do one of the following:
Click Delete icon from the Markers pod.
Click Delete Marker button from the Marker pod.
Select the marker (or element) you want to edit, change the text in the Markers pod, and click the Edit marker icon.
To add or delete a custom marker type:
Choose Edit from the Marker Type pop-up menu.
and chooseDo one of the following:
Type a new name and click Add.
Choose a name from the pop-up menu and click Delete.
Click Done.
To copy a marker type from one document to another:
Copy a marker or text containing a marker and paste it in another document.
Choose Document Properties.
and importTo rename a marker type:
Choose Edit from the Marker Type pop-up menu.
and chooseChoose the marker type you want to rename from the pop-up menu and click Change.
Do one of the following:
To rename the specified markers with a new name, enter the new name in the To text box.
To rename the specified markers with the name of another marker type, choose the new marker type from the To pop-up menu.
Click OK.
Click Done.