|

A
host or presenter (or a participant that has been given rights)
can use a whiteboard to create collaborative text, drawings, and
other annotations in a meeting.
Note:
Adobe Connect administrators
can change pod, sharing, and other settings to adhere to standards
for governance. These settings affect the layout of meeting rooms
and what you can do in meeting rooms. For more information, see
Working with compliance and control settings
.
Create and display a whiteboard
A whiteboard allows hosts or presenters to
create text, lines, circles, squares, and other freehand drawings
in real time during a meeting.
You can use a whiteboard in
two different ways in a Share pod:
-
A stand-alone
whiteboard allows presenters to create content on a white background.
-
An overlay whiteboard allows presenters to create content
over an existing document in a Share pod, adding annotations to
and drawing on the document. You can lay a whiteboard over presentations,
JPG, SWF, FLV, and PDF documents.
If you turn off sharing,
change the content in a Share pod, or close the Share pod, the whiteboard
is still part of the meeting room and can be displayed again.
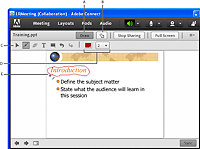
View full size graphic

Whiteboard overlay
-
A.
-
Show/Hide whiteboard overlay
-
B.
-
Pointer
-
C.
-
Whiteboard
tools
-
D.
-
Whiteboard tool options
-
E.
-
Annotation
added using the Pencil tool
Create a stand-alone whiteboard in a blank Share pod
 In the Share pod, choose Share My Screen
> Share Whiteboard.
Add an overlay whiteboard in a Share pod
 With the document displayed in a Share
pod, do one of the following:
-
In the upper-right corner of the Share
pod, click Draw. See
Whiteboard drawing tools
.
-
If you are sharing an application, in the upper-right
corner of the application window, click the arrow next to the Stop
Sharing button, and select Pause and Annotate.
-
If you are sharing your entire desktop, click the
Connect Add‑in icon
 in
the system tray (Windows) or icon bar (Macintosh) and select Pause
and Annotate.
Display an existing whiteboard
 Select Pods > Share >
[name of whiteboard].
Navigate between multiple whiteboard pages
A stand-alone whiteboard contains multiple
pages that you can move between during a presentation.
 In the lower-left corner of the Share pod, click
the left or right arrow.
Whiteboard drawing tools
In the upper-left corner of the
Share pod, the tools below are available to create text and drawings
on the whiteboard.
-
Selection tool

-
Selects a shape or area of the whiteboard. Click a shape
to select it. Drag on the whiteboard or content to create a selection
rectangle that selects all the shapes within the rectangle. The
selection rectangle has eight control points for resizing the selected
shape or shapes. Shift-drag a corner control point to maintain the
aspect ratio when you resize. Select and drag a shape to move it.
To add a shape to the selection, Shift-click the shape.
-
Pencil tool

-
Creates
a free-form line. You can customize stroke color and stroke weight
by using the color picker and stroke weight pop‑up menu at the lower
part of the Whiteboard pod.
-
Highlighter tool (click Pencil to access)

-
Creates
a free-form thick marker line. You can customize stroke color and
stroke weight by using the color picker and stroke weight pop‑up
menu at the lower part of the Whiteboard pod.
-
Delete Selected

-
Deletes
items selected with the Selection tool.
-
Text tool

-
Creates
a floating multiline text field. You can customize fill color, font
face, and font size by using the color picker, font pop‑up menu,
and font size pop‑up menu. Drag to create a text area where you
can type.
-
Shapes tool

-
Click
and hold to choose from rectangles, ellipses, lines, arrows, and
more. Use the options to the right of the tool to customize appearance.
Drag to expand the shape. Hold down the Shift key while dragging
to create even width and height for shapes, or snap lines every
45 degrees.
-
Undo

-
Undoes
the previous action. You can undo the following actions: drawing
a shape, moving a shape, resizing a shape, clearing the whiteboard,
and changing a shape’s property. There is no limit to the number
of times that you can perform this operation in the pod.
-
Redo

-
Repeats
the previous action.
Print the contents of a whiteboard
 In the upper-right corner of the Share
pod, click the menu icon
 , and
select Print.
|
|
|
