|

Adobe
Connect supports the following solutions for adding audio to meetings and
training sessions. Contact your administrator to find out which
audio conferencing options are available for your account.
Built-in VoIP
Adobe
Connect broadcasts audio in meetings or training sessions using
VoIP and the microphones on attendees’ computer systems. See
Audio in meetings
.
Universal voice audio providers
Universal voice audio providers
enable Adobe Connect to broadcast all telephone-based audio into
a Adobe Connect meeting room over VoIP. Both account administrators
and hosts can configure audio conferencing providers for universal
voice. See
Using universal voice
.
Integrated telephony adaptors without universal voice
These adaptors,
which are extensions to Adobe Connect written in Java, provide communication
between Adobe Connect and specific audio conferencing providers.
Integrated adaptors have advanced call capabilities, allowing hosts
to control the audio conference from the meeting. Adobe provides
several integrated telephony adaptors for hosted installations.
For example, MeetingOne, PGi, and InterCall are integrated telephony
adaptors. Integrated adaptors in licensed installations can also
be configured for universal voice. See
Using integrated adaptors
.
The following table compares the
universal voice and integrated telephony solutions.
|
|
Universal Voice Audio Provider
|
Integrated Telephony Adaptor
|
|
Broadcast audio in Adobe Connect over VoIP
|
Yes
|
Yes, if enabled for universal voice
|
|
Enhanced call control. For example, mute,
hold, and so on.
|
No
|
Yes
|
|
Record audio with Adobe Connect meeting
|
Yes
|
Yes
|
|
Requires Flash Media Gateway (bundled in
the Adobe Connect installer)
|
Yes
|
No
|
Using universal voice
Workflows for universal voice
The
universal
voice
solution enables you to conduct a live audio conference
with meeting participants over VoIP. Participants hear any telephone-based
audio through their computer speakers and can broadcast their voices
either via telephone or computer microphone. Hosts can record the
audio conference with the Adobe Connect meeting.
Configure a universal voice audio provider (administrators/hosts)
Administrators configure audio providers for all users
of an account. Hosts configure audio providers for their personal
use in audio conferences.
1. Add or edit an audio provider.
You
can configure virtually any audio provider to use universal voice
functionality, as long as an account exists with the provider. The
first step is to set up identification details, including the name
of the provider and telephone numbers for dialing into the meeting.
See
Create or edit audio providers
.
2. Add a dialing sequence.
For
hosted accounts, the Adobe Connect server uses the dialing sequence
to join the audio conference in the background when the host joins
the conference in the meeting room. In this step, you set up the
conference number, DTMF tones, and pauses for dialing into an audio
conference. See
Define a dialing sequence
.
3. Test the dialing sequence.
To
verify that the dialing sequence works as expected, you can execute
the steps, including the user-defined steps, and then adjust the
dialing sequence accordingly. See
Test a dialing sequence
.
Create and use an audio profile (administrators/hosts)
1. Create an audio profile.
For
any audio provider in your account, you can create one or more audio
profiles for setting up audio conferences. See
Create and use audio profiles
.
2. Create a meeting and select an audio profile.
You create a meeting using the Meeting
wizard, but instead of entering audio conference settings manually,
you select one of your audio profiles. These audio profiles contain
the conference settings for the audio provider. See
Associate an audio profile with a meeting
.
Start an audio conference (hosts)
1. Enter the meeting room.
Hosts start the meeting, and participants receive
an invitation by e-mail or instant message to join the meeting.
See
Join a meeting
.
2. Start the audio conference.
From
the meeting room, hosts start the audio conference so that Adobe
Connect can join the conference. See
Start meeting audio
.
3. (Optional) Record the audio conference.
Hosts can record any telephone-based audio
along with the web conference. The audio is played back with the
audio conference. See
Record a meeting
.
Best practices for starting a universal voice conference
If a host starts an audio
conference as a
moderator
and then leaves the meeting room
or is disconnected, the conference ends for all participants. However,
if a host starts the audio conference as a
participant
and
then leaves the meeting room, the audio conference continues for
the remaining participants.
To avoid ending the audio conference if you leave the meeting
room, do the following:
-
Create an audio profile that uses a participant code
to start the audio conference. See
Create and use audio profiles
.
For user-configured providers,
make sure that the dialing sequence includes a participant text
box. This text box appears when you create an audio profile based
on that provider.
-
Enter the Adobe Connect meeting room, and start the audio
conference.
-
Use a telephone to dial into the meeting.
Using integrated adaptors
Include attendees in an audio conference call
Hosts
have several options for dialing out to include participants in
an audio conference call. You can dial out to a registered participant
by using the telephone number stored in their profile or by entering
a new telephone number. To include an unregistered participant in
the audio conference call only, you can enter a new name and number
to dial.
About audio conference status
After
attendees connect to an audio conference, status icons appear next
to their names.
Note:
Status icons do not appear for user-configured audio providers.
|
Attendee status
|
Icon
|
|
On the phone
|

|
|
Talking
|

|
|
Dialing in progress
|

|
|
On hold
|

|
|
Muted
|

|
Note:
Some audio conference providers do not support the On Hold
feature.
Create and use audio profiles
An
audio profile
is
a collection of audio conference settings that map to an audio provider.
You use audio profiles whenever you use an audio provider with a Connect
meeting.
Audio providers
are companies that offer audio
conferencing services that work with Adobe Connect. For more information
about audio providers, see
Audio conferencing options
.
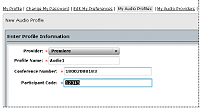
Create an audio profile
All audio profiles include the audio provider and profile
name. The remaining information includes numbers and access codes
that hosts provide for meetings. The text boxes that appear for
entering this information depend on the provider. For integrated
providers, the requested information comes from their configuration
code. For universal voice providers, the requested information comes
from host-defined steps in the dialing sequence. See
Define a dialing sequence
.
Note:
You can ensure that the audio conference
settings and other profile information successfully start an audio
conference. Run the test on the Enter Provider Information page
(Administration > Audio Providers or My Profile >
My Audio Providers, select a provider, and click Edit). See
Test a dialing sequence
.
Meeting hosts, limited administrators, and administrators can
create audio profiles.
-
In Adobe Connect Central, click My Profile >
My Audio Profiles.
-
Click New Profile.
-
Select an audio provider and name the profile.
-
Provider
-
Audio providers configured for universal voice by an account administrator
or host. Selecting a provider binds the audio profile to the information
configured for the provider.
-
Profile Name
-
A unique name that represents something meaningful to you, such
as the purpose of the audio profile.
If
the account administrator or host included a URL for the provider,
it appears in the Profile Information window. This URL can link
to an information page with details on how to create the audio profile.
-
Fill in the remaining information and click Save. Saving
the profile automatically enables it for use.

To enable or disable
an existing audio profile, select it in My Audio Profiles, click
Edit, change the Profile Status menu, and click Save.
Edit or delete an audio profile
You can change the profile
name, and enable or disable an existing audio profile. You cannot
change the audio provider. You specify a provider only when you create
a profile.
-
In Adobe Connect, click My Profile > My Audio
Profiles.
-
Select a profile and click Edit.
-
Change the profile name or status and click Save.
-
To delete an audio profile, select it and click Delete.
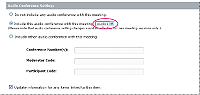
Associate an audio profile with a meeting
When you associate an audio profile with a meeting, you
include the audio conferencing settings defined for the audio provider.
-
Do one of the following:
-
In the Audio Conference Settings section, select Include
This Audio Conference With This Meeting. Select the profile from
the menu and click Save.
All the profiles you created appear
in the menu.
Note:
If you change the audio profile once you start the meeting,
the new conference settings take place only after you end and restart
the meeting. Wait for a few minutes to see the changes.
|
|
|