|

A
host can change the role of any attendee in the Attendees pod, promoting
and demoting attendees as necessary.
About attendee names
Adobe
Connect users who logged in with a password appear with their full
name in the Attendees pod, as it is registered in Adobe Connect
Central. If an attendee is logged in to a meeting as a guest, the
name in the Attendees pod is the name that the guest entered at
login. Within a role group (hosts, presenters, and participants),
attendee names are organized alphabetically.
Customize attendee names
As a meeting host, you can customize the display
name of attendees in the Attendees pod. You can include custom information
in display names, and sort attendees based on the customized display
names.
To add custom information to display names:
-
In the upper-right corner of the pod, click the menu icon.
-
From the pop-up menu, select Preferences.
-
In the dialog box, select Display Name on the left pane and
then select Customize format.
-
From the Available fields list, select predefined custom
fields for the display name, and include them in the Displayed fields
list. The custom fields hold custom information for the attendees.
You can sort attendees based on the information in these fields.
To include additional custom fields, see Add custom fields.
-
Select a custom field in the Available fields list, and then
select a delimiter from the corresponding list at the bottom.
Note:
The
custom changes to the display name attendees reflect immediately
at all places on the Connect interface, including Chat pods and
polls.
To sort attendees based on their customized
display names:
-
In the Attendees pod, click the menu
icon in the upper-right corner.
-
From the pop-up menu, select Preferences.
-
In the dialog box, select Attendees Pod on the left pane.
-
From the Available fields list, select custom fields to sort
attendees, and include them in the Sort by list.
-
Click Done to sort attendees based on the custom fields in
the order they appear in the Sort by list.
To add
custom fields:
Note:
You need administrator rights to modify
custom fields. Modifying custom fields impacts the entire account.
-
From the Connect main menu, click Administration.
-
From the second-level menu, click Users and Groups.
-
From the next-level menu, click Customize User Profile.
-
Click Add Predefined Field to add a custom field in Connect.
Change an attendee’s role

As a host, you can demote
yourself to a presenter or participant, revealing how attendees
with other roles see the meeting room.
-
In the Attendees pod, select one or more attendees.
(Shift-click to select multiple.)
-
Do either of the following:.
-
Drag the attendees to different roles.
-
From the pop-up menu, select Make Host, Presenter,
or Participant.
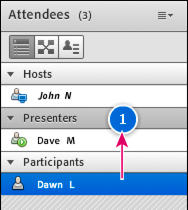
Dragging attendees to different roles
Automatically promote participants to presenters
If all participants in a meeting will be presenting,
do the following:
 Choose Meeting > Manage Access & Entry
> Auto-Promote Participants to Presenters.
Choose Meeting > Manage Access & Entry
> Auto-Promote Participants to Presenters.
Assign enhanced participant rights
Hosts
can change the rights of a participant to give them control over
selected pods. This enhances a participant’s rights without promoting
the participant to the presenter or host role.
-
In the Attendees pod, select the name of one or
more participants.
-
In the upper-right corner of the pod, click the menu
icon
 .
.
-
Select Attendee Options > Enhanced Participant Rights.
-
In the dialog box, select the pods that you want the
participant to control.
Remove an attendee from a meeting
-
In the Attendees pod, select the attendees
you want to remove.
-
In the upper-right corner of the pod, click the menu
icon
, and
choose Remove Selected User.
|
|
|


