|

To add a table titleIn
the Object Library palette, click the Standard category and drag
the Text object  above
the table. above
the table.
Double-click the default text and type the title.
Set the font properties.
 You can also merge the cells in the first row of the table and type the title in the combined cell. You can also merge the cells in the first row of the table and type the title in the combined cell.Adding spaceTo add space around a tableYou can add blank space around the
edges of a table by using margins.
Select the table. See To select a table, row, column, cell, or section.
In the Layout palette, set the margins for Left, Right, Top,
and Bottom.
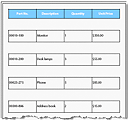
To add space around rowsYou
can add space around rows by using margins. For example, in the
following table, margins are set to 0.25 inch around the row.
Select the row. See To select a table, row, column, cell, or section.
In the Layout palette, set the margins for Left, Right, Top,
and Bottom.
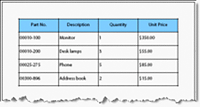
Applying borders and shading to a tableBorders
and shading can add interest and emphasis to a table. You can add borders
to a table or an individual row, column, or cell. You can use shading
to fill in the background of a table.
You can add a striped or alternating shading pattern to the rows.
You can select the number of rows or columns to include in a stripe
pattern and apply your color choices to the pattern.
To apply and remove borders and shadingSelect the
table. See To select a table, row, column, cell, or section.
To apply a border and shading, do one of the following actions:
To place borders only on particular sides, in the Border
palette, select Edit Individually from the Edges list. Now you can
set the border for each side.
To place the same border on all sides, select Edit Together
from the Edges list.
Select an option from the list of line types and select a
color from the color picker.
To apply shading, select a style from the Style list and
select a color from the color picker.
To remove a border or shading do the following action:
In the Border palette, select Edit Together from the Edges
list.
Select None from the list of line types.
To apply a striped or alternating shading to rows
In the Object palette, click the Row Shading tab and select
Apply Alternating Row Shading.
Select the shading color for the first row or first set of
rows.
Select the shading color for the next row or next set of
rows.
Note: If you use the Border palette to set shading for a cell, it overrides the row shading set for the table.
To remove the striped or alternating shading from rows
To remove the border from around the entire table Select the table and, in the Border palette, select None
from the list of line types. Select the table and, in the Border palette, select None
from the list of line types.
To distribute rows and columns evenlyYou
can make multiple rows or columns the same size. All rows adjust
to the height of the tallest selected row. All columns adjust to
equal distances based on the width of the table. The table does
not grow.
Select the rows or columns you want to make the same
size. See To select a table, row, column, cell, or section.
Select Table > Distribute Rows Evenly or Distribute Columns
Evenly.
Note: If you used the Merge Cells command, the original columns still exist but are hidden (so that you can split the cells again if you want). To make the columns the same size after you have merged cells, delete the hidden columns first by using the Table > Delete > Column command.
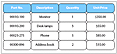
To format the corners of a table or cellsYou can format a table or specific cells
in a table to have rounded or notched corners.
Select the table or the cells. See To select a table, row, column, cell, or section.
In the Border palette, select one of the options for Corners.
In the Radius box, type a number. For example, the previous
example uses .1 inch.
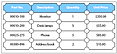
To show captions in rowsBy default, captions for fields are not shown
when a field is in a cell. For example, the following objects have
captions, but they are hidden when the field is in a cell.
Check Box
Date/Time Field
Decimal Field
Signature Field
Drop-down List
Image Field
List Box
Numeric Field
Password Field
Text Field
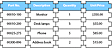
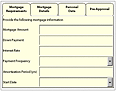
You may want to show the caption in some tables. For example,
in the following form, a table is used to present the information.
Each row below the header row is one cell.
Select the cell. See To select a table, row, column, cell, or section.
In the Layout palette, select a position for the caption
from the Position list.
|
|
|