|

A default process diagram consists of a pool that contains
one swimlane. Swimlanes are horizontal areas that divide the pool.
You can add more swimlanes to better organize operations and improve
the readability of processes. Swimlanes have no effect on the execution
of the process. For this tutorial, only one swimlane is used because
the process is simple.
Add operations to define the steps or activities in your process.
Operations can represent people involved in your automated process
and steps in the process.
In the process diagram, you can drag common operations from the
activity toolbar located at the top of the editor for the process.
The activity toolbar is shown in this illustration.
Add Assign Task operationsIn the editor for PreLoanProcess,
drag the Assign Task  operation
from the activity toolbar and position it between and to the right
of the Default Startpoint and Apply For Preliminary Loan start point
(Workspace start point). Arrows from the start points appear and
connect to the left side of the Assign Task operation. The green
arrowhead on the left side of the operation indicates that this
operation is the first step in the process, or known as the Start Activity. operation
from the activity toolbar and position it between and to the right
of the Default Startpoint and Apply For Preliminary Loan start point
(Workspace start point). Arrows from the start points appear and
connect to the left side of the Assign Task operation. The green
arrowhead on the left side of the operation indicates that this
operation is the first step in the process, or known as the Start Activity.
Click the AssignTask0 text, delete the text, type Review and approve loan form,
and then press Enter.
Drag another Assign Task operation to the process
diagram and position it near the lower-right edge of the process
diagram.
Click the AssignTask1 text, delete the text, type View approval status, and
then press Enter.
After you complete the steps, the process
diagram looks like this illustration.
Add Execute operationsIn the editor for PreLoanProcess,
drag the Set Value  operation
from the activity toolbar and position it near the top of the swimlane
and right of the Review And Approve Loan Form operation. operation
from the activity toolbar and position it near the top of the swimlane
and right of the Review And Approve Loan Form operation.
Click the execute2 text, delete the text, type Set form to APPROVED,
and then press Enter.
Drag another Set Value operation to the process diagram
and position it near the bottom of the swimlane and to the right
of the Review and Approve Loan Form operation.
Click the Execute3 text, delete the text, and type Set form to NOT APPROVED,
and then press Enter.
Add a GeneratePDFOutput operationIn the editor for
PreLoanProcess, drag the Activity Picker  from
the activity toolbar, and position it to the right of the Set Form
To APPROVED operation. The Define Activity dialog box appears and
displays a list of services. from
the activity toolbar, and position it to the right of the Set Form
To APPROVED operation. The Define Activity dialog box appears and
displays a list of services.
In the Find box, type generate. The
services in the list become filtered.
In the list of results, select the generatePDFOutput operation
(Output - 1.1), which is located under the Output service, and click OK.
Click the generatePDFOutput text, delete the text,
type Create PDF form, and then press Enter.
Add a Write Document operationIn the editor for PreLoanProcess,
drag the Activity Picker from
the activity toolbar, and position it on the upper-right corner
of the swimlane. (Beside the Create PDF form operation.) The Define
Activity dialog box appears and contains a list of services.
In the list, click Foundation.
Click the Write Document operation (File Utilities
- 1.0) and click OK.
Click the Write Document text, delete the text, type Save PDF form to network,
and then press Enter.
Select File > Save.
You have added
these operations to the process diagram:
Two Assign
Tasks operations (User service) to represent the loan officer and the
person to route the complete form to
Two Execute operations (Set Value service) to access and
manipulate process variable data
A Generate PDF Output operation (Output service) to create
a PDF form from the approved data
A Write Document operation (File Utilities service) to save
the PDF file to a network location
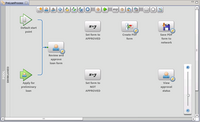
The completed
process diagram looks like this illustration.
|
|
|