|

Routes connect operations and define the order in
which operations execute. Routes, which are represented by arrow
lines, connect operations in the process diagram. You can draw multiple
routes that originate from a step to indicate different paths in
the process. You cannot draw routes from a start point to an operation.
Routes are created automatically to the operation that is set as
the Start Activity.
Draw routesSelect the Review and approve loan form operation.
Four anchors appear around the operation. Each anchor is displayed
as a round circle.
Drag the right anchor to the Set Form To APPROVED operation
and release your mouse button. Notice that, as you drag to the Set
Form To APPROVED operation, an arrow connects the two operations.
(To delete a route, right-click the route and select Delete Route
or press Delete.)
Repeat steps 1 and 2 to draw routes between these operations:
Set Form To APPROVED to Create PDF Form operation
Create PDF Form to Save PDF Form To Network operation
Save PDF Form To Network to View Approval Status operation
Review And Approve Loan Form to Set Form To NOT APPROVED
operation
Set Form To NOT APPROVED to View Approval Status operation
Select File > Save.
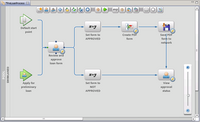
After you draw
the routes, the process diagram looks like this illustration:
|
|
|