|

Prepopulating forms displays data to users
within a rendered form. For example, assume a user logs in to a
website with a user name and password. If authentication is successful,
the client application queries a database for user information.
The data is merged into the form and then the form is rendered to
the user. As a result, the user is able to view personalized data
within the form.
Prepopulating a form has the following advantages:
Enables the user to view custom data in a form.
Reduces the amount of typing the user does to fill in a form.
Ensures data integrity by having control over where data
is placed.
The following two XML data sources can prepopulate a form:
An XDP data source, which is XML that conforms to XFA
syntax (or XFDF data to prepopulate a form created using Acrobat).
An arbitrary XML data source that contains name/value pairs
matching the form’s field names (the examples in this section use
an arbitrary XML data source).
An XML element must exist for every form field that you want
to prepopulate. The XML element name must match the field name.
An XML element is ignored if it does not correspond to a form field
or if the XML element name does not match the field name. It is
not necessary to match the order in which the XML elements are displayed,
as long as all XML elements are specified.
When you prepopulate a form that already contains data, you must
specify the data that is already displayed within the XML data source.
Assume that a form containing 10 fields has data in four fields.
Next, assume that you want to prepopulate the remaining six fields.
In this situation, you must specify 10 XML elements in the XML data
source that is used to prepopulate the form. If you specify only six
elements, the original four fields are empty.
For example, you can prepopulate a form such as the sample confirmation
form. (See “Confirmation form” in Rendering Interactive PDF Forms.)
To prepopulate the sample confirmation form, you have to create
an XML data source that contains three XML elements that match the
three fields in the form. This form contains the following three
fields: FirstName, LastName, and Amount.
The first step is to create an XML data source that contains XML elements
that match the fields located in the form design. The next step
is to assign data values to the XML elements, as shown in the following
XML code.
    <Untitled>
        <FirstName>Jerry</FirstName>
        <LastName>Johnson</LastName>
        <Amount>250000</Amount>
    </Untitled>
After you prepopulate the confirmation form with this XML data
source and then render the form, the data values that you assigned
to the XML elements are displayed, as shown in the following diagram.
Prepopulating forms with flowable layoutsForms with flowable layouts are useful to display an undetermined
amount of data to users. Because the layout of the form adjusts
automatically to the amount of data that is merged, you do not need
to predetermine a fixed layout or number of pages for the form as
you need to do with a form with a fixed layout.
A form is typically populated with data that is obtained during
run-time. As a result, you can prepopulate a form by creating an
in-memory XML data source and placing the data directly into the
in-memory XML data source.
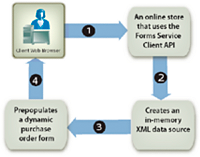
Consider a web-based application, such as an online store. After
an online shopper finishes purchasing items, all purchased items
are placed into an in-memory XML data source that is used to prepopulate
a form. The following diagram shows this process, which is explained
in the table following the diagram.
The following table describes the steps in this diagram.
Step
|
Description
|
|---|
1
|
A user purchases items from a web-based
online store.
|
2
|
After the user finishes purchasing items
and clicks the Submit button, an in-memory XML data source is created.
Purchased items and user information are placed into the in-memory
XML data source.
|
3
|
The XML data source is used to prepopulate
a purchase order form (an example of this form is shown following
this table).
|
4
|
The purchase order form is rendered to the
client web browser.
|
The following diagram shows an example of a purchase order form.
The information in the table can adjust to the number of records
in the XML data.
Note: A form can be prepopulated with data from other
sources such as an enterprise database or external applications.
Form design considerationsForms with flowable layouts are based on form designs that
are created in Designer. A form design specifies a set of layout,
presentation, and data capture rules, including calculating values
based on user input. The rules are applied when data is entered
into a form. Fields that are added to a form are subforms that are
within the form design. For example, in the purchase order form
shown in the previous diagram, each line is a subform. For information
about creating a form design that contains subforms, see Creating a purchase order form that has a
flowable layout.
Understanding data subgroupsAn XML data
source is used to prepopulate forms with fixed layouts and flowable layouts.
However, the difference is that an XML data source that prepopulates
a form with a flowable layout contains repeating XML elements that
are used to prepopulate subforms that are repeated within the form.
These repeating XML elements are called data subgroups.
An XML data source that is used to prepopulate the purchase order
form shown in the previous diagram contains four repeating data
subgroups. Each data subgroup corresponds to a purchased item. The
purchased items are a monitor, a desk lamp, a phone, and an address
book.
The following XML data source is used to prepopulate the purchase
order form.
    <header>
        <!-- XML elements used to prepopulate non-repeating fields such as address
        <!and city
        <txtPONum>8745236985</txtPONum>
        <dtmDate>2004-02-08</dtmDate>
        <txtOrderedByCompanyName>Any Company Name</txtOrderedByCompanyName>
        <txtOrderedByAddress>555, Any Blvd.</txtOrderedByAddress>
        <txtOrderedByCity>Any City</txtOrderedByCity>
        <txtOrderedByStateProv>ST</txtOrderedByStateProv>
        <txtOrderedByZipCode>12345</txtOrderedByZipCode>
        <txtOrderedByCountry>Any Country</txtOrderedByCountry>
        <txtOrderedByPhone>(123) 456-7890</txtOrderedByPhone>
        <txtOrderedByFax>(123) 456-7899</txtOrderedByFax>
        <txtOrderedByContactName>Contact Name</txtOrderedByContactName>
        <txtDeliverToCompanyName>Any Company Name</txtDeliverToCompanyName>
        <txtDeliverToAddress>7895, Any Street</txtDeliverToAddress>
        <txtDeliverToCity>Any City</txtDeliverToCity>
        <txtDeliverToStateProv>ST</txtDeliverToStateProv>
        <txtDeliverToZipCode>12346</txtDeliverToZipCode>
        <txtDeliverToCountry>Any Country</txtDeliverToCountry>
        <txtDeliverToPhone>(123) 456-7891</txtDeliverToPhone>
        <txtDeliverToFax>(123) 456-7899</txtDeliverToFax>
        <txtDeliverToContactName>Contact Name</txtDeliverToContactName>
    </header>
    <detail>
        <!-- A data subgroup that contains information about the monitor>
        <txtPartNum>00010-100</txtPartNum>
        <txtDescription>Monitor</txtDescription>
        <numQty>1</numQty>
        <numUnitPrice>350.00</numUnitPrice>
    </detail>
    <detail>
        <!-- A data subgroup that contains information about the desk lamp>
        <txtPartNum>00010-200</txtPartNum>
        <txtDescription>Desk lamps</txtDescription>
        <numQty>3</numQty>
        <numUnitPrice>55.00</numUnitPrice>
    </detail>
    <detail>
        <!-- A data subgroup that contains information about the Phone>
            <txtPartNum>00025-275</txtPartNum>
            <txtDescription>Phone</txtDescription>
            <numQty>5</numQty>
            <numUnitPrice>85.00</numUnitPrice>
    </detail>
    <detail>
        <!-- A data subgroup that contains information about the address book>
        <txtPartNum>00300-896</txtPartNum>
        <txtDescription>Address book</txtDescription>
        <numQty>2</numQty>
        <numUnitPrice>15.00</numUnitPrice>
    </detail>
Notice that each data subgroup contains four XML elements that
correspond to this information:
Items part number
Items description
Quantity of items
Unit price
The name of a data subgroup’s parent XML element must match the
name of the subform that is located in the form design. For example,
in the previous diagram, notice that the name of the data subgroup’s
parent XML element is detail. This corresponds
to the name of the subform that is located in the form design on which
the purchase order form is based. If the name of the data subgroup’s parent
XML element and the subform do not match, a server-side form is
not prepopulated.
Each data subgroup must contain XML elements that match the field
names in the subform. The detail subform located
in the form design contains the following fields:
txtPartNum
txtDescription
numQty
numUnitPrice
Note: If you attempt to prepopulate a form with a
data source that contains repeating XML elements and you set the RenderAtClient option
to No, only the first data record is merged into
the form. To ensure that all data records are merged into the form,
set the RenderAtClient to Yes.
For information about the RenderAtClient option,
see Rendering Forms at the Client.
Summary of stepsTo prepopulate a form with a flowable layout, perform the
following tasks:
Include project files.
Create an in-memory XML data source.
Convert the XML data source.
Render a prepopulated form.
Include project filesInclude necessary files into your development
project. If you are creating a client application using Java, include
the necessary JAR files. If you are using web services, ensure that
you include the proxy files.
Include project filesInclude necessary files into your development
project. If you are creating a client application using Java, include
the necessary JAR files. If you are using web services, ensure that
you include the proxy files.
Create an in-memory XML data sourceYou can use org.w3c.dom classes
to create an in-memory XML data source to prepopulate a form with
a flowable layout. You must place data into an XML data source that
conforms to the form. For information about the relationship between
a form with a flowable layout and the XML data source, see Understanding data subgroups.
Convert the XML data sourceAn in-memory XML data source that
is created by using org.w3c.dom classes can be
converted to a com.adobe.idp.Document object before
it can be used to prepopulate a form. An in-memory XML data source
can be converted by using Java XML transform classes.
Note: If you are using the Forms service’s WSDL to prepopulate
a form, you must convert a org.w3c.dom.Document object
into a BLOB object.
Render a prepopulated formYou render a prepopulated form just
like other form. The only difference is that you use the com.adobe.idp.Document object
that contains the XML data source to prepopulate the form.
Prepopulating forms using the Java APITo prepopulate a form with a flowable layout by using the
Forms API (Java), perform the following steps:
Include project files
Include client JAR files,
such as adobe-forms-client.jar, in your Java project’s class path.
For information about the location of these files, see Including LiveCycle Java library files.
Create an in-memory XML data source
Create
a Java DocumentBuilderFactory object by calling
the DocumentBuilderFactory class’ newInstance method.
Create a Java DocumentBuilder object by
calling the DocumentBuilderFactory object’s newDocumentBuilder method.
Call the DocumentBuilder object’s newDocument method
to instantiate a org.w3c.dom.Document object.
Create the XML data source’s root element by invoking the org.w3c.dom.Document object’s createElement method.
This creates an Element object that represents
the root element. Pass a string value representing the name of the
element to the createElement method. Cast the return
value to Element. Next, append the root element to
the document by calling the Document object’s appendChild method,
and pass the root element object as an argument. The following lines
of code shows this application logic:
Element root = (Element)document.createElement("transaction");
document.appendChild(root);
Create the XML data source’s header element by calling the Document object’s createElement method.
Pass a string value representing the name of the element to the createElement method.
Cast the return value to Element. Next, append
the header element to the root element by calling the root object’s appendChild method,
and pass the header element object as an argument. The XML elements
that are appended to the header element correspond to the static
portion of the form. The following lines of code show this application
logic:
Element header = (Element)document.createElement("header");
root.appendChild(header);
Create a child element that belongs to the header element
by calling the Document object’s createElement method,
and pass a string value that represents the element’s name. Cast
the return value to Element. Next, set a value
for the child element by calling its appendChild method, and
pass the Document object’s createTextNode method
as an argument. Specify a string value that appears as the child
element’s value. Finally, append the child element to the header
element by calling the header element’s appendChild method,
and pass the child element object as an argument. The following
lines of code show this application logic:
Element poNum= (Element)document.createElement("txtPONum");
poNum.appendChild(document.createTextNode("8745236985"));
header.appendChild(LastName);
Add all remaining elements to the header element by repeating
the last sub-step for each field appearing in the static portion
of the form (in the XML data source diagram, these fields are shown
in section A. (See Understanding data subgroups.)
Create the XML data source’s detail element by calling the Document object’s createElement method.
Pass a string value representing the name of the element to the createElement method.
Cast the return value to Element. Next, append
the detail element to the root element by calling the root object’s appendChild method,
and pass the detail element object as an argument. The XML elements
that are appended to the detail element correspond to the dynamic
portion of the form. The following lines of code show this application
logic:
Element detail = (Element)document.createElement("detail");
root.appendChild(detail);
Create a child element that belongs to the detail element
by calling the Document object’s createElement method,
and pass a string value that represents the element’s name. Cast
the return value to Element. Next, set a value
for the child element by calling its appendChild method, and
pass the Document object’s createTextNode method
as an argument. Specify a string value that appears as the child
element’s value. Finally, append the child element to the detail
element by calling the detail element’s appendChild method,
and pass the child element object as an argument. The following
lines of code show this application logic:
Element txtPartNum = (Element)document.createElement("txtPartNum");
txtPartNum.appendChild(document.createTextNode("00010-100"));
detail.appendChild(txtPartNum);
Repeat the last sub-step for all XML elements to append to
the detail element. To properly create the XML data source used
to populate the purchase order form, you must append the following
XML elements to the detail element: txtDescription, numQty,
and numUnitPrice.
Repeat the last two sub-steps for all data items used to
prepopulate the form.
Convert the XML data source
Create a javax.xml.transform.Transformer object
by invoking the javax.xml.transform.Transformer object’s
static newInstance method.
Create a Transformer object by invoking
the TransformerFactory object’s newTransformer method.
Create a ByteArrayOutputStream object by
using its constructor.
Create a javax.xml.transform.dom.DOMSource object
by using its constructor and passing the org.w3c.dom.Document object
that was created in step 1.
Create a javax.xml.transform.dom.DOMSource object
by using its constructor and passing the ByteArrayOutputStream object.
Populate the Java ByteArrayOutputStream object
by invoking the javax.xml.transform.Transformer object’s transform method
and passing the javax.xml.transform.dom.DOMSource and
the javax.xml.transform.stream.StreamResult objects.
Create a byte array and allocate the size of the ByteArrayOutputStream object
to the byte array.
Populate the byte array by invoking the ByteArrayOutputStream object’s toByteArray method.
Create a com.adobe.idp.Document object by
using its constructor and passing the byte array.
Render a prepopulated form
Invoke the FormsServiceClient object’s renderPDFForm method
and pass the following values:
A string value that
specifies the form design name, including the file name extension.
A com.adobe.idp.Document object that contains
data to merge with the form. Ensure that you use the com.adobe.idp.Document object created
in steps one and two.
A PDFFormRenderSpec object that stores run-time
options.
A URLSpec object that contains URI values
that are required by the Forms service.
A java.util.HashMap object that stores file
attachments. This is an optional parameter and you can specify null if
you do not want to attach files to the form.
The renderPDFForm method
returns a FormsResult object that contains a form
data stream that must be written to the client web browser.
Create a javax.servlet.ServletOutputStream object
used to send a form data stream to the client web browser.
Create a com.adobe.idp.Document object by
invoking the FormsResult object ‘s getOutputContent method.
Create a java.io.InputStream object by invoking
the com.adobe.idp.Document object’s getInputStream method.
Create a byte array populate it with the form data stream
by invoking the InputStream object’s read method
and passing the byte array as an argument.
Invoke the javax.servlet.ServletOutputStream object’s write method
to send the form data stream to the client web browser. Pass the byte
array to the write method.
Prepopulating forms using the web service APITo prepopulate a form with a flowable layout by using the
Forms API (web service), perform the following steps:
Include project files
Create an in-memory XML data source
Create
a Java DocumentBuilderFactory object by calling
the DocumentBuilderFactory class’ newInstance method.
Create a Java DocumentBuilder object by
calling the DocumentBuilderFactory object’s newDocumentBuilder method.
Call the DocumentBuilder object’s newDocument method
to instantiate a org.w3c.dom.Document object.
Create the XML data source’s root element by invoking the org.w3c.dom.Document object’s createElement method.
This creates an Element object that represents
the root element. Pass a string value representing the name of the
element to the createElement method. Cast the return
value to Element. Next, append the root element to
the document by calling the Document object’s appendChild method,
and pass the root element object as an argument. The following lines
of code show this application logic:
Element root = (Element)document.createElement("transaction");
document.appendChild(root);
Create the XML data source’s header element by calling the Document object’s createElement method.
Pass a string value representing the name of the element to the createElement method.
Cast the return value to Element. Next, append
the header element to the root element by calling the root object’s appendChild method,
and pass the header element object as an argument. The XML elements
that are appended to the header element correspond to the static
portion of the form. The following lines of code show this application
logic:
Element header = (Element)document.createElement("header");
root.appendChild(header);
Create a child element that belongs to the header element
by calling the Document object’s createElement method,
and pass a string value that represents the element’s name. Cast
the return value to Element. Next, set a value
for the child element by calling its appendChild method, and
pass the Document object’s createTextNode method
as an argument. Specify a string value that appears as the child
element’s value. Finally, append the child element to the header
element by calling the header element’s appendChild method,
and pass the child element object as an argument. The following
lines of code shows this application logic:
Element poNum= (Element)document.createElement("txtPONum");
poNum.appendChild(document.createTextNode("8745236985"));
header.appendChild(LastName);
Add all remaining elements to the header element by repeating
the last sub-step for each field appearing in the static portion
of the form (in the XML data source diagram, these fields are shown
in section A. (See Understanding data subgroups.)
Create the XML data source’s detail element by calling the Document object’s createElement method.
Pass a string value representing the name of the element to the createElement method.
Cast the return value to Element. Next, append
the detail element to the root element by calling the root object’s appendChild method,
and pass the detail element object as an argument. The XML elements
that are appended to the detail element correspond to the dynamic
portion of the form. The following lines of code shows this application
logic:
Element detail = (Element)document.createElement("detail");
root.appendChild(detail);
Create a child element that belongs to the detail element
by calling the Document object’s createElement method,
and pass a string value that represents the element’s name. Cast
the return value to Element. Next, set a value
for the child element by calling its appendChild method, and
pass the Document object’s createTextNode method
as an argument. Specify a string value that appears as the child
element’s value. Finally, append the child element to the detail
element by calling the detail element’s appendChild method,
and pass the child element object as an argument. The following
lines of code shows this application logic:
Element txtPartNum = (Element)document.createElement("txtPartNum");
txtPartNum.appendChild(document.createTextNode("00010-100"));
detail.appendChild(txtPartNum);
Repeat the last sub-step for all XML elements to append to
the detail element. To properly create the XML data source used
to populate the purchase order form, you must append the following
XML elements to the detail element: txtDescription, numQty,
and numUnitPrice.
Repeat the last two sub-steps for all data items used to
prepopulate the form.
Convert the XML data source
Create a javax.xml.transform.Transformer object
by invoking the javax.xml.transform.Transformer object’s
static newInstance method.
Create a Transformer object by invoking
the TransformerFactory object’s newTransformer method.
Create a ByteArrayOutputStream object by
using its constructor.
Create a javax.xml.transform.dom.DOMSource object
by using its constructor and passing the org.w3c.dom.Document object
that was created in step 1.
Create a javax.xml.transform.dom.DOMSource object
by using its constructor and passing the ByteArrayOutputStream object.
Populate the Java ByteArrayOutputStream object
by invoking the javax.xml.transform.Transformer object’s transform method
and passing the javax.xml.transform.dom.DOMSource and
the javax.xml.transform.stream.StreamResult objects.
Create a byte array and allocate the size of the ByteArrayOutputStream object
to the byte array.
Populate the byte array by invoking the ByteArrayOutputStream object’s toByteArray method.
Create a BLOB object by using its constructor
and invoke its setBinaryData method and pass the
byte array.
Render a prepopulated form
Invoke the FormsService object’s renderPDFForm method
and pass the following values:
A string value that
specifies the form design name, including the file name extension.
A BLOB object that contains data to merge
with the form. Ensure that you use the BLOB object
that was created in steps one and two.
A PDFFormRenderSpecc object that stores
run-time options. For more information, see LiveCycle API Reference.
A URLSpec object that contains URI values
that are required by the Forms service.
A java.util.HashMap object that stores file
attachments. This is an optional parameter and you can specify null if
you do not want to attach files to the form.
An empty com.adobe.idp.services.holders.BLOBHolder object
that is populated by the method. This is used to store the rendered PDF
form.
An empty javax.xml.rpc.holders.LongHolder object
that is populated by the method. (This argument will store the number
of pages in the form).
An empty javax.xml.rpc.holders.StringHolder object
that is populated by the method. (This argument will store the locale
value).
An empty com.adobe.idp.services.holders.FormsResultHolder object
that will contain the results of this operation.
The renderPDFForm method
populates the com.adobe.idp.services.holders.FormsResultHolder object that
is passed as the last argument value with a form data stream that
must be written to the client web browser.
Create
a FormResult object by getting the value of the com.adobe.idp.services.holders.FormsResultHolder object’s value data
member.
Create a BLOB object that contains form
data by invoking the FormsResult object’s getOutputContent method.
Get the content type of the BLOB object
by invoking its getContentType method.
Set the javax.servlet.http.HttpServletResponse object’s content
type by invoking its setContentType method and
passing the content type of the BLOB object.
Create a javax.servlet.ServletOutputStream object
used to write the form data stream to the client web browser by
invoking the javax.servlet.http.HttpServletResponse object’s getOutputStream method.
Create a byte array and populate it by invoking the BLOB object’s getBinaryData method.
This task assigns the content of the FormsResult object
to the byte array.
Invoke the javax.servlet.http.HttpServletResponse object’s write method
to send the form data stream to the client web browser. Pass the
byte array to the write method.
Note: The renderPDFForm method populates
the com.adobe.idp.services.holders.FormsResultHolder object that
is passed as the last argument value with a form data stream that
must be written to the client web browser.
|
|
|