|

You can use the XMP Utilities Java
and web service APIs to programmatically import XMP metadata into
a PDF document. Metadata provides information about a PDF document
such as the document’s author and keywords related to the document.
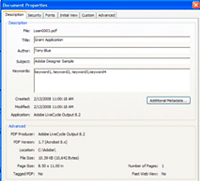
Metadata can be located in the document’s Document Properties dialog,
as shown in the following illustration.
To programmatically import metadata into a PDF document, you
can use an existing XML document that specifies the metadata values
or you can use an object of type XMPUtilityMetadata.
(See LiveCycle API Reference.)
Note: This section discusses how to use an XML document
to import metadata into a PDF document.
The following XML code contains metadata values that correspond
to the previous illustration. For example, notice the bold items,
which specify keywords.
<?xpacket begin="?" id="W5M0MpCehiHzreSzNTczkc9d"?>
<x:xmpmeta xmlns:x="adobe:ns:meta/" x:xmptk="Adobe XMP Core 4.2-jc015 52.349034, 2008 Jun 20 00:30:39-PDT (debug)">
      <rdf:RDF xmlns:rdf="http://www.w3.org/1999/02/22-rdf-syntax-ns#">
         <rdf:Description rdf:about=""
               xmlns:xmp="http://ns.adobe.com/xap/1.0/">
            <xmp:MetadataDate>2008-10-22T10:52:21-04:00</xmp:MetadataDate>
            <xmp:CreatorTool>Adobe LiveCycle Output 8.2</xmp:CreatorTool>
            <xmp:ModifyDate>2008-10-22T10:52:21-04:00</xmp:ModifyDate>
            <xmp:CreateDate>2008-02-13T11:00:18-05:00</xmp:CreateDate>
         </rdf:Description>
         <rdf:Description rdf:about=""
               xmlns:pdf="http://ns.adobe.com/pdf/1.3/">
            <pdf:Producer>Adobe LiveCycle Output 8.2</pdf:Producer>
            <pdf:Keywords>keyword1, keyword2, keyword3,keyword4</pdf:Keywords>
         </rdf:Description>
         <rdf:Description rdf:about=""
               xmlns:xmpMM="http://ns.adobe.com/xap/1.0/mm/">
            <xmpMM:DocumentID>uuid:1cce1f84-331e-4d8d-8538-15441c271dd7</xmpMM:DocumentID>
            <xmpMM:InstanceID>uuid:cdda0ca6-7c91-4771-9dc9-796c8fe59350</xmpMM:InstanceID>
         </rdf:Description>
         <rdf:Description rdf:about=""
               xmlns:dc="http://purl.org/dc/elements/1.1/">
            <dc:format>application/pdf</dc:format>
            <dc:description>
               <rdf:Alt>
                  <rdf:li xml:lang="x-default">Adobe Designer Sample</rdf:li>
               </rdf:Alt>
            </dc:description>
            <dc:title>
               <rdf:Alt>
                  <rdf:li xml:lang="x-default">Grant Application</rdf:li>
               </rdf:Alt>
            </dc:title>
            <dc:creator>
               <rdf:Seq>
                  <rdf:li>Tony Blue</rdf:li>
               </rdf:Seq>
            </dc:creator>
            <dc:subject>
               <rdf:Bag>
                  <rdf:li>keyword1</rdf:li>
                  <rdf:li>keyword2</rdf:li>
                  <rdf:li>keyword3</rdf:li>
                  <rdf:li>keyword4</rdf:li>
               </rdf:Bag>
            </dc:subject>
         </rdf:Description>
         <rdf:Description rdf:about=""
               xmlns:desc="http://ns.adobe.com/xfa/promoted-desc/">
            <desc:version rdf:parseType="Resource">
               <rdf:value>1.0</rdf:value>
               <desc:ref>/template/subform[1]</desc:ref>
            </desc:version>
            <desc:contact rdf:parseType="Resource">
               <rdf:value>Adobe Systems Incorporated</rdf:value>
               <desc:ref>/template/subform[1]</desc:ref>
            </desc:contact>
         </rdf:Description>
      </rdf:RDF>
</x:xmpmeta>
Summary of stepsTo import XMP metadata into a PDF document, perform the
following steps:
Include project files.
Create an XMPUtilityService client.
Invoke the XMP metadata import operation.
Include project filesInclude necessary files into your development
project. If you are creating a client application using Java, include
the necessary JAR files. If you are using web services, ensure that
you include the proxy files.
Create an XMPUtilityService clientBefore you can programmatically
perform an XMP Utilities operation, you must create an XMPUtilityService
client. With the Java API, this is accomplished by creating an XMPUtilityServiceClient object.
With the web service API, this is accomplished by using an XMPUtilityServiceService object.
Invoke the XMP metadata import operationAfter you create the
service client, you can invoke one of the XMP metadata import operations
to import the XMP metadata into the specified PDF document.
Import XMP metadata using the Java APIImport XMP metadata by using the XMP Utilities API (Java):
Include project files
Include client JAR files,
such as adobe-pdfutility-client.jar, in your Java project’s class
path.
Note: The adobe-pdfutility-client.jar file
contains classes that enable you to programmatically invoke the
XMP Utilities service.
Create an XMPUtilityService client
Create an XMPUtilityServiceClient object
by using its constructor and passing a ServiceClientFactory object
that contains connection properties.
Invoke the XMP metadata import operation
To modify
the XMP metadata, invoke either the XMPUtilityServiceClient object’s importMetadata method
or its importXMP method.
If you use the importMetadata method,
pass in the following values:
If you use the importXMP method,
pass in the following values:
In
either case, the returned value is a com.adobe.idp.Document object that
represents the PDF file with the newly imported metadata. You can
then save this object to disk.
Importing XMP metadata using the web service APITo programmatically import XMP metadata using the XMP Utilities
web service API, perform the following tasks:
Include project files
Create an XMPUtilityService client
Create an XMPUtilityServiceService object
by using your proxy class constructor.
Invoke the XMP metadata import operation
To modify
the XMP metadata, invoke either the XMPUtilityServiceService object’s importMetadata method
or its importXMP method.
If you use the importMetadata method,
pass in the following values:
If you use the importXMP method,
pass in the following values:
In either
case, the returned value is a BLOB object that
represents the PDF file with the newly imported metadata. You can
then save this object to disk.
|
|
|