Set up and adjust HTML mappings

Know how to modify and set up adjust HTML mappings, auto level mappings and mappings for formats in FrameMaker.

You can change the following HTML mappings:

After you save a document in HTML format, you may want to refine the mappings.

Note: A few mappings cannot be changed. For example, a FrameMaker table always converts to an HTML table, and an anchored frame always becomes an image with an IMG tag.

Set up or modify HTML mappings

  1. Choose File > Utilities > HTML Setup. The HTML Setup dialog is displayed.

    Figure 1. HTML Setup dialog
    FrameMaker HTML Setup dialog

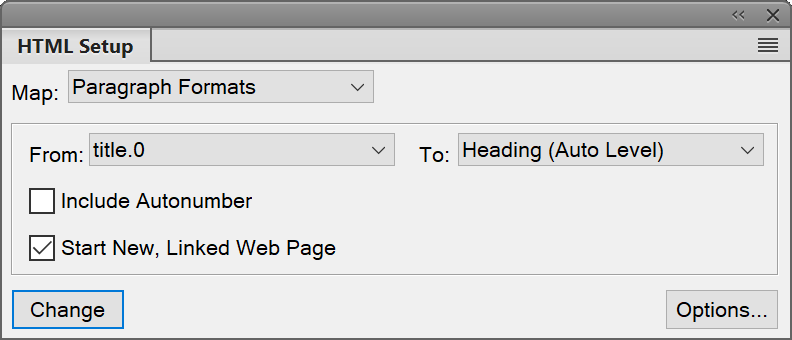
    FrameMaker either loads the current mappings into the HTML Setup dialog box or, if no mappings have been created yet, creates default mappings.

  2. From the Map drop-down list, choose the type of formats to map (Character Formats, Paragraph Formats, or Cross-Reference Formats).

  3. Specify a mapping by choosing a FrameMaker format from the From: drop-down list and an HTML element or macro from the To: drop-down list.

    Tip: You can click in the document to select a format to adjust. The HTML Setup dialog box immediately shows the current mapping for the format you click.
  4. Choose from the following options:

    • If you are mapping paragraph styles and want to include the paragraph autonumber in the converted text, click Include Autonumber. (You do not have to include an autonumber for items in a list.)

    • If you are mapping to Heading (AutoLevel) and want to start a new Web page whenever this format is found, click Start New, Linked Web Page.

      Use this option to break up a long FrameMaker document into several HTML files, each linked to a single file. Whenever the specified format is found, FrameMaker leaves the heading in the original file (the parent file) and makes it a link to a subdocument whose content starts at the heading format and continues until the next instance of the format. For information on using this setting to simulate a table of contents, see Create links that simulate a TOC.

    • If you are mapping to the List Item element for either a bulleted or numbered list, and want to specify how many levels deep the item is (which usually translates as how much the item should be indented), enter a Nest List at Depth value.

  5. Click Change to accept the mapping.

  6. Repeat steps 2 through 5 as needed.

  7. When you finish specifying mappings, close the dialog box and save the document as HTML.

If you want to edit the mapping tables on the HTML reference page, be sure to close the HTML Setup dialog box first. Keeping the dialog box open results in an error when you try to edit the tables on that page.

Autolevel mappings for headings

HTML supports six levels of headings. You can convert any FrameMaker paragraph style to a heading by mapping it to Heading (Autolevel). With this special mapping, headings in the document are mapped to H1, H2, and so on, according to their relative levels and based on the highest-level mapping in that file. The advantage of this method is that if the document is broken into separate HTML files, each will always have an H1 mapping and an appropriate hierarchy of headings under that H1.

For example, suppose your document uses Title1, Title2, and Title3 formats. When you convert to HTML, you might want to break up the document into two files, and the second file might contain only instances of Title2 and Title3. The autolevel feature ensures that Title2 maps to H2 in the first file but maps to H1 in the second file.

For more information on how the autolevel headings work, when you choose to split a document into separate HTML files, see Use the Headings reference page.

If you want to fine-tune the autolevel mechanism or override the autolevel function and make mappings to specific heading levels, you must edit special tables on reference pages of the FrameMaker document. For more information, see Edit the HTML Mapping table.

Mappings for lists

FrameMaker automatically maps bulleted lists to HTML unordered lists and numbered lists to HTML ordered lists. If you want to override the automatic mapping, you must edit a table on the HTML reference page of the FrameMaker document. (See Edit the HTML Mapping table.)

In the HTML Setup dialog box, you can define the level of a list by specifying a value for Nest List at Depth. Typically, a browser displays different levels with different amounts of indentation.

You can include a FrameMaker autonumber in the converted text by choosing Include Autonumber. However, most browsers provide their own bullet characters and numbers with lists, so you are unlikely to use this option when converting lists.

The following table shows paragraph-based HTML elements.

Mapping name in the HTML Setup dialog box

Equivalent HTML element

Recommended use and typical appearance in a Web browser

Heading (AutoLevel)

H1, H2, H3, H4, H5, H6

Six levels of headings, with H1 the largest and most prominent

Paragraph

P

Normal body paragraphs

Preformatted Text

PRE

Text that closely matches the original’s line breaks and spacing; usually achieved by using multiple spaces and a fixed-width font

Address

ADDRESS

Text set off from the rest denoting an e-mail address or the like; usually indented or italicized

Block Quote

BLOCKQUOTE, BQ

A quotation set off by indenting

List Item

LI

Item preceded by a bullet character when it is part of an unordered list (UL), or by a sequential number when it is part of an ordered list (OL)

List Item (Continued)

P

Body paragraph within a list (not preceded by a bullet or number)

Data Term

DT

Item (such as a term in a glossary) that is to be defined by a DD element

Data Definition

DD

Definition of a term (a DT), such as in a glossary item

Data Definition (Continued)

P

Body paragraph within a data definition

Throw Away

None

Discarded during conversion to HTML

The following table shows character-based HTML elements.

Mapping name in the HTML Setup dialog box

Equivalent HTML element

Recommended use and typical appearance in a Web browser

Citation

CITE

A citation, usually displayed in italics or underlined

Code

CODE

Computer-program code, usually displayed in a fixed-width font such as Courier

Definition

DFN

Definition of a term, usually displayed in italics

Emphasis

EM

Emphasized text, usually displayed in italics or underlined

Keyboard

KBD

Text that a user types, usually displayed in a fixed-width font such as Courier

Sample

SAMP

Text that appears in a fixed-width font such as Courier

Short Quotation (Intl)

Q

Quotation of less than a full paragraph, usually displayed in quotation marks (may not be recognized by all browsers)

Span (CSS)

SPAN

Text that is displayed as specified in an HTML style sheet (by browsers that recognize style sheets) or without special formatting (by other browsers). For use when no other mapping is appropriate for example, for a drop cap.

Strong

STRONG

Emphasized text, displayed in bold

Typewriter

TT

Text in a fixed-width font such as Courier

Variable

VAR

A special term or, in programming contexts, the name of a variable, displayed in italics or bold italics

Plain Text

None

Text that cancels any previous character mapping, displayed as appropriate for the paragraph mapping

Throw Away

None

Discarded during conversion to HTML

Mappings for cross-reference formats

A typical cross-reference in a printed document such as “See Syntax on page 8 for more information” loses its meaning in HTML documents, which do not use page numbers. For this reason, cross-references are mapped by default to a predefined cross-reference conversion macro called See Also. The See Also macro changes the cross-reference so that it refers to the text of the paragraph but not to the page number (for example, “See Syntax for more information”). The cross-reference text in the original document becomes an HTML link in the converted document regardless of what format is used.

You can modify the See Also macro, or you can create your own macros and then map cross-reference formats to them.

When you first map a cross-reference, the See Also macro is the only macro in the To drop-down list in the HTML Setup dialog box. If you create other conversion macros, they will appear in this menu as well. For information on how to create and edit cross-reference macros, see HTML conversion macros.

Two other choices in the To: drop-down list let you map a cross-reference in other ways:

Fine-tuning mappings by editing reference pages

You can fine-tune the HTML conversion by editing tables on two special FrameMaker reference pages: the Headings page and the HTML page. If you are converting a book, the reference pages are BookHeadings and BookHTML. (See Convert books to HTML files.) For general information on reference pages, see Reference pages.

Note: Do not edit the information on the HTML reference page unless you are familiar with HTML coding. Most users will not need to edit the tables on this page.

The reference-page tables are set up automatically the first time you save as HTML or the first time you choose File > Utilities > HTML Setup. The Headings reference page contains one table, the Headings table. The HTML reference page contains the following tables:

If the tables are large, the HTML reference page will continue on for as many pages as needed.

Use the Headings reference page

The Headings table on the Headings reference page identifies which tags should be used for headings and what their hierarchy is.

Figure 2. The Headings Table sets up the relative hierarchy of the headings.
Setting up the hierarchy of the headings in the Headings table on the Headings Reference page.

Using this table, you can modify the mappings for headings and the relative levels of those headings.

To Help you identify heading formats, text appears in the same font and point size as the headings do on the body pages of the document.

Edit the Headings table

  1. Choose View > Reference Pages and display the Headings page. The Headings page will not exist until you save the document as HTML, or choose File > Utilities > HTML Setup.

  2. Edit the table by doing the following:

    • To map a different paragraph style to a heading level, change the paragraph style in the second column but do not change the heading level number. For example, if a Tip format is mapped to a level-6 heading but you want the Warning style to be mapped at that level instead, just change Tip to Warning in the second column.

    • To change the relative levels of headings, change the numbers in the Heading Level column. For example, to promote the Warning style to a higher heading level, change the 6 to a 5 in the Heading Level column. (You do not have to change the order of the rows when you do this, but you might want to so that the table is easier to read.)

    • To map several styles to a single level of heading, use the same number in the Heading Level column. For example, the Note and Warning formats are both level-6 headings in the following Headings table.

      Heading Level

      Paragraph Style

      Comment

      6

      Note

      6

      Warning

    • To add a format to the Headings table, press Ctrl+Return to add a row and then fill in the Heading Level and Paragraph Style columns.

  3. If you removed or added formats in the Headings table, change their mappings in the HTML Mapping table as well. For example, you might change the entry of a SubHead style from H* to P in the HTML Mapping table. For more information on editing this table, see the next section.

Edit the HTML Mapping table

The HTML Mapping table on the HTML reference page contains the mappings you assign using the HTML Setup dialog box. (Mappings for headings appear here too, as well as in the Headings table.) You usually do not need to edit this table directly, but you might want to edit it in the following situations:

The first column of the Mapping table contains a FrameMaker source item prefixed with a letter that indicates the type of item: P for paragraph style, C for character style, or X for cross-reference format. The second column can contain the name of an HTML element or an HTML conversion macro name.

Figure 3. The HTML Mapping table on the HTML reference page
Using the HTML Mapping table on the HTML reference page

For information on defining macros, see HTML conversion macros.

Edit a mapping using the HTML Mapping table

  1. Choose View > Reference Pages and display the HTML page.

  2. Locate the Mapping table on that page, and find the format whose mapping you want to change.

  3. Make the following changes as needed:

    • In the Element column, enter the name of the HTML element or conversion macro that the format is to be mapped to. If you are not sure of the correct HTML element name, see the tables in Mappings for lists. Enter H* to map to an autolevel heading.

    • In the New Web Page column, enter Y for Yes to create a separate HTML document whenever this format is found. Otherwise, enter N for No.

    • In the Include Auto# column, enter Y or Yes to include the full autonumber text of this format in the conversion. Otherwise, enter N or No.

    • In the Comments column, enter any text to document the purpose of the mapping, special cases, and so on. You can leave this column blank.

    An edited row might look like this.

    FrameMaker Source Item

    HTML Element

    New Web Page?

    Include Auto#?

    Comments

    P:Fnote

    FOOTNOTE

    N

    N

    Will not work in all browsers

Convert special characters

The FrameMaker character set and the character set used by HTML and the Web are not identical. Because of this, some characters are mapped to substitutions when converted to HTML. Some mappings are internal and rely on special HTML codes called entities. (For example, curved quotation marks are changed to the entity for straight ones.) Other substitutions are defined in the Character Macros table. For example, an em dash is defined as two hyphens. If no mapping exists, the character is ignored.

The following characters either have special predefined mappings or are treated specially.

Character

Default mapping

Where defined

… (ellipsis)

... (three periods)

Character Macros table

— (em dash)

-- (two hyphens)

Character Macros table

– (en dash)

- (one hyphen)

Character Macros table

¢ (cent)

¢ (HTML character reference)

Character Macros table

© (copyright)

© (HTML character reference)

Character Macros table

® (registered)

® (HTML character reference)

Character Macros table

° (degree symbol)

° (HTML character reference)

Character Macros table

< and > (angle brackets)

&lt; and &gt; (HTML entities)

Internal

"

&quot; (HTML entity for ")

Internal

& (ampersand)

&amp; (HTML entity)

Internal

You can add or change mappings for characters by adding or editing entries in the Character Macros table. As the previous table illustrates, you can map characters to text or to HTML character and entity references (which begin with an ampersand and end with a semicolon).

  1. Choose View > Reference Pages and display the Character Macros table on the HTML page.

  2. Edit a mapping, or create a new row (by pressing Ctrl+Return) and enter a new mapping.

If you are unsure how to type a special character in the first column, look up its keystroke.

For example, to set up mappings for the dagger character, the trademark symbol, and the ae ligature, you could add the following rows.

Character

Replace With

Comments

*

Dagger symbol

(tm)

Trademark symbol

æ

&aelig;

ae maps to the HTML entity reference for that symbol