Learn how to publish your DITA map to PDF with Adobe FrameMaker and define which templates FrameMaker should use.
A DITA map in Adobe FrameMaker can be converted into PDF via two routes. First, as a single composite document and other as a book with related components.
If you choose to save your DITA map as a composite document, then FrameMaker uses the default DITA base template to generate the PDF.
If you choose the Save PDF via Book With Components route in the DITA Options tab, then the DITA map file is converted into a .book file. All other referenced topic files are converted into .fm files before the final PDF is generated.
The DITA base template generates a basic PDF without any title, list of figures or tables, table of contents, and other components. However, if you choose to generate the PDF through book with FrameMaker components route, then you get the title page, front matter, back matter, list of figures or tables, table of contents and other book components. Depending on your requirements, you can choose to generate a PDF using any of the available routes.
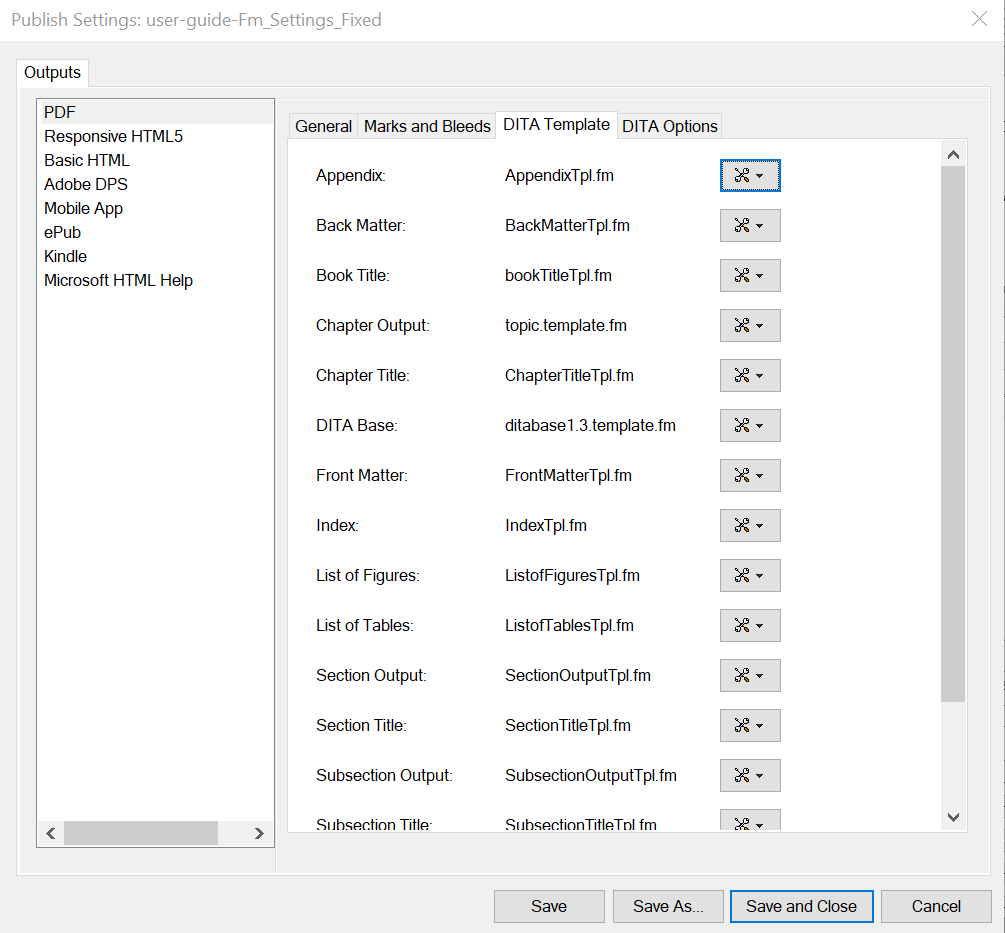
The DITA Template tab contains the templates that you can customize and use to generate a PDF for a DITA map. If you want to customize a template, export the required template, make changes to it, and import it back. The settings icons next to each template gives you the option to export and import a template.

Adobe FrameMaker uses the following templates to generate a PDF through the composite document route:
- DITA Base
This template is used to generate a PDF through the composite document route.
The following templates are used to generate a PDF through the book with FrameMaker components route:
- Appendix
This template defines the styling for appendices in your book. This is a single composite template that contains the master pages for left, right, left section, right section, left subsection, and right subsection.
- Back Matter
This template defines the styling for back matter in your book. This is a single composite template that contains the master pages for left, right, left section, right section, left subsection, and right subsection.
- Book Title
This template defines the styling for the book’s title page.
- Chapter Output
This template defines the styling for the chapter contents. Chapters are essentially DITA topic and concept type documents.
- Chapter Title
This template defines the styling for the chapter’s title page.
- Front Matter
This template defines the styling for front matter in your book. This is a single composite template that contains the master pages for left, right, left section, right section, left subsection, and right subsection.
- Index
This template defines the styling for an index.
- List of Figures
This template defines the styling for the list of figures.
- List of Tables
This template defines the styling for the list of tables.
- Section Output
This template defines the styling for the section within a chapter.
- Section Title
This template defines the styling for the section’s title page.
- Subsection Output
This template defines the styling for the subsection.
- Subsection Title
This template defines the styling for the subsection’s title page
- TOC
This template defines the styling for the table of contents.
Import DITA templates from a folder
The DITA Templates tab allows you to export the desired template one at a time. Once you have customized these templates, you can import them individually or together as a batch. To import a single template at a time, click the settings icons next to the template and choose Import. You can then browse to the location where the template file is stored, select the file, and click Open to import the desired template file.
If you have multiple template files to import, then you can simply provide the folder location and FrameMaker imports all templates from the given folder. To import multiple templates files from a folder, click the icon next to the Import From Folder field and then browse to the location where your template files are stored.
While customizing the template files, ensure that you do not rename the files. You must save your customized templates with the original file name, else FrameMaker will not be able to import the template files. It is not mandatory to have all template files available at the given location. You can choose to customize one or multiple files as per your requirements. FrameMaker imports only those files that it is able to locate in the given folder. The remaining files are skipped.