Copy and arrange objects
Cut, copy, or paste an object by using the clipboard
1)Select the object and choose Edit > Cut, or Edit > Copy.
2)Do one of the following:
•To paste the object on a page, click in the margin of the page.
•To paste the object in an existing graphic frame, click the frame’s border to select the frame.
•To paste the object in text, click in the text where you want to paste the object.
3)Choose Edit > Paste. When you paste the object in a graphic frame or on a page that is the same size as the one from which you copied or cut the object, FrameMaker puts the object in the same relative location. Otherwise, FrameMaker centers the object.
When you paste an object into text, FrameMaker creates an anchored frame to hold the object, and centers the object in the frame. An anchor symbol  appears at the insertion point when text symbols are visible.
Copy an object by dragging
1)Select the object.
2)Point on the object (not on a handle), and Alt-drag the duplicate of the object, or right-drag the object and then choose Copy Here from the menu. To constrain the duplicate object’s movement to either a horizontal or vertical direction, hold down Shift while you drag.
Delete an object
1)Select the object and press Delete.
Move an object
1)Select the object.
2)Do one of the following:
•Drag in the direction you want to move the object.
•To move the object horizontally or vertically, Shift-drag.
•To move an object into a graphic frame, drag it until the pointer is in the frame.
•To move an object out of a graphic frame, drag it until the pointer is outside the frame. As you drag, the frame’s border may temporarily crop the object.
When you drag the object, the status bar shows the distance from the upper-left corner of the object to the upper-left corner of the page (or frame, if the object is in a graphic frame). When rulers are visible, lines in the rulers show you the object’s position. If the snap grid is on, objects snap to the invisible grid as you drag them.
tip: If your screen does not redraw properly when moving an object, press Ctrl+l (lowercase L) to redraw the screen.
•To move an object in small increments, hold down Alt and press an arrow key to move 1 point, or hold down Alt+Shift and press an arrow key to move 6 points. However, do not use an arrow key on the numeric keypad.
The preceding distances assume a 100% zoom setting. The actual distance moved depends on the current zoom setting, so you can do finer work when you’re zoomed in closer. For example, at 200% zoom, the distance is halved. At 50% zoom, the distance is doubled.
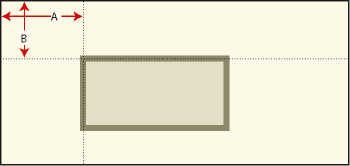
•To specify the exact position of an object, select the object, choose Graphics > Object Properties, do one of the following and apply the changes:
–For all objects except text lines and equations, specify the offset from the top and left edges of the page or graphic frame in the Offset From area.
A. Offset from left B.Offset from top
–For text lines and equations, specify the offset in the Alignment Point Offset area.
Left-aligned text line
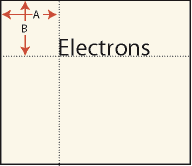
A. Offset from left B. Offset from top
Change the stacking order of objects
When you draw or paste an object, FrameMaker places it in front of all other objects on the page or in a graphic frame. You can control how objects overlap by putting them in front of or in back of other objects.
Circle in front and circle in back

1)Select one of the objects and do one of the following:
•To put an object in front of other objects, choose Graphics > Bring to Front.
•To put an object in back of other objects, choose Graphics > Send to Back.
tip: To create a drop shadow, stack two objects and offset them slightly.
Use gravity and grids to align objects
You can align objects (except graphic frames) with one another along either a horizontal line (by specifying top/bottom alignment) or a vertical line (by specifying left/right alignment.
1)Select the objects and choose Graphics > Align. To align a single object in a graphic frame or on a page—for example, along the left side of a graphic frame—select only the object you want to align.
2)Choose the alignment you want and click Align. To align objects in only one direction, set the other direction to As Is.
FrameMaker aligns the objects—along their paths—with the last object you select. For example, “Top Align” aligns selected objects with the last selected object and is not necessarily the object that is currently highest in the anchored frame.
If you selected objects by dragging a selection border, FrameMaker aligns the objects with the object in the foreground.
Objects have gravity along their paths and at their corners. Rectangles and ovals also have gravity at their centers. Some points on an object exert a greater pull than others. For example, the corners of a triangle attract the pointer more than its sides do.
With Gravity on, an object attracts the pointer as you draw, resize, or reshape a nearby object. Gravity has no effect when you move objects.
Gravity extends the same distance on the screen regardless of the zoom setting. When you zoom in, objects and the space between them appear larger, so you can drag a handle or draw closer to an object without the object attracting the pointer.
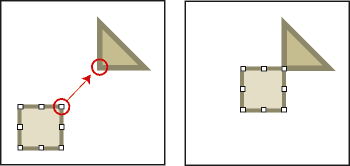
Use gravity to align objects
It’s easier to make objects touch when you use the Gravity feature. If Gravity and Snap are both selected in the Graphics menu, gravity takes precedence.
1)If Gravity isn’t already on, choose Graphics > Gravity.
2)Drag a handle of an object, or draw an object, close to the object to which you want to connect. As you drag, the handle jumps so the two objects touch each other.
Gravity ensures perfect alignment.
Align objects on a grid
The visible grid appears as horizontal and vertical lines onscreen, but not on the printed page. A graphic frame contains its own visible grid, which begins at the upper-left corner of the frame.
The invisible snap grid attracts objects to it. As you draw, rotate, resize, or drag objects (and when you drag indent and tab stop symbols on the ruler), they snap to the invisible grid.
note: If Snap and Gravity are both selected in the Graphics menu, gravity takes precedence.
•To show or hide the visible grid, choose View > Grid Lines. If the visible grid doesn’t appear in a text frame, change the frame’s fill pattern to None.
•To turn the snap grid on or off, choose Graphics > Snap.
•To change the grid spacing, choose View > Options, and do any of the following, and then click Set:
–To set the space between lines in the visible grid, choose the spacing from the Grid Lines pop-up menu.
–To set the interval for the snap grid, enter the interval in the Grid Spacing text box.
–To set the snap interval for rotating objects, enter the number of degrees in the Snap Rotate text box.
tip: If you intend to use the grids together, make the visible grid spacing a multiple of the snap grid interval. For example, if the snap grid spacing is 0.125 inch, you could make the visible grid spacing 0.125 inch, 0.25 inch, or 0.5 inch.
Align text lines
When you create a text line, it is left aligned on its alignment point (where you clicked). You can change the alignment to centered or right aligned. FrameMaker then maintains the text line’s alignment when you insert text.
1)Select the text line and choose Graphics > Object Properties.
2)Choose a new alignment from the Alignment pop-up menu and click Align.
Distribute objects
You can move objects—distribute them—so they have an equal amount of space between them. You can distribute objects horizontally and vertically.
Objects before and after distributing (with zero edge gap)

Equidistant centers and equidistant edges
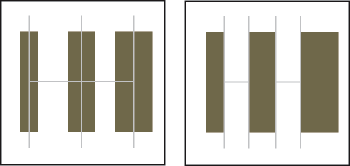
If you specify the exact space between the objects (the edge gap), FrameMaker moves all objects except the one at the left or top. If you specify that the objects’ centers or edges should be equidistant, FrameMaker leaves the left and right, or top and bottom, objects where they are and moves the others.
1)Select the objects and choose Graphics > Distribute.
2)Choose the spacing you want and click Distribute. To distribute objects in only one direction, set the other direction to As Is.
When you specify a large edge gap, objects may move off the page and disappear from sight. If they do, immediately choose Edit > Undo.
Make lines intersect cleanly
Lines intersect cleanly when they are the same thickness, meet at right angles, and use a projecting cap; lines don’t intersect cleanly when they use a projecting cap but don’t intersect at right angles. Notice the different intersections created by using the three line cap styles.
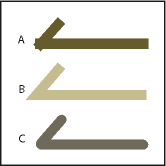
A. Projecting B. Butt C. Round
1)Do one of the following:
•If the lines don’t meet at a right angle, try a round cap for both lines.
•If the lines aren’t the same thickness, try a butt cap for the thinner line when the lines meet at their endpoints and for the stem of a T when they meet in a T.
For information on changing the line cap style, see Change the line end style.
Apply and change drawing properties
Group and ungroup objects
When several objects (except graphic frames) are part of the same graphic, you can group the objects. You can then edit and arrange them as a single object.
You can combine a group of objects with other objects to form an even larger group. Because FrameMaker group and ungroup objects hierarchically, the first set of grouped objects is maintained as a set when you group other objects with it.
•To group objects, select the objects and choose Graphics > Group. One set of handles appears around the group.
Objects selected and then grouped
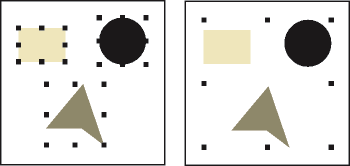
•To ungroup objects, select the group and choose Graphics > Ungroup. Handles appear on each object in the group. When a group has been grouped with other objects, you must choose Ungroup more than once to ungroup all objects.