Apply and change drawing properties
An object’s drawing properties include the fill pattern, pen pattern, line width, line ends, color, and whether the line is solid or dashed. You change drawing properties from pop-up menus on the Tools pod.
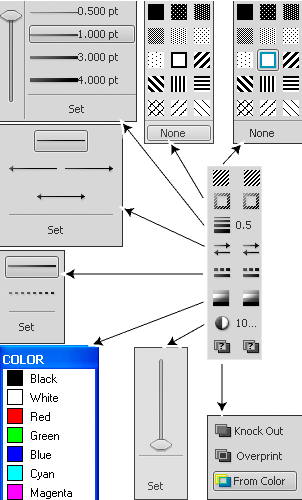
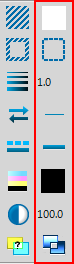
Pop-up menus on the Tools pod
You can change drawing properties before you draw an object, or you can select objects that you’ve already drawn and then change their properties. After you change a property, it becomes the current property—that is, it will be applied to any object you draw. For example, if you choose a line width of 1 point, this is applied to all newly drawn objects until you choose another line width or exit FrameMaker.
You can make objects look alike by applying one object’s properties to another object.
You can also change the colors in the Color pop-up menu and customize the following choices that appear on the Tools pod:
•The values assigned to the line widths that appear in the Line Widths pop-up menu.
•The Line end style, which determines the appearance of any line ends that don’t have an arrowhead.
•The pattern that FrameMaker uses when you choose the dashed line style from the Line Styles pop-up menu. (The pattern that appears in the pop-up menu doesn’t change, but FrameMaker uses the new pattern.)
The new line width settings remain until you change them. The other new settings remain until you change them or exit FrameMaker.
None of the changes described here are applied automatically to existing objects. However, you can apply the new settings to both new and existing objects.
note: Dashed line pattern and polylines may appear solid on screen and in print if the lines are especially thick and contain acute angles or have round or projecting caps. To make the lines print correctly, change the Line Ends Options setting to Butt, use a smaller line width, or redraw the object using separate lines.
Apply a fill pattern or pen pattern to a selected object
1)Choose the pattern from the Fill Pattern pop-up menu  or Pen Pattern pop-up menu
  . You can fill any objects except lines, text lines, and equations.
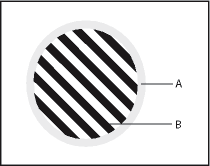
A. Pen pattern B. Fill pattern
The eight gray fill and pen patterns have the following percentages: 100, 90, 70, 50, 30, 10, 3, and 0 (no ink, typically white).
tip: To make an object transparent (so objects in back of it show through), choose a fill pattern of None. If you don’t want the object to have a border, choose a pen pattern of None. To see the border of an object that uses both a pen and a fill pattern of None, choose View > Borders.
Choose a line width for a line or an object’s border
1)Choose a width from the Line Widths pop-up menu  . You can change the line width of any object except text lines.
Change the ends of an arc, a line, a polyline, or a freehand curve
1)Choose the line end from the Set Line End Style pop-up menu  . You can use no arrowhead or place an arrowhead at the beginning, at the end, or at both ends.
Make a line or object’s borders solid or dashed
1)Choose a solid or dashed style from the Dashed Line Pattern pop-up menu  .
.
Inspect an object’s drawing properties or apply them to other objects
1)Select the object that has the properties you want to inspect or copy.
2)Hold down Shift and choose Graphics > Pick Up Object Properties. The properties of the selected object become the current properties on the Tools pod. Any object you draw picks up those properties.
3)To apply the properties to existing objects, select the objects you want to change. In the Tools pod, click the current drawing properties you want to apply to the selected objects.
Current drawing properties
Change line width settings
1)Choose Set from the Line Width pop-up menu on the Tools pod.
2)Do one of the following:
•To change the line widths, enter the new line widths and click Set. You can enter the values in any order. When you click Set, the line widths are sorted from smallest to largest. The widths that appear in the pop-up menu don’t change.
•To revert to the line widths you had when you started FrameMaker, click Get Defaults.
Change the line end style
1)Choose Set from the Set Line End Style pop-up menu on the Tools pod.
2)Select a line end style and click Set.
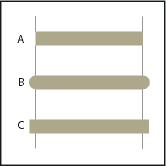
A. Butt B. Round C. Projecting
Change the dashed line style
1)Choose Set from the Set Dashed Line Pattern pop-up menu on the Tools pod.
2)Click one of the patterns and click Set.
You can also create custom dashed line pattern.
tip: To create a dotted line that uses round dots, use a dashed line pattern of short dashes with a round line cap.
Change the arrow style
You can choose from among several preset arrow styles. Arrow styles are determined by their base angle, tip angle, and length.
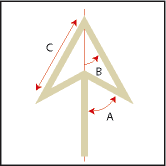
A. Base angle B. Tip angle C. Length
None of the changes described here are applied automatically to existing objects. However, you can apply the new arrow style to both new and existing objects.
1)Choose Set from the Set Line End Style pop-up menu on the Tools pod.
2)Do one of the following:
•Click a preset arrow style and click Set.
•Fill in a custom base angle, tip angle, length, and style, and then click Set. You can use the following values for the custom options.
|
Option |
Values |
|---|---|
|
Base Angle |
Between 10 and 175 degrees (and at least 5 degrees greater than the tip angle) |
|
Tip Angle |
Between 5 and 85 degrees |
|
Length |
Between 0 and 255 points |
|
Style |
Filled Hollow Stick |


FrameMaker ignores the Base Angle option when you use Stick. The length you specify applies to objects that have a line width of 1 point. When you use a thicker line width, the arrowhead is longer.
The following table contains sample custom arrows and their settings.
|
Arrow |
Base Angle |
Tip Angle |
Length |
|---|---|---|---|
|
|
70 degrees |
30 degrees |
10 points |
|
|
80 degrees |
30 degrees |
10 points |
|
|
70 degrees |
15 degrees |
10 points |
|
|
70 degrees |
30 degrees |
5 points |
|
|
120 degrees |
30 degrees |
5 points |


