Print documents
When you print a document, you can specify options such as how many copies to print and whether to print crop marks and registration marks. The available options vary slightly with the platform and the printer you are using. You can also print a book made up of several documents.
When you are working with structured documents, element boundaries, either as brackets or as tags, are printable characters. If you are showing these boundaries in the document window, you should hide them before you print.
If you have turned off graphics in the View Options dialog box, graphics will not appear in the printed document.
The printing feature supports the Unicode text encoding standard.
note: For PostScript printing, use a PostScript Level 2 or higher output device and make sure that you use a print driver and PPD for such a device.
View element boundaries in the document window
Prepare color documents for output
Print to a desktop printer
You can print each page of a document as a composite. A composite page contains all the colors that are used on the page. You print a composite color document when printing to a desktop color printer.
1)Choose File > Print.
2)Specify the page range that you want to print.
3)Make sure that Print Separations is unselected.
4)Set the remaining print options as necessary and click Print.
Print options
The following print options are available for all printers. All these options are in the Print dialog box. For information on additional options available for your printer, see your printer documentation.
note: FrameMaker products for Windows have no control over the abilities or limitations of any printer driver. FrameMaker products can only support printer drivers that have been approved for use in the version of Windows where FrameMaker is running. If you are using an outdated printer driver, you may experience problems, such as lost graphics and characters and the inability to open documents. See the Adobe website for information on installing the latest PostScript drivers.
Collating
To print one complete copy before printing the next copy, select Collate when you are printing multiple copies. Printing might be slower when Collate is selected.
Printing double-sided
To print a double-sided document when you are not using a duplex printer, print the odd-numbered pages, turn the paper over in the printer, and print the even-numbered pages. Depending on how your printer produces pages, you may need to select Last Sheet First before you click Print, because turning the paper over in the printer may reverse the page order.
Changing page order
To print a document starting with the last page, select Last Sheet First.
Printing more quickly
To print a document more quickly, select Low-Resolution Images. The imported images are printed as gray boxes.
Printing crop marks and registration marks
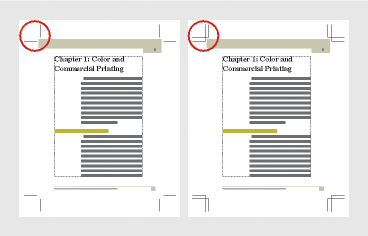
To print a document with crop marks and registration marks, choose an option from the Registration Marks pop-up menu. In some instances, you may want to scale down the printed page image so that crop marks and registration marks will fit on the page.
You can choose between Western and Tombo (Japanese) crop marks.
Western and Tombo crop marks

Reducing or enlarging the page image
To print a reduced or enlarged page image centered on the page, enter a percentage in the Scale box.
Printing thumbnails
To print thumbnails (small images of several pages on one page), enter values in the Thumbnails text boxes. In the Rows box, enter the number of thumbnails you want to print down the page. In the Cols box, enter the number of thumbnails you want to print across the page.
Skipping blank pages
To prevent printing blank pages, select Skip Blank Pages.
Printing colors in black and white
To ensure that colored items (FrameMaker drawn images and text) are printed in black and white rather than in shades of gray, select Spot Color As Black/White.
Feeding paper manually
To print the document on paper that is not in your printer paper cassette, choose File > Print Setup. Choose Manual Feed from the Source pop-up menu, and click OK.
note: The Print Document dialog box in FrameMaker contains some options that may also appear in the Windows printer Properties dialog box, such as the number of copies. When you print a document, FrameMaker printer settings override Windows printer settings.
Create PostScript files
You can create a description of a document called a PostScript file (also called a print file). You can use a PostScript file to download the document later to a PostScript printer or to send the document to a service provider for typesetting. In addition, you can create an Adobe PDF file.
Create a single print file from a document
1)Choose File > Print.
2)Select Print to File and enter the path and filename in the box, or click Browse to specify a folder and filename.
tip: You can enter a .ps extension for your PostScript file.
Create a single print file for a book
1)In the book window, choose File > Print Book, or select the documents you want to print and choose File > Print Selected Files.
2)Select Print to File and enter the path and filename in the box, or click Browse to specify a folder and filename. Choose Single File from the Save Book As (or Save Selected Files As) pop-up menu. Then click Print.
Create a series of separate print files for a book
1)In the book window, choose File > Print Book, or select the documents you want to print and choose File > Print Selected Files.
2)Select Print to File and enter the path and filename in the box, or click Browse to select a folder and type a filename. Choose Single File or Separate File for Each Document from the Save Book As or Save Selected Files As pop-up menu. Then click Print.