Print output
Prepare color documents for output
Prepare color documents for commercial printing
You can print each page of a document as a series of color separations. Color separation splits color images into several pages. Each page contains one component color. A commercial printer uses the separations to make printing plates, one for each color.
You can also print mirror and negative images, which is sometimes required when commercially printing to film.
If color objects overlap in your document, you can overprint. Overprinting prints an object (most often a dark one) on top of another color object. You can also create a knockout, in which the top color is printed but colors behind it are not. You can use trapping to ensure that no gap exists between objects.
Print color separations
When you print color separations, choose which colors to print as spot colors, which to print as process colors, and which not to print at all. Text and graphic objects are printed in black for each separation, with shades of gray indicating the percentages of color saturation. The color name of each separation is printed outside the registration marks (if registration marks are on and if there is room on the page).
note: For best results, print CMYK colors as process rather than spot-color inks. You can check plate assignments in the Separations Setup dialog box (File > Print and click Separations Setup).
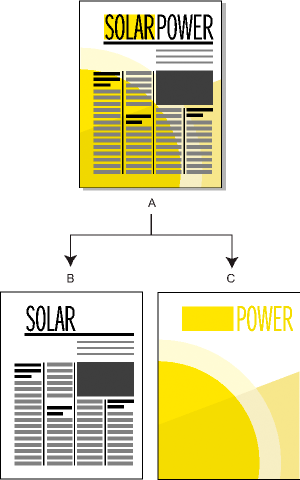
A. Composite image B. Black separation C. Spot color separation
Imported color graphics are separated if they are in CMYK, TIFF, DCS, or EPS line art format. Also, bitmap images in EPS graphics can be separated as long as they can also be separated in Adobe Illustrator.
You can also separate a document by printing to a single PostScript file and then having a commercial printer separate the file for you.
Make sure that spot colors with identical definitions have the same names. Spot colors with the same definition but with different names appear on different plates when you print color separations.
Process color separations are printed using grids of black dots for each color the larger the dots, the more color is printed. The halftone screen settings control how close together the dots appear, the orientation of the grid (the screen angle), and the dot shape. For information, consult your printer documentation and your commercial printer.
Creating color separations
1)Make sure that you have not set colors to print as black and white instead of shades of gray.
2)Choose File > Print.
3)Choose an option from the Registration Marks pop-up menu.
4)To print all pages for one plate and then all pages for the next plate, deselect Collate. Select Collate to print all plates for one page before printing all plates for the next page, and so on.
5)Click Separations Setup. If necessary, move the color names to the appropriate scroll lists and click Set. To move a color, double-click the color. To move all colors, select a color in the list and Shift-click an arrow.
Tints do not appear in this dialog box; they print on the same plate as the base color.
If your printer cannot print process color separations, the dialog box contains only the Print As Spot and Don’t Print scroll lists. The scroll list where each color appears by default depends on how the color was defined on its Print As setting.
6)To specify halftone screen settings, click Halftone Screens, adjust the settings, and then click Set.
7)In the Print dialog box, select Print Separations, set the remaining print options as necessary, and then click Print.
Knock out and overprint colors
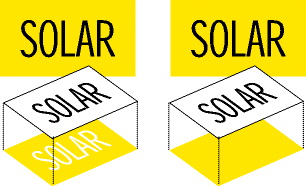
When one color object overlaps another, FrameMaker normally knocks out the overlapped portion so that it does not print in a color separation. It appears as the color of the paper. If you are producing color separations and printing commercially, registration errors sometimes occur, and small gaps between colors appear.
Accurate and inaccurate registration

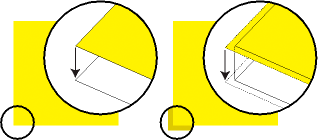
To avoid gaps between colors, you can apply overprinting to the top object so that the overlapped portion is not knocked out.
Knocked out (left) and overprinted (right)
You can also use overprinting to combine two colors for special effects.

Knock out or overprint all objects of a particular color
1)Define a color.
2)To make this color print on top of other colors when printing separations, do one of the following:
•To have any object that uses this color overprint, choose Overprint.
•To have any object that uses this color knock out, choose Knock Out.
Apply knock out or overprint to objects
1)Select the object and open the Tools palette or choose Graphics > Object Properties.
2)Choose one of the following from the Overprint pop-up menu:
•To have this object overprint objects beneath it, choose Overprint.
•To have this object knock out objects beneath it, choose Knock Out from.
•To have this object use the overprint setting defined for the color, choose From Color. This option is the recommended setting.
Overprinting images created in other applications
If you want images created in other applications to overprint other objects when printed from FrameMaker, note these special cases:
•CMYK TIFF files overprint objects on spot color plates under all of the following conditions: if printed as separations, if their Overprint attribute is set to True, and if their Fill property is set to None.
•EPS files do not overprint other objects when printed as separations.
Print negative and mirror images
Your commercial printer sometimes asks you to print negative images in which all text and objects are inverted when you submit printing files on film. Sometimes you print flipped images with the emulsion side down. Emulsion is the photosensitive substance on the film surface. These flipped images mirror the normal appearance of the pages.
note: Sometimes the settings differ depending on the printer driver you are using, and are unavailable with non-PostScript printer drivers.
1)Choose File > Print Setup. Click Properties to access the printer driver options. Locate and set the options that control negative and mirror images.
Trap objects
In commercial printing, overprinting to compensate for registration errors sometimes produces unacceptable color mixing. In this case, perhaps you trap the object instead of overprinting it. A trap is a line bordering the object on top. It is wide enough to fill the color gap and to overprint the other object along the border of its cutout.
Without trapping and with trapping
Having a commercial printer trap your documents saves you the effort of hand-trapping each object individually. Also, manual trapping sometimes must be undone if you later decide to have a commercial printer do the trapping.
1)Create a border for the object on top by duplicating the object and setting the duplicate fill pattern to None. Be sure that the duplicated object is exactly over the original.
2)Set the line width of the border as appropriate. Consider the size and contour of the object, the type of printing paper, and the accuracy of the printing press. Consult your commercial printer for information on suitable line widths for trapping.
The stroke of a line is always centered on an object edge. Therefore, double the line width specification that the commercial printer gives you.
3)Select the border and choose Overprint from the Tools palette.
Processing color documents using OPI
You can have a document color separated, or have all objects in a document or book trapped by printing to a PostScript file. Then have a commercial printer process the PostScript file for you. Creating a PostScript file in this way embeds instructions in the file. These instructions conform to the Adobe Document Structuring Convention (DSC). DSC enhances the performance of postprocessing products that perform trapping and imposition. DSC also lets you take full advantage of products that support Open Prepress Interface (OPI) version 1.3. OPI reduces the hardware overhead for working with high-resolution color images.
OPI-enhanced PostScript files contain information that the commercial printer software uses to match the placeholder images with the high-resolution ones at print time.
note: Before beginning, ask your commercial printer for any special instructions for producing PostScript files.
1)Ask your service bureau or commercial printer to make high-quality scans of your artwork and keep the high-resolution images. You take the OPI-ready low resolution EPS or TIFF versions of the images to work with.
2)Import (by reference or by copying) the low resolution images into your document.
3)Create a print file, or a series of print files for a book.
Print to Linotronic typesetters
Here are some tips for printing to Linotronic typesetters:
•Some Linotronic typesetters automatically place registration marks on the page. Check with your service bureau to see whether to use the Registration Marks setting when you print.
•Not all Linotronic models support thumbnails. Test various thumbnail settings to find the optimum setting. Some Linotronic models print 1 x 2 thumbnails correctly, but not 2 x 2 thumbnails.
•Some Linotronic drivers fail to let you enter a custom paper size even after you have chosen User Defined Size in the Paper Size pop-up menu. To enter a custom paper size, right-click the Linotronic driver and choose Properties. Click the Paper tab, and then select the custom paper size icon from the scroll list of icons.