Generate indexes
After you insert index markers in your source document, you can generate a standard index or any other index of markers. When you revise your source document, you can generate the index again to update it.
You ordinarily use predefined marker types. However, you can create your own marker types for special effects in indexes, such as displaying principal entries in bold or adding custom text to some page entries but not to others. The custom text might be the word note to follow some page numbers and figure to follow others. Scholarly indexes might use abbreviations, such as ff and passim after page numbers.
You can also generate a special-use index of references, such as an index of fonts used in a document. This type of index is not generated from markers.
note: If you are generating an index for an RTL language such as Arabic, Hebrew, or Farsi, ensure that the locale on your computer is set to the locale for that language.
Generate an index for a book
1)Open the book window and select the file above where you want the generated file to appear.
2)Do one of the following:
•Choose Add > Standard Index.
•Choose Add > Index Of, and then choose the type of specialized index you want to create.
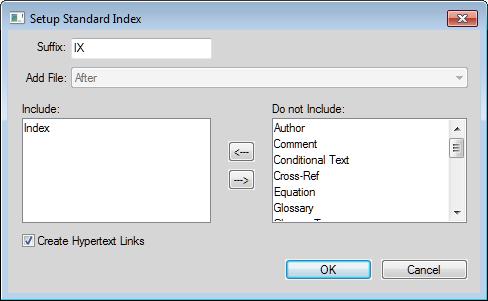
3)Move the marker types you used for the entries to the Include scroll list.
Generating a book index
To move an item between scroll lists, select the item and click an arrow, or double-click the item. To move all items from one scroll list to the other, Shift-click an arrow.
4)In the Add File pop-up menu, specify whether the generated list appears before or after the current document.
5)Enter a suffix or keep the default one. The suffix indicates the type of generated file. For example, IX is the usual suffix for a standard index.
note: The suffix is not the same as the filename’s extension. The suffix is used with paragraph tags in the generated lists, and appears as part of the generated file’s filename, such as UserGuideIX.fm.
6)To link each entry in the generated index to its source, select Create Hypertext Links.
7)Click OK, and then click Update. FrameMaker generates the index and displays it in a separate document.
8)Save the index in the same folder as the source document or book. If you want to rename the generated file, use the book window to do so—FrameMaker will rename it on the disk and update all references.
The first time you generate an index, it uses the page layout of the first nongenerated document in the book, and all entries look the same. (You can avoid this unformatted look by using a template.) For information on making changes to the format of an index—changes that won’t be lost when you regenerate it.
9)Save any open files in the book. Open files are updated only in your computer’s memory and not on the disk. If a file isn’t open, the changes are made on the disk.
Generate an index for a document
1)Do one of the following:
•Choose Special > Standard Index.
•Choose Special > Index Of, and then choose the type of specialized index you want to create.
2)When prompted, specify whether you want to create the generated file as a standalone document or add it to a book.
If you choose Yes to create a stand-alone document, FrameMaker will create a generated index in the original document’s folder. If you choose No, FrameMaker adds the index to an open book, or creates a new book if necessary.
3)Enter a suffix or keep the default one. The suffix indicates the type of generated file. For example, IX is the usual suffix for a standard index.
note: The suffix is not the same as the filename’s extension. The suffix is used with paragraph tags in the generated lists, and appears as part of the generated file’s filename, such as UserGuideIX.fm.
4)To link each entry in the generated index to its source, select Create Hypertext Links.
5)Do one of the following:
•If you are creating a stand-alone index, click OK. FrameMaker generates and displays the index.
•If you are adding the index to a book, click Add, and then click Update. If a new book is created, choose File > Save Book As, and then save the book.
The first time you generate an index, it uses the page layout of the source document or of the first nongenerated document in the book, and all entries look the same. For information on making changes to the format of an index—changes that won’t be lost when you regenerate it.
6)Save the index in the same folder as the source document or book.
Generate a standard index that displays page numbers in a variety of ways
1)Create one or more custom marker types, and name them in a way that indicates their intended use. For example, if you want to distinguish index entries that refer to footnotes, you might create a marker type called IndexNote.
2)Index your source document, using the Index marker type for regular entries and your custom marker types for the others.
3)Generate the index. Select the Index marker type along with the custom ones.
In the index, edit the special text flow on the reference page for the custom marker (the reference page would be called IX) to add text after the page number or to change character format. For example, you might change the text for IndexNoteIX as follows to have [note] appear after the page number: <$pagenum> [note].
4)Update the index again for your edits to take effect.