Manage books
Manage book files
Display filenames or heading text in the book window
1)Do one of the following:
•Click the Display Heading Text icon  .
.
•Click the Display File Names icon  .
.
Exclude book components from output
1)Right-click the book component to exclude and select Exclude.
If you exclude a folder or group, all files within the folder or group are excluded from the outputs. When you update a book, the numbering is automatically updated to account for the excluded files.
Select book components
Select all book components
Choose Edit > Select > All.
Select all generated files in a book
Choose Edit > Select > Generated Files.
Select all nongenerated files in a book
Choose Edit > Select > Nongenerated Files.
Select only FrameMaker files, such as .fm, .book, .mif files
Choose Edit > Select > FrameMaker Files.
Select all excluded files
Choose Edit > Select > Excluded Components
Select all the files that are not marked as Excluded
Choose Edit > Select > Nonexcluded Components.
Select all the book components at the first hierarchical level
Choose Edit > Select > Chapter Components.
Select all book components at the second hierarchical level
Choose Edit > Select > Section Components.
Select all book components at the third hierarchical level
Choose Edit > Select > Sub-section Components.
Rearrange and delete files
When working with structured books, you can rearrange and delete files by working with element bubbles in the Structure View. After you update the book, the text snippets identify the files.
If you delete a file from a structured book you’ve updated, the file may retain some structure information inherited from the book. Remove this information from the file to make it a stand-alone document again.
1)In the book window, select one or more files. Do either of the following:
•Drag the selected files to the desired position in the book window.
•Choose Edit > Delete. Filenames are removed from the book window, but the files remain on the disk.
Rename files
When you rename a file in a book, FrameMaker renames the corresponding file on the disk and updates cross-references, hypertext links, and text inset links in other files in the book.
When you add a generated file (such as a table of contents or index) to a book, the file is assigned a name based on the book’s filename. If you leave generated files with the default filename and rename the book, then the filename is changed in the book, but not on disk. If you rename the generated file so it doesn’t have the default name, renaming the book won’t rename the generated file.
For example, in New.book, you have a generated file with the default name NewTOC.fm. If you rename the book to Samples.book, FrameMaker renames the generated file to SamplesTOC.fm in the book window, but not on disk. But if you rename the generated file as Contents.fm and then rename the book, the generated TOC remains Contents.fm in the book window as well as on disk.
1)Select the file you want to rename, and either choose Edit > Rename or right-click and choose Rename.
2)Type the new name of the file and press Enter. When the alert message appears, click OK to update other files in the book.
Revert to a previously saved version
This procedure affects files that have been added or deleted, as well as settings that have been applied to documents in the book, such as numbering, pagination, color definitions, and file setup specifications. The contents of documents are not changed.
1)Choose File > Revert to Saved Book.
note: This command clears the command history. To undo only selected commands, use the History pod instead of Revert To Saved Book.
Open, close, or save files
You can use a book window to open, save, print, and close individual files in a book. You can also open, save, and close all the files in a book and print and update the format of several files or all files.
When you open a non-FrameMaker document from the book window, the appropriate application, if available, is launched.
1)Do one of the following:
•To open one file in a book or map, make sure only the file is selected and double-click it.
•To open several files in a book, select the files you want to open and press Enter.
•To open all files in the book, hold down Shift and choose File > Open All Files in Book.
note: Using Open All Files in books can be time consuming if there are many cross-references and text insets to update in the file. You can suspend the automatic update of cross-references or text insets by choosing Edit > Suppress Automatic Reference Updating from a book window, selecting the appropriate check box, and then clicking Set. When you open an individual document that has settings for automatic update, cross-references and text insets are still updated.
•To close all files in a book, hold down Shift and choose File > Close All Files In Book.
•To save all files in a book, hold down Shift and choose File > Save All Files in Book. The book file is also saved.
Compare documents
FrameMaker can compare two versions of a document to show you what has changed. FrameMaker compares not only the text in the two versions, but also the footnotes, markers, anchored frames, text insets, variables, and cross-references.
note: For structured documents, FrameMaker additionally compares the structure of the two documents and optionally can compare the attributes within those structures
1)Open both versions of the documents.
2)In the document window of the newer version, choose File > Utilities > Compare Documents.
3)Specify the older version of the document to be compared.
4)Choose the report format. You can either have a summary document or a composite document.
The summary document gives a report of the differences in the files. Composite documents (which have a CMP suffix) show the differences in the files side by side.
5)To set up the comparison options, click Options. The options screen is displayed as follows:
Comparison options
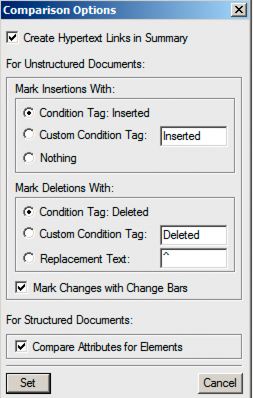
note: To compare attributes within the structures, select Compare Attributes For Elements. If this option is not selected, attributes within the structures are not compared.
6)Click Compare. The results are displayed in the selected reporting format.
7)All differences are displayed with Track Changes. You can accept or reject the changes as desired.
Apply book-wide commands
Many FrameMaker commands can be used across some or all documents in a book. You can change view options, spell-check, or change the page layout of selected files in the book, among other options.
If the document associated with a book is open, FrameMaker applies the book-wide command to the document, but the document is not saved or closed. Therefore, in the case of open documents, you should explicitly save the changes before you close them.
If the document associated with the book is closed, FrameMaker silently opens the document, applies the book-wide commands, then saves and closes the document. If FrameMaker is unable to open a closed file or if other problems occur when you apply the command to a selected file, a message appears in the Book Error Log.
1)In the book window, select the file or files you want to change.
2)Choose the desired command, such as Edit > Spelling Checker.
tip: For .mif and .xml files, open the files before applying a book-wide command.
In structured documents, you can edit attributes, set available elements, and set new element options in the book.