|

Any custom application you write
that uses Adobe® Connect™ Web
Services functionality or integrates with a third-party system needs
to log in a user to Adobe Connect. In its simplest form, the process
of logging in calls the
login
action.
However, the technique for logging in varies according to whether
you use cookie management, have a licensed server or a hosted account,
and authenticate directly to Adobe Connect or use external authentication.
Depending on your environment and server configuration, you might
also use combinations of these options.
-
Cookie management
-
When a user logs in, Adobe Connect returns
a cookie that identifies the user’s session. You need to pass the
cookie back to the server on all calls made to the server during
the user’s session. Then, when the user logs out, the server makes
the cookie expire and you should invalidate it.
In your development
environment, you can use a code library that manages cookies for
you. The process of logging in and managing a user’s session varies according
to whether you use a cookie management library or manage the user’s session
yourself.
-
Licensed server or hosted account
-
Your organization might have a licensed Adobe Connect server
within your firewall, or you may have an Adobe Connect hosted account
at Adobe. Either way, you send XML requests over HTTP or HTTPS,
but security requirements and the login process vary. If you are
a hosted customer, you can use certain parameters with the
login
action
to avoid sending user IDs and passwords over the Internet.
-
Direct or external authentication
-
Whether you are a hosted or licensed customer, your application
might authenticate directly to Adobe Connect, or you might authenticate
users on your own network, set an identifier in an HTTP request
header, and send it to Adobe Connect. The login process varies according to
whether you use direct or external authentication.
Log in to Adobe Connect server
The standard technique for logging
a user in to Adobe Connect server uses the
login
action,
passing the user’s login ID and password. This technique works with
both HTTP
GET
and
POST
requests.
You also need to manage the
BREEZESESSION
cookie
the server returns for each user session. If you use a client-side
cookie management library, it is much easier to allow it to manage
cookies for you than to manage the cookies yourself. If you do not
have such a library, call
login
with the
session
parameter,
as it is easier and more reliable than setting HTTP header values.
Note:
If you send user passwords to Adobe Connect
server, use SSL so passwords are encrypted in transit, even if you
have a licensed Adobe Connect server within your own firewall.
Log in with cookie management
-
Call the
login
action,
passing it the user’s login ID and password, but no
session
parameter:
http://example.com/api/xml?action=login&login=bobs@acme.com
        &password=football
-
Parse the response for a status code of
ok
.
If
the login is successful, the server returns the
BREEZESESSION
cookie
in the response header:
Set-Cookie: BREEZESESSION=breezbryf9ur23mbokzs8;domain=.macromedia.com;path=/
-
Allow your cookie management library to manage the
BREEZESESSION
cookie.
Your
client-side library passes the cookie back to the server in a request
header on subsequent calls for the remainder of the user’s session.
You do not need to set the cookie in the request header explicitly.
When the user logs out, the cookie expires.
Log in using the session parameter
-
Before
you log the user in, call
common-info
to get the
value of the
BREEZESESSION
cookie:
http://example.com/api/xml?action=common-info
-
Extract the cookie value from the response:
<cookie>breezxq66rt43poai3if8</cookie>
-
Log the user in, specifying the cookie value:
http://example.com/api/xml?action=login&login=bobs@acme.com
        &password=football&session=breezxq66rt43poai3if8
-
Parse the response for a status code of
ok
.
-
Use the
session
parameter with the same
cookie value on subsequent calls for the user, until the user’s
session ends:
https://example.com/api/xml?action=principal-list
        &session=breezxq66rt43poai3if8
-
When the user logs out or the user’s session ends, do not
reuse the cookie value.
Log in to a Adobe Connect hosted account
If you want to log in directly to an Adobe
Connect hosted account or multiple hosted accounts, you still use
the
login
action, but you need to specify an account
ID or domain name, in addition to the user’s login ID and password.
You can specify a domain name if you want to avoid sending an account
ID over the Internet.
With an Adobe Connect hosted account, you cannot use single sign-on
or external authentication. You must pass the user’s authentication
credentials on the Adobe Connect hosted account, not the credentials
for an external network.
Note:
It is important to have SSL enabled on your
Adobe Connect hosted account, because you are sending user IDs,
passwords, and account information over the Internet to your Adobe
Connect account hosted at Adobe.
Log in to an Adobe Connect hosted account with an account ID
-
Before
you log the user in, call
common-info
with the
domain name of your Adobe Connect hosted account in either the request
URL or the
domain
parameter:
http://acme.adobe.com/api/xml?action=common-info
http://adobe.com/api/xml?action=common-info&domain=acme.adobe.com
-
Parse the response for the values of
cookie
and
account-id:
<cookie>Sbreezzd2dfr2ua5gscogv</cookie>
...
<account account-id="295153" />
-
Collect the user’s login ID and password in your application.
-
Call the
login
action, adding the user’s
credentials and the
account-id
and
session
parameters:
https://example.com/api/xml?action=login&login=joy@acme.com
    &password=happy&account-id=295153&session=Sbreezzd2dfr2ua5gscogv
-
Parse the response for a status code of
ok
.
-
(Optional) If you prefer, you can call
login
before
common-info
,
extract the cookie value from the response header, and manage it
yourself or using a cookie management library.
Log in to an Adobe Connect hosted account with a domain name
-
Before you log the user in, call
common-info
with
the domain name of your Adobe Connect hosted account in either the
request URL or the
domain
parameter:
http://acme.adobe.com/api/xml?action=common-info
http://adobe.com/api/xml?action=common-info&domain=acme.adobe.com
-
Parse the response for the values of
cookie
and
host
:
<cookie>breezxq66rt43poai3if8</cookie>
...
<host>https://acme.adobe.com</host>
-
Extract the domain name from the value of
host
:
acme.adobe.com
-
In your application, collect the user’s login ID and password.
Be
sure the login ID is the user’s Adobe Connect hosted account login
ID, not an external one.
-
Call
login
, adding the user’s credentials
and the
domain
and
session
parameters:
https://example.com/api/xml?action=login&login=joe
    &password=smith99&domain=acme.adobe.com&session=breezxq66rt43poai3if8
The
domain
is
equivalent to the
account-id
, but by using it you
can avoid sending an account ID over the Internet, especially if
you use a non-encrypted connection.
-
Parse the response for a status code of
ok
.
-
(Optional) If you prefer, you can call
login
before
common-info
,
extract the cookie value from the response header, and manage it
yourself or using a cookie management code library.
Log in using HTTP header authentication
Note:
The instructions in this section apply
only to Adobe Connect server.
Your application can use a trusted
central server to authenticate users with single sign-on and pass
your network’s (here called
external
) authentication to Adobe Connect
server, without explicitly passing an Adobe Connect server user
ID and password. (For detailed instructions on how to set up and
configure HTTP header authentication, see
Adobe Connect Installation and Configuration Guide
).
With
HTTP header authentication, a user logs in to your authentication
server. Once the user is authenticated, you add an HTTP request
header that identifies the user, or configure a proxy server to
add the header. The authentication filter on Adobe Connect (named
HeaderAuthenticationFilter
)
converts your user identifier to an Adobe Connect login ID and authenticates
the user.
View full size graphic
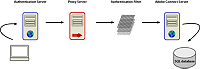
Authentication filters convert external authentication credentials
to Adobe Connect c
redentials.
External authentication works in addition to standard Adobe Connect
authentication. Each user who needs to access Adobe Connect server
needs a valid Adobe Connect server login and password.
When you send a login request to Adobe Connect server with an
external authentication credential:
-
The authentication filter intercepts the request and
checks for a user on Adobe Connect server with an
ext-login
field
that matches your external credential.
-
If a match exists, the filter passes your external authentication
to Adobe Connect server, and the server logs the user in.
-
If no match exists, the filter passes the login request to
the server, which displays its login page. The user must then log
in to Adobe Connect server.
-
If the user logs in successfully, Adobe Connect server updates
the
ext-login
field in the user’s profile with
the external credential from your request. The next time you send
a request with the user’s external credential, Adobe Connect server
finds a match in
ext-login
, and the user does not
need to log in to Adobe Connect.
-
If the user does not log in successfully, the user is not
allowed access to Adobe Connect server applications, content, or
meetings.
The steps that follow describe how to call
login
when
you use HTTP header authentication.
Log in to Adobe Connect server using HTTP header authentication
-
Configure your network servers and
Adobe Connect server for HTTP header authentication using the instructions
in
Adobe Connect Installation and Configuration Guide
.
-
In
[your server directory]
/appserv/conf/WEB-INF/web.xml,
remove comment tags around the
filter-mapping
element
for
HeaderAuthenticationFilter
and add comment
tags around any other
filter-mapping
elements:
<filter-mapping>
    <filter-name>HeaderAuthenticationFilter</filter-name>
    <url-pattern>/*</url-pattern>
</filter-mapping>
<!--
<filter-mapping>
<filter-name>NtlmAuthenticationFilter</filter-name>
<url-pattern>/*</url-pattern>
</filter-mapping>
-->
-
In the
filter
element for
HeaderAuthenticationFilter
,
enable the
/api/
pattern for request URLs. You
have two choices for how to do this:
-
If your
application uses the XML API and any Adobe Connect applications
-
In the
filter
element for
HeaderAuthenticationFilter
,
use comment tags to disable the
init-param
element
with a
param-value
of/
api/
:
<!--
<init-param>
    <param-name>ignore-pattern-0</param-name>
    <param-value>/api/</param-value>
</init-param>
-->
-
If your application uses only the XML API
-
Change the
filter-mapping
element for your
filter type to use the URL pattern
/api/*
instead
of
/*
:
<filter-mapping>
    <filter-name>HeaderAuthenticationFilter</filter-name>
    <url-pattern>/api/*</url-pattern>
</filter-mapping>
Then, in the
filter
element
for your filter type, add comment tags around all
init-param
elements
with a
param-name
of
ignore-pattern-
x
:
<filter>
    <filter-name>HeaderAuthenticationFilter</filter-name>
        <filter-class>
            com.macromedia.airspeed.servlet.filter.HeaderAuthenticationFilter
        </filter-class>
<!--
    <init-param>
        <param-name>ignore-pattern-0</param-name>
        <param-value>/api/</param-value>
    </init-param>
    ...
    <init-param>
        <param-name>ignore-pattern-4</param-name>
        <param-value>/servlet/testbuilder</param-value>
    </init-param>
-->
</filter>
-
Configure Adobe Connect server so that users are created
with the field
ext-login
set to the external user
ID you send (see
Adobe Connect Installation and Configuration Guide
for
details).
By default,
ext-login
has the same
value as
login
, the Adobe Connect server login
ID.
-
Once your system authenticates the user, create a
login
request.
Add the parameter
external-auth=use
, but no
login
or
password
parameters:
https://example.com/api/xml?action=login&external-auth=use
-
Add your authenticated user ID to the HTTP request header.
By default, use the header name
x-user-id
:
x-user-id: joesmith
You
can specify a different header name by setting a value for
HTTP_AUTH_HEADER
in
the custom.ini file. You can also configure a proxy server to set
the HTTP header value. See
Adobe Connect Installation and Configuration Guide
for
details of either.
-
Parse the response for a status code of
ok
.
-
Handle the
BREEZESESSION
cookie value returned
in the response header. You have two choices for how to do this:
-
If you use a client library that manages cookies
-
Allow your library to extract the cookie value, store it,
and pass it back to the server on subsequent requests for the user.
-
If you manage cookies yourself
-
Extract the value of the
BREEZESESSION
cookie
from the response header. Store it and pass it back to the server
in the
session
parameter of all subsequent actions
you call for the same user, as long as the user’s session is valid:
https://example.com/api/xml?action=principal=list&session=breezs7zuepmy9wh2tseu
Be
sure not to reuse the cookie value when the user’s session ends.
|
|
|


