|

Adobe Connect Desktop is an AIR application that lets you
manage meetings and recordings locally, with or without a web connection.
If you work with large numbers of meeting rooms, attendees, and
recordings, Adobe Connect Desktop helps you manage them more efficiently.
To download Adobe Connect Desktop, visit
www.adobe.com/go/learn_desktop_en
.
Start Adobe Connect Desktop
-
From the Start menu (Windows) or Applications folder
(Mac OS), start Adobe Connect Desktop.
-
Enter your server, user name, and password.
-
Select any of the following:
-
Secure login
-
Encrypts data transmitted to and from secure servers (URLs beginning
with
https
). Deselect this option when using standard servers
(URLs beginning with
http
).
-
Save password
-
Automatically enters you password when you next start Connect
Desktop.
-
Log in automatically
-
Skips the login screen when you next start Connect Desktop.

To later deselect automatic log-in, click your
user name in the upper-right corner of Adobe Connect Desktop.
Manage meeting rooms
-
In Adobe Connect Desktop, click Meetings.
-
In the Meeting Rooms area, do any of the following:
-
Select an existing room to enter, delete, or edit. Click
Advanced Settings to access the full range of settings in Adobe
Connect Central.
-
Select Favorites to create a list of commonly used meetings
for easy access. Click Add New Favorite, and search for the meeting
by name, description, or URL. Select the meeting from the list of
results, and click Add To Favorites.

Favorites
can include meetings others own. If an owner deletes a meeting, however,
the related favorite will no longer work. To delete an outdated favorite,
right-click it, and choose Remove From Favorites.
-
Choose Create New Meeting or Refresh Meeting List from the
pop-up menu
 .
.
Refreshing
the list retrieves the latest meeting information from the server. (Adobe
Connect Desktop automatically refreshes the list each time you start
it.)
For more details about editing or creating meetings, see
Edit meeting information
.

To quickly enter default and favorite meeting
rooms, right-click the Adobe Connect Desktop icon

in
the system tray (Windows) or dock (Mac OS).
Create contact groups
-
In Adobe Connect Desktop, click Meetings.
-
In the Contacts area, click the pop-up menu
 , and
choose Add New Group.

To remove a previously
added group, right-click it in the Contacts list, and choose Delete.
-
Double-click the Working List title to give the group a custom
name.
-
In the right pane, search for and add users to the group.
-
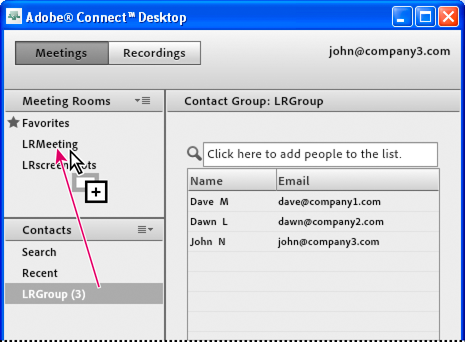
To add a group to a meeting, drag the group either to the
Meeting Rooms list or to the Participants list for a selected meeting.

Right-click in the Participants list to remove
participants or change their role.

To add a group to a meeting, drag to Meeting Rooms list or
Participants list
Add users to meetings or groups
-
In Adobe Connect Desktop, click Meetings.
-
In the Contacts area, do either of the following:
-
Right-click a user, choose Add To Meeting or Add To Group,
and then select the specific meeting or group. (To select multiple
users, Shift-click.)

Information about selected
users appears in the Contact Details area. To retrieve the latest
information from the server, click the Contacts pop-up menu

, and
choose Refresh Contact Data. (Adobe Connect Desktop automatically refreshes
contact data each time you start it.)
Find recordings in Adobe Connect Desktop
-
In Adobe Connect Desktop, click Recordings.
-
Do any of the following:
-
Click My Meetings,
My Content, Virtual Classrooms, or Seminars to browse recordings
stored in Adobe Connect Central,
-
Click Search Recordings to find recordings stored in Connect
Central. Titles And Descriptions searches content, meetings, training,
seminars, and folders. Search Within Content searches recordings,
courses, and presentations.
-
Click Local to navigate to recordings on your system.
-
Select a found recording, and either click Play to hear it,
or Fetch to download the FLV file to your system.
If you click
Fetch, a Downloads pane temporarily appears, showing the status of
all active downloads. To stop a download, right-click it, and choose
Cancel.
In the left pane, click Local
to access downloaded recordings. Then click Play Local to hear the
downloaded version, or Play to hear the online one. (The two versions
may differ if the meeting owner edits a recording.) If you want
to remove the local copy from your system, click Delete.
|
|
|
