Using the Text Layout Framework
Flash Player 10 and later, Adobe AIR 1.5 and
later
|

Overview of the Text Layout Framework
The Text Layout Framework (TLF) is an extensible ActionScript
library. The TLF is built on the text engine in Adobe® Flash® Player 10 and Adobe® AIR® 1.5. The TLF provides advanced typographic
and text layout features for innovative typography on the web. The
framework can be used with Adobe® Flex® or Adobe® Flash® Professional. Developers can use or extend
existing components, or they can use the framework to create their
own text components.
The TLF includes the following capabilities:
-
Bidirectional
text, vertical text, and over 30 writing scripts including Arabic, Hebrew,
Chinese, Japanese, Korean, Thai, Lao, Vietnamese, and others
-
Selection, editing, and flowing text across multiple columns
and linked containers
-
Vertical text, Tate-Chu-Yoko (horizontal within vertical
text) and justifier for East Asian typography
-
Rich typographical controls, including kerning, ligatures,
typographic case, digit case, digit width, and discretionary hyphens
-
Cut, copy, paste, undo, and standard keyboard and mouse gestures
for editing
-
Rich developer APIs to manipulate text content, layout, and
markup and create custom text components
-
Robust list support including custom markers and numbering
formats
-
Inline images and positioning rules
The TLF is an ActionScript 3.0 library built on the Flash Text
Engine (FTE) introduced in Flash Player 10. FTE can be accessed
through the
flash.text.engine
package, which is
part of the Flash Player 10 Application Programming Interface (API).
The Flash Player API, however, provides low-level access to the
text engine, which means that some tasks can require a relatively
large amount of code. The TLF encapsulates the low-level code into
simpler APIs. The TLF also provides a conceptual architecture that
organizes the basic building blocks defined by FTE into a system
that is easier to use.
Unlike FTE, the TLF is not built in to Flash Player. Rather,
it is an independent component library written entirely in ActionScript
3.0. Because the framework is extensible, it can be customized for
specific environments. Both Flash Professional and the Flex SDK
include components that are based on the TLF framework.
Complex script support
The TLF provides complex script support. Complex script support
includes the ability to display and edit right-to-left scripts.
The TLF also provides the ability to display and edit a mixture
of left-to-right and right-to-left scripts such as Arabic and Hebrew.
The framework not only supports vertical text layout for Chinese, Japanese,
and Korean, but also supports tate-chu-yoko (TCY elements). TCY elements
are blocks of horizontal text embedded into vertical runs of text.
The following scripts are supported:
-
Latin (English, Spanish, French, Vietnamese, and so
on)
-
Greek, Cyrillic, Armenian, Georgian, and Ethiopic
-
Arabic and Hebrew
-
Han ideographs and Kana (Chinese, Japanese, and Korean) and
Hangul Johab (Korean)
-
Thai, Lao, and Khmer
-
Devanagari, Bengali, Gurmukhi, Malayalam, Telugu, Tamil,
Gujarati, Oriya, Kannada, and Tibetan
-
Tifinagh, Yi, Cherokee, Canadian Syllabics, Deseret, Shavian,
Vai, Tagalog, Hanunoo, Buhid, and Tagbanwa
Using the Text Layout Framework in Flash Professional and Flex
You can use the TLF classes directly to create custom components
in Flash. In addition, Flash Professional CS5 provides a new class,
fl.text.TLFTextField, that encapsulates the TLF functionality. Use
the TLFTextField class to create text fields in ActionScript that
use the advanced text display features of the TLF. Create a TLFTextField
object the same way you create a text field with the TextField class. Then,
use the
textFlow
property to assign advanced formatting
from the TLF classes.
You can also use Flash Professional to create the TLFTextField
instance on the stage using the text tool. Then you can use ActionScript
to control the formatting and layout of the text field content using
the TLF classes. For more information, see
TLFTextField
in
the ActionScript 3.0 Reference for the Adobe Flash Platform.
If you are working in Flex, use the TLF classes. For more information,
see
Using the Text Layout Framework
.
Using the Text Layout Framework
If you are working in Flex or are building custom text components,
use the TLF classes. The TLF is an ActionScript 3.0 library contained
entirely within the textLayout.swc library. The TLF library contains
about 100 ActionScript 3.0 classes and interfaces organized into
ten packages. These packages are subpackages of the flashx.textLayout
package.
The Text Layout Framework classes
The TLF classes can be grouped into three categories:
Data structures and formatting classes
The following packages contain the data structures and
formatting classes for the TLF:
The main data structure of the TLF is the text flow hierarchy,
which is defined in the elements package. Within this structure,
you can assign styles and attributes to runs of text with the formats
package. You can also control how text is imported to, and exported
from, the data structure with the conversion package.
Rendering classes
The following packages contain the rendering classes for
the TLF:
The
classes in these packages facilitate the rendering of text for display
by Flash Player. The factory package provides a simple way to display
static text. The container package includes classes and interfaces
that define display containers for dynamic text. The compose package
defines techniques for positioning and displaying dynamic text in
containers.
User interaction classes
The following packages contain the user interaction classes
for the TLF:
The
edit and operations packages define classes that you can use to
allow editing of text stored in the data structures. The events
package contains event handling classes.
General steps for creating text with the Text Layout Framework
The following steps describe the general process for creating
text with the Text Layout Format:
Text Layout Framework example: News layout
The
following example demonstrates using the TLF to lay out a simple newspaper
page. The page includes a large headline, a subhead, and a multicolumn
body section:
package
{
    import flash.display.Sprite;
    import flash.display.StageAlign;
    import flash.display.StageScaleMode;
    import flash.events.Event;
    import flash.geom.Rectangle;

    import flashx.textLayout.compose.StandardFlowComposer;
    import flashx.textLayout.container.ContainerController;
    import flashx.textLayout.container.ScrollPolicy;
    import flashx.textLayout.conversion.TextConverter;
    import flashx.textLayout.elements.TextFlow;
    import flashx.textLayout.formats.TextLayoutFormat;

    public class TLFNewsLayout extends Sprite
    {
        private var hTextFlow:TextFlow;
        private var headContainer:Sprite;
        private var headlineController:ContainerController;
        private var hContainerFormat:TextLayoutFormat;

        private var bTextFlow:TextFlow;
        private var bodyTextContainer:Sprite;
        private var bodyController:ContainerController;
        private var bodyTextContainerFormat:TextLayoutFormat;

        private const headlineMarkup:String = "<flow:TextFlow xmlns:flow='http://ns.adobe.com/textLayout/2008'><flow:p textAlign='center'><flow:span fontFamily='Helvetica' fontSize='18'>TLF News Layout Example</flow:span><flow:br/><flow:span fontFamily='Helvetica' fontSize='14'>This example formats text like a newspaper page with a headline, a subtitle, and multiple columns</flow:span></flow:p></flow:TextFlow>";

        private const bodyMarkup:String = "<flow:TextFlow xmlns:flow='http://ns.adobe.com/textLayout/2008' fontSize='12' textIndent='10' marginBottom='15' paddingTop='4' paddingLeft='4'><flow:p marginBottom='inherit'><flow:span>There are many </flow:span><flow:span fontStyle='italic'>such</flow:span><flow:span> lime-kilns in that tract of country, for the purpose of burning the white marble which composes a large part of the substance of the hills. Some of them, built years ago, and long deserted, with weeds growing in the vacant round of the interior, which is open to the sky, and grass and wild-flowers rooting themselves into the chinks of the stones, look already like relics of antiquity, and may yet be overspread with the lichens of centuries to come. Others, where the lime-burner still feeds his daily and nightlong fire, afford points of interest to the wanderer among the hills, who seats himself on a log of wood or a fragment of marble, to hold a chat with the solitary man. It is a lonesome, and, when the character is inclined to thought, may be an intensely thoughtful occupation; as it proved in the case of Ethan Brand, who had mused to such strange purpose, in days gone by, while the fire in this very kiln was burning.</flow:span></flow:p><flow:p marginBottom='inherit'><flow:span>The man who now watched the fire was of a different order, and troubled himself with no thoughts save the very few that were requisite to his business. At frequent intervals, he flung back the clashing weight of the iron door, and, turning his face from the insufferable glare, thrust in huge logs of oak, or stirred the immense brands with a long pole. Within the furnace were seen the curling and riotous flames, and the burning marble, almost molten with the intensity of heat; while without, the reflection of the fire quivered on the dark intricacy of the surrounding forest, and showed in the foreground a bright and ruddy little picture of the hut, the spring beside its door, the athletic and coal-begrimed figure of the lime-burner, and the half-frightened child, shrinking into the protection of his father's shadow. And when again the iron door was closed, then reappeared the tender light of the half-full moon, which vainly strove to trace out the indistinct shapes of the neighboring mountains; and, in the upper sky, there was a flitting congregation of clouds, still faintly tinged with the rosy sunset, though thus far down into the valley the sunshine had vanished long and long ago.</flow:span></flow:p></flow:TextFlow>";

        public function TLFNewsLayout()
        {
            //wait for stage to exist
            addEventListener(Event.ADDED_TO_STAGE, onAddedToStage);
        }

        private function onAddedToStage(evtObj:Event):void
        {
            removeEventListener(Event.ADDED_TO_STAGE, onAddedToStage);
            stage.scaleMode = StageScaleMode.NO_SCALE;
            stage.align = StageAlign.TOP_LEFT;

            // Headline text flow and flow composer
            hTextFlow = TextConverter.importToFlow(headlineMarkup, TextConverter.TEXT_LAYOUT_FORMAT);

            // initialize the headline container and controller objects
            headContainer = new Sprite();
            headlineController = new ContainerController(headContainer);
            headlineController.verticalScrollPolicy = ScrollPolicy.OFF;
            hContainerFormat = new TextLayoutFormat();
            hContainerFormat.paddingTop = 4;
            hContainerFormat.paddingRight = 4;
            hContainerFormat.paddingBottom = 4;
            hContainerFormat.paddingLeft = 4;

            headlineController.format = hContainerFormat;
            hTextFlow.flowComposer.addController(headlineController);
            addChild(headContainer);
            stage.addEventListener(flash.events.Event.RESIZE, resizeHandler);

            // Body text TextFlow and flow composer
            bTextFlow = TextConverter.importToFlow(bodyMarkup, TextConverter.TEXT_LAYOUT_FORMAT);

            // The body text container is below, and has three columns
            bodyTextContainer = new Sprite();
            bodyController = new ContainerController(bodyTextContainer);
            bodyTextContainerFormat = new TextLayoutFormat();
            bodyTextContainerFormat.columnCount = 3;
            bodyTextContainerFormat.columnGap = 30;

            bodyController.format = bodyTextContainerFormat;
            bTextFlow.flowComposer.addController(bodyController);
            addChild(bodyTextContainer);
            resizeHandler(null);
        }

        private function resizeHandler(event:Event):void
        {
            const verticalGap:Number = 25;
            const stagePadding:Number = 16;
            var stageWidth:Number = stage.stageWidth - stagePadding;
            var stageHeight:Number = stage.stageHeight - stagePadding;
            var headlineWidth:Number = stageWidth;
            var headlineContainerHeight:Number = stageHeight;

            // Initial compose to get height of headline after resize
            headlineController.setCompositionSize(headlineWidth,
headlineContainerHeight);
            hTextFlow.flowComposer.compose();
            var rect:Rectangle = headlineController.getContentBounds();
            headlineContainerHeight = rect.height;

            // Resize and place headline text container
            // Call setCompositionSize() again with updated headline height
            headlineController.setCompositionSize(headlineWidth, headlineContainerHeight );
            headlineController.container.x = stagePadding / 2;
            headlineController.container.y = stagePadding / 2;
            hTextFlow.flowComposer.updateAllControllers();

            // Resize and place body text container
            var bodyContainerHeight:Number = (stageHeight - verticalGap - headlineContainerHeight);
            bodyController.format = bodyTextContainerFormat;
            bodyController.setCompositionSize(stageWidth, bodyContainerHeight );
            bodyController.container.x = (stagePadding/2);
            bodyController.container.y = (stagePadding/2) + headlineContainerHeight + verticalGap;
            bTextFlow.flowComposer.updateAllControllers();
        }
    }
}
The TLFNewsLayout class uses two text containers. One container
displays a headline and subhead, and the other displays three-column
body text. For simplicity, the text is hard-coded into the example
as TLF Markup text. The
headlineMarkup
variable
contains both the headline and the subhead, and the
bodyMarkup
variable
contains the body text. For more information on TLF Markup, see
Structuring text with TLF
.
After some initialization, the
onAddedToStage()
function
imports the headline text into a TextFlow object, which is the main
data structure of the TLF:
hTextFlow = TextConverter.importToFlow(headlineMarkup, TextConverter.TEXT_LAYOUT_FORMAT);
Next,
a Sprite object is created for the container, and a controller is
created and associated with the container:
headContainer = new Sprite();
headlineController = new ContainerController(headContainer);
The
controller is initialized to set formatting, scrolling, and other
options. The controller contains geometry that defines the bounds
of the container that the text flows into. A TextLayoutFormat object
contains the formatting options:
hContainerFormat = new TextLayoutFormat();
The controller is assigned to the flow composer and the function
adds the container to the display list. The actual composition and
display of the containers is deferred to the
resizeHandler()
method.
The same sequence of steps is performed to initialize the body TextFlow
object.
The
resizeHandler()
method measures the space
available for rendering the containers and sizes the containers
accordingly. An initial call to the
compose()
method
allows for the calculation of the proper height of the headline
container. The
resizeHandler()
method can then
place and display the headline container with the
updateAllControllers()
method. Finally,
the
resizeHandler()
method uses the size of the
headline container to determine the placement of the body text container.
Structuring text with TLF
The TLF uses a hierarchical tree to represent text. Each
node in the tree is an instance of a class defined in the elements
package. For example, the root node of the tree is always an instance
of the TextFlow class. The TextFlow class represents an entire story
of text. A story is a collection of text and other elements that is
treated as one unit, or flow. A single story can require more than
one column or text container to display.
Apart from the root node, the remaining elements are loosely
based on XHTML elements. The following diagram shows the hierarchy
of the framework:
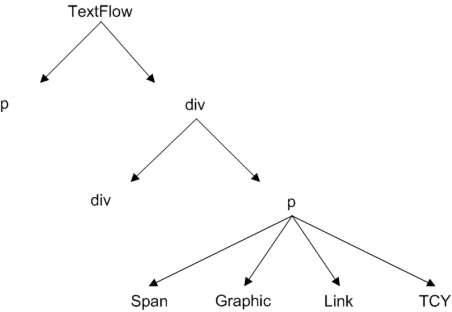
TextFlow Hierarchy
Text Layout Framework markup
Understanding the structure of the TLF is also helpful
when dealing with TLF Markup. TLF Markup is an XML representation
of text that is part of the TLF. Although the framework also supports
other XML formats, TLF Markup is unique in that it is based specifically
on the structure of the TextFlow hierarchy. If you export XML from
a TextFlow using this markup format, the XML is exported with this
hierarchy intact.
TLF Markup provides the highest fidelity representation of text
in a TextFlow hierarchy. The markup language provides tags for each
of the TextFlow hierarchy’s basic elements, and also provides attributes
for all formatting properties available in the TextLayoutFormat
class.
The following table contains the tags that can be used in TLF
Markup.
|
Element
|
Description
|
Children
|
Class
|
|
textflow
|
The root element of the markup.
|
div, p
|
TextFlow
|
|
div
|
A division within a TextFlow. May contain
a group of paragraphs.
|
div, list, p
|
DivElement
|
|
p
|
A paragraph.
|
a, tcy, span, img, tab, br, g
|
ParagraphElement
|
|
a
|
A link.
|
tcy, span, img, tab, br, g
|
LinkElement
|
|
tcy
|
A run of horizontal text (used in a vertical TextFlow).
|
a, span, img, tab, br, g
|
TCYElement
|
|
span
|
A run of text within a paragraph.
|
|
SpanElement
|
|
img
|
An image in a paragraph.
|
|
InlineGraphicElement
|
|
tab
|
A tab character.
|
|
TabElement
|
|
br
|
A break character. Used for ending a line within
a paragraph; text continues on the next line, but remains in the
same paragraph.
|
|
BreakElement
|
|
linkNormalFormat
|
Defines the formatting attributes used for links
in normal state.
|
TextLayoutFormat
|
TextLayoutFormat
|
|
linkActiveFormat
|
Defines the formatting attributes used for links
in active state, when the mouse is down on a link.
|
TextLayoutFormat
|
TextLayoutFormat
|
|
linkHoverFormat
|
Defines the formatting attributes used for links
in hover state, when the mouse is within the bounds (rolling over)
a link.
|
TextLayoutFormat
|
TextLayoutFormat
|
|
li
|
A list item element. Must be inside a list
element.
|
div, li, list, p
|
ListItemElement
|
|
list
|
A list. Lists can be nested, or placed adjacent to
each other. Different labeling or numbering schemes can be applied
to the list items.
|
div, li, list, p
|
ListElement
|
|
g
|
A group element. Used for grouping elements
in a paragraph. The lets you nest elements below the paragraph level.
|
a, tcy, span, img, tab, br, g
|
SubParagraphGroupElement
|
Using numbered and bulleted lists
You can use the
ListElement
and
ListItemElement
classes to
add bulleted lists to your text controls. The bulleted lists can
be nested and can be customized to use different bullets (or markers)
and auto-numbering, as well as outline-style numbering.
To create lists in your text flows, use the
<list>
tag.
You then use
<li>
tags within the
<list>
tag
for each list item in the list. You can customize the appearance
of the bullets by using the ListMarkerFormat class.
The following example creates simple lists:
<flow:list paddingRight="24" paddingLeft="24">
    <flow:li>Item 1</flow:li>
    <flow:li>Item 2</flow:li>
    <flow:li>Item 3</flow:li>
</flow:list>
You can nest lists within other lists, as the following example
shows:
<flow:list paddingRight="24" paddingLeft="24">
    <flow:li>Item 1</flow:li>
    <flow:list paddingRight="24" paddingLeft="24">
        <flow:li>Item 1a</flow:li>
        <flow:li>Item 1b</flow:li>
        <flow:li>Item 1c</flow:li>
    </flow:list>
    <flow:li>Item 2</flow:li>
    <flow:li>Item 3</flow:li>
</flow:list>
To customize the type of marker in the list, use the
listStyleType
property of
the ListElement. This property can be any value defined by the ListStyleType class
(such as
check
,
circle
,
decimal
,
and
box
). The following example creates lists with
various marker types and a custom counter increment:
<flow:list paddingRight="24" paddingLeft="24" listStyleType="upperAlpha"> <flow:li>upperAlpha item</flow:li> <flow:li>another</flow:li> </flow:list> <flow:list paddingRight="24" paddingLeft="24" listStyleType="lowerAlpha"> <flow:li>lowerAlpha item</flow:li> <flow:li>another</flow:li> </flow:list> <flow:list paddingRight="24" paddingLeft="24" listStyleType="upperRoman"> <flow:li>upperRoman item</flow:li> <flow:li>another</flow:li> </flow:list> <flow:list paddingRight="24" paddingLeft="24" listStyleType="lowerRoman"> <flow:listMarkerFormat> <!-- Increments the list by 2s rather than 1s. --> <flow:ListMarkerFormat counterIncrement="ordered 2"/> </flow:listMarkerFormat> <flow:li>lowerRoman item</flow:li> <flow:li>another</flow:li> </flow:list>
You use the
ListMarkerFormat
class to define
the counter. In addition to defining the increment of a counter,
you can also customize the counter by resetting it with the
counterReset
property.
You can further customize the appearance of the markers in your
lists by using the
beforeContent
and
afterContent
properties
of the ListMarkerFormat. These properties apply to content that
appears before and after the content of the marker.
The following example adds the string “XX” before the marker,
and the string “YY” after the marker:
<flow:list listStyleType="upperRoman" paddingLeft="36" paddingRight="24">
    <flow:listMarkerFormat>
        <flow:ListMarkerFormat fontSize="16"
            beforeContent="XX"
            afterContent="YY"
            counterIncrement="ordered -1"/>
        </flow:listMarkerFormat>
    <flow:li>Item 1</flow:li>
    <flow:li>Item 2</flow:li>
    <flow:li>Item 3</flow:li>
</flow:list>
The
content
property itself can define further
customizations of the marker format. The following example displays
an ordered, uppercase Roman numeral marker:
<flow:list listStyleType="disc" paddingLeft="96" paddingRight="24">
<flow:listMarkerFormat>
<flow:ListMarkerFormat fontSize="16"
beforeContent="Section "
content="counters(ordered,"*",upperRoman)"
afterContent=": "/>
</flow:listMarkerFormat>
<flow:li>Item 1</li>
<flow:li>Item 2</li>
<flow:li>Item 3</li>
</flow:list>
As the previous example shows, the
content
property
can also insert a suffix: a string that appears after the marker,
but before the
afterContent
. To insert this string
when providing XML content to the flow, wrap the string in
"e;
HTML
entities rather than quotation marks (
"<
string
>"
).
Using padding in TLF
Each
FlowElement
supports
padding properties that you use to control the position of each
element’s content area, and the space between the content areas.
The total width of an element is the sum of its content’s width,
plus the
paddingLeft
and
paddingRight
properties.
The total height of an element is the sum of its content’s height,
plus the
paddingTop
and
paddingBottom
properties.
The padding is the space between the border and the content.
The padding properties are
paddingBottom
,
paddingTop
,
paddingLeft
,
and
paddingRight
. Padding can be applied to the
TextFlow object, as well as the following child elements:
Padding properties cannot be applied to span elements.
The following example sets padding properties on the TextFlow:
<flow:TextFlow version="2.0.0" xmlns:flow="http://ns.adobe.com/textLayout/2008" fontSize="14" textIndent="15" paddingTop="4" paddingLeft="4" fontFamily="Times New Roman">
Valid values for the padding properties are a number (in pixels),
“auto”, or “inherit”. The default value is “auto”, which means it
is calculated automatically and set to 0, for all elements except
the ListElement. For ListElements, “auto” is 0 except on the start
side of the list where the value of the
listAutoPadding
property
is used. The default value of
listAutoPadding
is
40, which gives lists a default indent.
The padding properties do not, by default, inherit. The “auto”
and “inherit” values are constants defined by the
FormatValue
class.
Padding properties can be negative values.
Formatting text with TLF
The flashx.textLayout.formats package contains interfaces and
classes that allow you to assign formats to any FlowElement in the
text flow hierarchy tree. There are two ways to apply formatting.
You can assign a specific format individually or assign a group
of formats simultaneously with a special formatting object.
The ITextLayoutFormat interface contains all of the formats that
can be applied to a FlowElement. Some formats apply to an entire
container or paragraph of text, but do not logically apply to individual
characters. For example, formats such as justification and tab stops
apply to whole paragraphs, but are not applicable to individual
characters.
Assigning formats to a FlowElement with properties
You can set formats on any FlowElement through property assignment.
The FlowElement class implements the ITextLayoutFormat interface,
so any subclass of the FlowElement class must also implement that
interface.
For example, the following code shows how to assign individual
formats to an instance of ParagraphElement:
var p:ParagraphElement = new ParagraphElement();
p.fontSize = 18;
p.fontFamily = "Arial";
Assigning formats to a FlowElement with the TextLayoutFormat class
You can apply formats to a FlowElement with the TextLayoutFormat
class. You use this class to create a special formatting object
that contains all of the formatting values you want. You can then
assign that object to the
format
property of any
FlowElement object. Both TextLayoutFormat and FlowElement implement
the ITextLayoutFormat interface. This arrangement ensures that both classes
contain the same format properties.
For more information, see
TextLayoutFormat
in the ActionScript
3.0 Reference for the Adobe Flash Platform.
Format inheritance
Formats are inherited through the text flow hierarchy. If you
assign an instance of TextLayoutFormat to a FlowElement instance
with children, the framework initiates a process called a
cascade
.
During a cascade, the framework recursively examines each node in
the hierarchy that inherits from your FlowElement. It then determines
whether to assign the inherited values to each formatting property. The
following rules are applied during the cascade:
-
Property values are inherited only from an immediate
ancestor (sometimes called the parent).
-
Property values are inherited only if a property does not
already have a value (that is, the value is
undefined
).
-
Some attributes do not inherit values when undefined, unless
the attribute’s value is set to “inherit” or the constant
flashx.textLayout.formats.FormatValue.INHERIT
.
For example, if you set the
fontSize
value at
the TextFlow level, the setting applies to all elements in the TextFlow.
In other words, the values cascade down the text flow hierarchy.
You can, however, override the value in a given element by assigning
a new value directly to the element. As a counter-example, if you
set the
backgroundColor
value for at the TextFlow
level, the children of the TextFlow do not inherit that value. The
backgroundColor
property
is one that does not inherit from its parent during a cascade. You
can override this behavior by setting the
backgroundColor
property
on each child to
flashx.textLayout.formats.FormatValue.INHERIT
.
For more information, see
TextLayoutFormat
in the ActionScript
3.0 Reference for the Adobe Flash Platform.
Importing and exporting text with TLF
The TextConverter class in the flashx.textLayout.conversion.*
package lets you import text to, and export text from, the TLF.
Use this class if you plan to load text at runtime instead of compiling
the text into the SWF file. You can also use this class to export
text that is stored in a TextFlow instance into a String or XML object.
Both import and export are straightforward procedures. You call
either the
export()
method or the
importToFlow()
method,
both of which are part of the TextConverter class. Both methods
are static, which means that you call the methods on the TextConverter
class rather than on an instance of the TextConverter class.
The classes in the flashx.textLayout.conversion package provide
considerable flexibility in where you choose to store your text.
For example, if you store your text in a database, you can import
the text into the framework for display. You can then use the classes
in the flashx.textLayout.edit package to change the text, and export
the changed text back to your database.
For more information, see
flashx.textLayout.conversion
in
the ActionScript 3.0 Reference for the Adobe Flash Platform.
Managing text containers with TLF
Once text is stored in the TLF data structures, Flash Player
can display it. The text that is stored in the flow hierarchy must
be converted into a format that Flash Player can display. The TLF
offers two ways to create display objects from a flow. The first,
more simple approach is suitable for displaying static text. The
second, more complicated approach lets you create dynamic text that
can be selected and edited. In both cases, the text is ultimately
converted into instances of the TextLine class, which is part of
the flash.text.engine.* package in Flash Player 10.
Creating static text
The simple approach uses the TextFlowTextLineFactory class,
which can be found in the
flashx.textLayout.factory
package.
The advantage of this approach, beyond its simplicity, is that it
has a smaller memory footprint than does the FlowComposer approach.
This approach is advisable for static text that the user does not
need to edit, select, or scroll.
For more information, see
TextFlowTextLineFactory
in
the ActionScript 3.0 Reference for the Adobe Flash Platform.
Creating dynamic text and containers
Use a flow composer if you want to have more control over
the display of text than that provided by TextFlowTextLineFactory.
For example, with a flow composer, your users can select and edit
the text. For more information, see
Enabling text selection, editing, and undo with TLF
.
A flow composer is an instance of the StandardFlowComposer class
in the
flashx.textLayout.compose
package.
A flow composer manages the conversion of TextFlow into TextLine
instances, and also the placement of those TextLine instances into
one or more containers.
Every TextFlow instance has a corresponding object that implements
the IFlowComposer interface. This IFlowComposer object is accessible
through the
TextFlow.flowComposer
property. You
can call methods defined by the IFlowComposer interface through
this property. These methods allow you to associate the text with
one or more containers and prepare the text for display within a
container.
A container is an instance of the Sprite class, which is a subclass
of the DisplayObjectContainer class. Both of these classes are part
of the Flash Player display list API. A container is a more advanced
form of the bounding rectangle used in with TextLineFactory class.
Like the bounding rectangle, a container defines the area where
TextLine instances appear. Unlike a bounding rectangle, a container
has a corresponding “controller” object. The controller manages
scrolling, composition, linking, formatting, and event handling
for a container or set of containers. Each container has a corresponding
controller object that is an instance of the ContainerController
class in the flashx.textLayout.container package.
To display text, create a controller object to manage the container
and associate it with the flow composer. Once you have the container
associated, compose the text so that it can be displayed. Accordingly,
containers have two states: composition and display. Composition
is the process of converting the text from the text flow hierarchy
into TextLine instances and calculating whether those instances
fit into the container. Display is the process of updating the Flash
Player display list.
For more information, see
IFlowComposer
,
StandardFlowComposer
, and
ContainerController
in the
ActionScript 3.0 Reference for the Adobe Flash Platform.
Enabling text selection, editing, and undo with TLF
The ability to select or edit text is controlled at the text
flow level. Every instance of the TextFlow class has an associated
interaction manager. You can access a TextFlow object’s interaction
manager through the object’s
TextFlow.interactionManager
property.
To enable text selection, assign an instance of the SelectionManager
class to the
interactionManager
property. To enable
both text selection and editing, assign an instance of the EditManager
class instead of an instance of the SelectionManager class. To enable
undo operations, create an instance of the UndoManager class and include
it as an argument when calling the constructor for EditManager.
The UndoManager class maintains a history of the user's most recent
editing activities and lets the user undo or redo specific edits.
All three of these classes are part of the edit package.
For more information, see
SelectionManager
,
EditManager
,
and
UndoManager
in the ActionScript
3.0 Reference for the Adobe Flash Platform.
Event handling with TLF
TextFlow objects dispatch events in many circumstances, including:
-
When the text or layout changes
-
Before an operation begins and after an operation completes
-
When the status of a FlowElement object changes
-
When a compose operation completes
For more information, see
flashx.textLayout.events
in
the ActionScript 3.0 Reference for the Adobe Flash Platform.
Positioning images within text
The
float
property controls the placement of
the graphic and the text around it. The
clearFloats
property
controls the placement of the paragraph elements relative to the
float
.
To control the location of an image within a text element, you
use the
float
property. The following example adds
an image to a paragraph and aligns it to the left so the text wraps
around the right:
<flow:p paragraphSpaceAfter="15" >Images in a flow are a good thing. For example, here is a float. It should show on the left: <flow:img float="left" height="50" width="19" source="../assets/bulldog.jpg"></flow:img> Don't you agree? Another sentence here. Another sentence here. Another sentence here. Another sentence here. Another sentence here. Another sentence here. Another sentence here. Another sentence here.</flow:p>
Valid values for the
float
property are “left”,
“right”, “start”, “end”, and “none”. The Float class
defines these constants. The default value is “none”.
The
clearFloats
property is useful in cases
where you want to adjust the starting position of subsequent paragraphs
that would normally wrap around the image. For example, assume that
you have an image that is larger than the first paragraph. To be
sure the second paragraph starts
after
the image, set the
clearFloats
property.
The following example uses an image that is taller than the text
in the first paragraph. To get the second paragraph to start after
the image in the text block, this example sets the
clearFloats
property
on the second paragraph to “end”.
<flow:p paragraphSpaceAfter="15" >Here is another float, it should show up on the right: <flow:img float="right" height="50" elementHeight="200" width="19" source="../assets/bulldog.jpg"></flow:img>We'll add another paragraph that should clear past it.</flow:p><flow:p clearFloats="end" >This should appear after the previous float on the right.</flow:p>
Valid values for the
clearFloats
property are
“left”, “right”, “end”, “start”, “none”, and “both”. The
ClearFloats
class
defines these constants. You can also set the
clearFloats
property
to “inherit”, which is a constant defined by the
FormatValue
class.
The default value is “none”.
|
|
|
|
|


