|

You can create a web-based application that uses Java servlets
to invoke the Forms service and render forms. An advantage of using
a Java™ servlet is that you can write the
return value of the process to a client web browser. That is, a
Java servlet can be used as the link between the Forms service that
returns a form and a client web browser.
Note:
This section describes how to create a web-based
application that uses a Java servlet that invokes the Forms service
and renders forms-based on fragments. (See
Rendering Forms Based on Fragments
.)
Using a Java servlet, you can write a form to a client web browser
so that a customer can view and enter data into the form. After
populating the form with data, the web user clicks a submit button
located on the form to send information back to the Java servlet,
where the data can be retrieved and processed. For example, the
data can be sent to another process.
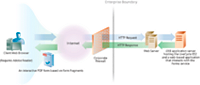
This section discusses how to create a web-based application
that enables the user to select either American-based form data
or Canadian-based form data, as shown in the following illustration.
The form that is rendered is a form that is based on fragments.
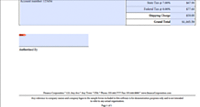
That is, if the user selects American data, then the returned form
uses fragments based on American data. For example, the footer of
the form contains an American address, as shown in the following
illustration.
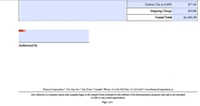
Likewise, if the user selects Canadian data, then the returned
form contains a Canadian address, as shown in the following illustration.
Note:
For information about creating form designs
based on fragments, see
LiveCycle Designer
.
Sample Files
This section uses sample files that can be located
in the following location:
<
LiveCycle Designer install directory
>/Samples/Forms/Purchase
Order/Form Fragments
where <
install directory
>
is the installation path. For the purposes of the client application,
the Purchase Order Dynamic.xdp file was copied from this installation
location and deployed to a LiveCycle application named
Applications/FormsApplication
.
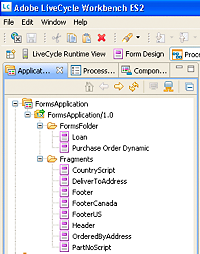
The Purchase Order Dynamic.xdp file is placed in a folder named
FormsFolder. Likewise, the fragments are placed in folder named Fragments,
as shown in the following illustration.
To
access the Purchase Order Dynamic.xdp form design, specify
Applications/FormsApplication/1.0/FormsFolder/Purchase Order Dynamic.xdp
as
the form name (the first parameter passed to the
renderPDFForm
method)
and
repository:///
as the content root URI value.
The
XML data files used by the web application were moved from the Data
folder to
C:\Adobe
(the file system that belongs
to the J2EE application server hosting LiveCycle). The file names
are Purchase Order
Canada.xml
and Purchase Order
US.xml
.
Note:
For information about creating a LiveCycle application
using Workbench, see
workbench Help
.
Summary of steps
To create a web-based applications that
renders forms based on fragments, perform the following steps:
-
Create a new web project.
-
Create Java application logic that represents the Java servlet.
-
Create the web page for the web application.
-
Package the web application to a WAR file.
-
Deploy the WAR file to the J2EE application server.
-
Test your web application.
Note:
Some of these steps depend on the J2EE application
on which LiveCycle is deployed. For example, the method you use
to deploy a WAR file depends on the J2EE application server that
you are using. This section assumes that LiveCycle is deployed on
JBoss®.
Creating a web project
The first step to create a web application that contains
a Java servlet that can invoke the Forms service is to create a
new web project. The Java IDE that this document is based on is
Eclipse 3.3. Using the Eclipse IDE, create a web project and add
the required JAR files to your project. Finally, add an HTML page
named
index.html
and a Java servlet to your project.
The following list specifies the JAR files that you must add
to your web project:
For the location of these JAR files, see
Including LiveCycle Java library files
.
To create a web project:
-
Start Eclipse and click
File
>
New
Project
.
-
In the
New Project
dialog box, select
Web
>
Dynamic Web Project
.
-
Type
FragmentsWebApplication
for the name
of your project and then click
Finish
.
To add required JAR files to your project:
-
From the
Project Explorer window, right-click the
FragmentsWebApplication
project
and select
Properties
.
-
Click
Java build path
and then click the
Libraries
tab.
-
Click the
Add External JARs
button and browse to the
JAR files to include.
To add a Java servlet to your project:
-
From the Project
Explorer window, right-click the
FragmentsWebApplication
project
and select
New
>
Other
.
-
Expand the
Web
folder, select
Servlet
, and
then click
Next
.
-
In the Create Servlet dialog box, type
RenderFormFragment
for
the name of the servlet and then click
Finish
.
To add an HTML page to your project:
-
From the Project
Explorer window, right-click the
FragmentsWebApplication
project
and select
New
>
Other
.
-
Expand the
Web
folder, select
HTML
, and click
Next
.
-
In the New HTMLdialog box, type
index.html
for
the file name and then click
Finish
.
Note:
For information about creating the HTML page that
invokes the
RenderFormFragment
Java servlet, see
Creating the web page
.
Creating Java application logic for the servlet
You
create Java application logic that invokes the Forms service from
within the Java servlet. The following code shows the syntax of
the
RenderFormFragment
Java Servlet:
    public class RenderFormFragment extends HttpServlet implements Servlet {
        public void doGet(HttpServletRequest req, HttpServletResponse resp
        throws ServletException, IOException {
        doPost(req,resp);

        }
        public void doPost(HttpServletRequest req, HttpServletResponse resp
        throws ServletException, IOException {
            //Add code here to invoke the Forms service
            }
Normally, you would not place client code within a Java servlet’s
doGet
or
doPost
method.
A better programming practice is to place this code within a separate
class, instantiate the class from within the
doPost
method
(or
doGet
method), and call the appropriate methods.
However, for code brevity, the code examples in this section are
kept to a minimum and code examples are placed in the
doPost
method.
To render a form based on fragments using the Forms service API,
perform the following tasks:
-
Include client JAR files, such as adobe-forms-client.jar,
in your Java project’s class path. For information about the location
of these files, see
Including LiveCycle Java library files
.
-
Retrieve the value of the radio button that is submitted
from the HTML form and specifies whether to use American or Canadian
data. If American is submitted, create a
com.adobe.idp.Document
that
stores data located in the
Purchase Order US.xml
. Likewise,
if Canadian, then create a
com.adobe.idp.Document
that
stores data located in the
Purchase Order Canada.xml
file.
-
Create a
ServiceClientFactory
object that
contains connection properties. (See
Setting connection properties
.)
-
Create an
FormsServiceClient
object by using
its constructor and passing the
ServiceClientFactory
object.
-
Create a
URLSpec
object that stores URI
values by using its constructor.
-
Invoke the
URLSpec
object’s
setApplicationWebRoot
method
and pass a string value that represents the application’s web root.
-
Invoke the
URLSpec
object’s
setContentRootURI
method
and pass a string value that specifies the content root URI value.
Ensure that the form design and the fragments are located in the
content root URI. If not, the Forms service throws an exception.
To reference the LiveCycle repository, specify
repository://
.
-
Invoke the
URLSpec
object’s
setTargetURL
method
and pass a string value that specifies the target URL value to where
form data is posted. If you define the target URL in the form design,
you can pass an empty string. You can also specify the URL to where
a form is sent in order to perform calculations.
-
Invoke the
FormsServiceClient
object’s
renderPDFForm
method
and pass the following values:
-
A string value that
specifies the form design name, including the file name extension.
-
A
com.adobe.idp.Document
object that contains
data to merge with the form (created in step 2).
-
A
PDFFormRenderSpec
object that stores run-time
options. For more information, see
LiveCycle API Reference
.
-
A
URLSpec
object that contains URI values
that are required by the Forms service to render a form based on
fragments.
-
A
java.util.HashMap
object that stores file
attachments. This is an optional parameter and you can specify
null
if
you do not want to attach files to the form.
The
renderPDFForm
method
returns a
FormsResult
object that contains a form
data stream that must be written to the client web browser.
-
Create a
com.adobe.idp.Document
object by
invoking the
FormsResult
object ‘s
getOutputContent
method.
-
Get the content type of the
com.adobe.idp.Document
object
by invoking its
getContentType
method.
-
Set the
javax.servlet.http.HttpServletResponse
object’s content
type by invoking its
setContentType
method and
passing the content type of the
com.adobe.idp.Document
object.
-
Create a
javax.servlet.ServletOutputStream
object
used to write the form data stream to the client web browser by
invoking the
javax.servlet.http.HttpServletResponse
object’s
getOutputStream
method.
-
Create a
java.io.InputStream
object by invoking
the
com.adobe.idp.Document
object’s
getInputStream
method.
-
Create a byte array populate it with the form data stream
by invoking the
InputStream
object’s
read
method
and passing the byte array as an argument.
-
Invoke the
javax.servlet.ServletOutputStream
object’s
write
method
to send the form data stream to the client web browser. Pass the
byte array to the
write
method.
The following code example represents the Java servlet that invokes
the Forms service and renders a form based on fragments.
/*
    * This Java Quick Start uses the following JAR files
    * 1. adobe-forms-client.jar
    * 2. adobe-livecycle-client.jar
    * 3. adobe-usermanager-client.jar
    *
    *  (Because Forms quick starts are implemented as Java servlets, it is
    *  not necessary to include J2EE specific JAR files - the Java project
    *  that contains this quick start is exported as a WAR file which
    *  is deployed to the J2EE application server)
    *
    *  These JAR files are located in the following path:
    * <install directory>/sdk/client-libs
    *
    * For complete details about the location of these JAR files,
    * see "Including LiveCycle library files" in Programming with AEM forms
    */
import java.io.File;
import java.io.FileInputStream;
import java.io.IOException;
import java.io.PrintWriter;

import javax.servlet.Servlet;
import javax.servlet.ServletException;
import javax.servlet.ServletOutputStream;
import javax.servlet.http.HttpServlet;
import javax.servlet.http.HttpServletRequest;
import javax.servlet.http.HttpServletResponse;
import com.adobe.livecycle.formsservice.client.*;
import java.util.*;
import java.io.InputStream;
import java.net.URL;

import com.adobe.idp.Document;
import com.adobe.idp.dsc.clientsdk.ServiceClientFactory;
import com.adobe.idp.dsc.clientsdk.ServiceClientFactoryProperties;

public class RenderFormFragment extends HttpServlet implements Servlet {

    public void doGet(HttpServletRequest req, HttpServletResponse resp)
        throws ServletException, IOException {
            doPost(req,resp);

    }
    public void doPost(HttpServletRequest req, HttpServletResponse resp)
    throws ServletException, IOException {


        try{
            //Set connection properties required to invoke LiveCycle
            Properties connectionProps = new Properties();
            connectionProps.setProperty(ServiceClientFactoryProperties.DSC_DEFAULT_EJB_ENDPOINT, "jnp://hiro-xp:1099");
            connectionProps.setProperty(ServiceClientFactoryProperties.DSC_TRANSPORT_PROTOCOL,ServiceClientFactoryProperties.DSC_EJB_PROTOCOL);
            connectionProps.setProperty(ServiceClientFactoryProperties.DSC_SERVER_TYPE, "JBoss");
            connectionProps.setProperty(ServiceClientFactoryProperties.DSC_CREDENTIAL_USERNAME, "administrator");
            connectionProps.setProperty(ServiceClientFactoryProperties.DSC_CREDENTIAL_PASSWORD, "password");

            //Get the value of selected radio button
            String radioValue = req.getParameter("radio");

            //Create an Document object to store form data
            Document oInputData = null;

            //The value of the radio button determines the form data to use
            //which determines which fragments used in the form
            if (radioValue.compareTo("AMERICAN") == 0)            {
                FileInputStream myData = new FileInputStream("C:\\Adobe\Purchase Order US.xml");
                oInputData = new Document(myData);
            }
            else if (radioValue.compareTo("CANADIAN") == 0)            {
                FileInputStream myData = new FileInputStream("C:\\Adobe\Purchase Order Canada.xml");
                oInputData = new Document(myData);
            }

            //Create a ServiceClientFactory object
            ServiceClientFactory myFactory = ServiceClientFactory.createInstance(connectionProps);

            //Create a FormsServiceClient object
            FormsServiceClient formsClient = new FormsServiceClient(myFactory);

            //Set the parameter values for the renderPDFForm method
            String formName = "Applications/FormsApplication/1.0/FormsFolder/Purchase Order Dynamic.xdp";

            //Cache the PDF form
            PDFFormRenderSpec pdfFormRenderSpec = new PDFFormRenderSpec();
            pdfFormRenderSpec.setCacheEnabled(new Boolean(true));

            //Specify URI values that are required to render a form
            //design based on fragments
            URLSpec uriValues = new URLSpec();
            uriValues.setApplicationWebRoot("http://hiro-xp:8080/RenderFormFragment");
            uriValues.setContentRootURI("repository:///");
            uriValues.setTargetURL("http://hiro-xp:8080/FormsServiceClientApp/HandleData");

            //Invoke the renderPDFForm method and write the
            //results to a client web browser
            FormsResult formOut = formsClient.renderPDFForm(
                        formName,               //formQuery
                        oInputData,             //inDataDoc
                        pdfFormRenderSpec,      //PDFFormRenderSpec
                        uriValues,                //urlSpec
                        null                    //attachments
                        );

            //Create a Document object that stores form data
            Document myData = formOut.getOutputContent();

            //Get the content type of the response and
            //set the HttpServletResponse object's content type
            String contentType = myData.getContentType();
            resp.setContentType(contentType);

            //Create a ServletOutputStream object
            ServletOutputStream oOutput = resp.getOutputStream();

            //Create an InputStream object
            InputStream inputStream = myData.getInputStream();

            //Write the data stream to the web browser
            byte[] data = new byte[4096];
            int bytesRead = 0;
            while ((bytesRead = inputStream.read(data)) > 0)
            {
                oOutput.write(data, 0, bytesRead);
            }

        }catch (Exception e) {
             System.out.println("The following exception occurred: "+e.getMessage());
      }
    }
}
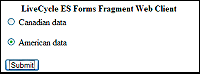
Creating the web page
The index.html web page provides an entry point to the
Java servlet and invokes the Forms service. This web page is a basic
HTML form that contains two radio buttons and a submit button. The
name of the radio buttons is radio. When the user clicks the submit
button, form data is posted to the
RenderFormFragment
Java
servlet.
The Java servlet captures the data that is posted from the HTML
page by using the following Java code:
            Document oInputData = null;

            //Get the value of selected radio button
            String radioValue = req.getParameter("radio");

            //The value of the radio button determines the form data to use
            //which determines which fragments used in the form
            if (radioValue.compareTo("AMERICAN") == 0)            {
                FileInputStream myData = new FileInputStream("C:\\Adobe\Purchase Order US.xml");
                oInputData = new Document(myData);
            }
            else if (radioValue.compareTo("CANADIAN") == 0)            {
                FileInputStream myData = new FileInputStream("C:\\Adobe\Purchase Order Canada.xml");
                oInputData = new Document(myData);
            }
The following HTML code is located in the index.html file that
was created during setup of the development environment. (See
Creating a web project
.)
<!DOCTYPE html PUBLIC "-//W3C//DTD XHTML 1.0 Transitional//EN" "http://www.w3.org/TR/xhtml1/DTD/xhtml1-transitional.dtd">
<html xmlns="http://www.w3.org/1999/xhtml">
<head>
<meta http-equiv="Content-Type" content="text/html; charset=utf-8" />
<title>Untitled Document</title>
</head>

<body>
<form name="myform" action="http://scottm-xp:8080/FragmentsWebApplication/RenderFormFragment" method="post">
     <table>
     <tr>
       <th width="344" scope="col">Forms Fragment Web Client</th>
     </tr>
     <tr>
       <td>
         <label>
         <input type="radio" name="radio" id="radio_Data" value="CANADIAN" />
         Canadian data<br />
         </label>
         <p>
           <label>
           <input type="radio" name="radio" id="radio_Data" value="AMERICAN" checked/>
           American data</label>
         </p>
       </td>
     </tr>
     <tr>
     <td>
       <label>
         <input type="submit" name="button_Submit" id="button_Submit" value="Submit" />
           </label>
           </td>
        </tr>
       </table>
     </form>
</body>
</html>
Packaging the web application
To deploy the Java servlet that invokes the Forms service,
package your web application to a WAR file. Ensure that external
JAR files that the component’s business logic depends on, such as
adobe-livecycle-client.jar and adobe-forms-client.jar, are also
included in the WAR file.
To package a web application to a WAR file:
-
From
the
Project Explorer
window, right-click the
FragmentsWebApplication
project
and select
Export
>
WAR file
.
-
In the
Web module
text box, type
FragmentsWebApplication
for
the name of the Java project.
-
In the
Destination
text box, type
FragmentsWebApplication.war
for thefile
name, specify the location for your WAR file, and then click Finish.
Deploying the WAR file to the J2EE application server
You can deploy the WAR file to the J2EE application server
on which LiveCycle is deployed. After the WAR file is deployed,
you can access the HTML web page by using a web browser.
To deploy the WAR file to the J2EE application server:
Testing your web application
After you deploy the web application, you can test it by
using a web browser. Assuming that you are using the same computer
that is hosting LiveCycle, you can specify the following URL:
-
http://localhost:8080/FragmentsWebApplication/index.html
Select
a radio button and click the Submit button. A Form that is based
on fragments will appear in the web browser. If problems occur,
see the J2EE application server’s log file.
|
|
|