|

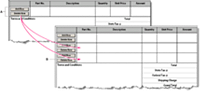
You can create a table that adds a row when
a user clicks an Add Row button. You can also include a Delete Row
button. You must create the table, add the buttons, and then set
the properties that will make the table grow.
View full size graphic
-
A.
-
Buttons that add a row or delete a row
-
B.
-
When the user clicks the Add Row button twice, Designer
adds two rows.
To create a table that grows using the Button object
-
Select Table > Insert Table.
-
In the Insert Table dialog box, select Create Table Using
Assistant and click OK.
-
In the Body Layout panel of the Table Assistant, select Body
Rows Vary Depending On Data.
This creates a table that adds
or removes rows, depending on the data sent to it.
-
Enter the number of columns and click Next.
-
(Optional) Select Has Header Row and click Next.
-
(Optional) Select Has Footer Row and click Next.
-
(Optional) Select Has Body Rows And No Sections and click
Next.
-
(Optional) Select Alternate Row Colors and click Finish.
-
Save
the form as an Adobe Dynamic XML Form (*pdf).
Now,
you must add the buttons that will be used to add and delete rows.
To add the buttons
-
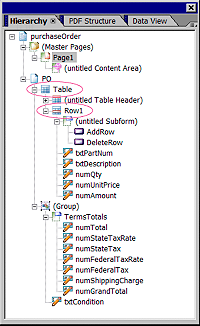
Select the first cell of the body row and, in the
Object palette, click the Cell tab and select Subform from the Type
list.
This cell needs to be a subform so that it can contain
two buttons.
 You can also drag the Subform object from the Object Library palette into a cell in the table.
-
In the Object Library palette, click the Standard category
and drag the Button object into a cell in the body row. For example,
place it in the first cell of the body row.
-
In the Object palette, click the Field tab and type
Add Row
in
the Caption box.
-
Repeat steps 2 and 3 to create a Delete Row button.
-
Select the Add Row button and, in the Script Editor, select
Click from the Show list.
-
In the Script Editor, select JavaScript from the Language
list.
-
Type the following script:
Table.Row1.instanceManager.addInstance(1);
To
modify the script for your own form, you must understand how the
script relates to the hierarchy. For example, in the hierarchy for
the current form, both buttons are inside the same subform; therefore,
you do not need to specify any objects beyond the Table level.
-
Select the Delete Row button and, in the Script Editor, select
Click from the Show list.
-
In the Script Editor, select JavaScript from the Language
list.
-
Type the following script:
Table.Row1.instanceManager.removeInstance(1);
To reuse these buttons in another form, you can add them to the Custom category (or your own category) of the Object Library palette. Note that you may have to edit the script for the button if you use it in a different form.
-
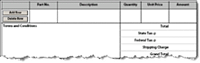
View the form in the Preview PDF tab.
For example,
this is what you would see if you modified the Part table from the Purchase
Order template.
|
|
|