|

DataGrid コンポーネントは、オーサリング時および実行時に、縦横に変形できます。 オーサリング時には、ステージ上でコンポーネントを選択して、自由変形ツールを使用するか、修正/変形でいずれかのコマンドを使用します。実行時には、
setSize()
メソッドを使用するか、適切なプロパティ(
width
、
height
、
scaleX
、
scaleY
など)を使用します。横方向のスクロールバーがない場合は、列の幅が相対的に調整されます。 列 (したがってセル) のサイズが変わると、そのセル内のテキストが切り詰められる可能性があります。
DataGrid コンポーネントでのスタイルの使用
一連のスタイルプロパティを設定して、DataGrid コンポーネントの外観を変更できます。 DataGrid コンポーネントは、List コンポーネントからスタイルを継承します (
List コンポーネントでのスタイルの使用
を参照してください)。
各列のスタイルの設定
DataGrid オブジェクトは複数の列を持つことができ、ユーザーは各列に別々のセルレンダラーを指定できます。DataGrid の各列は DataGridColumn オブジェクトによって表され、DataGridColumn クラスは
cellRenderer
プロパティを含みます。このプロパティに、列の CellRenderer を定義できます。
-
新しい Flash ドキュメント (ActionScript 3.0) を作成します。
-
DataGrid コンポーネントをライブラリパネルにドラッグします。
-
タイムラインのフレーム 1 のアクションパネルに次のコードを追加します。 このコードは、3 番目の列に長いテキストのストリングのある DataGrid を作成します。 最後に、列の
cellRenderer
プロパティを、複数行のセルをレンダリングするセルレンダラーの名前に設定します。
/* This is a simple cell renderer example.It invokes
the MultiLineCell cell renderer to display a multiple
line text field in one of a DataGrid's columns. */

import fl.controls.DataGrid;
import fl.controls.dataGridClasses.DataGridColumn;
import fl.data.DataProvider;
import fl.controls.ScrollPolicy;

// Create a new DataGrid component instance.
var aDg:DataGrid = new DataGrid();

var aLongString:String = "An example of a cell renderer class that displays a multiple line TextField"
var myDP:Array = new Array();
myDP = [{firstName:"Winston", lastName:"Elstad", note:aLongString, item:100},
    {firstName:"Ric", lastName:"Dietrich", note:aLongString, item:101},
    {firstName:"Ewing", lastName:"Canepa", note:aLongString, item:102},
    {firstName:"Kevin", lastName:"Wade", note:aLongString, item:103},
    {firstName:"Kimberly", lastName:"Dietrich", note:aLongString, item:104},
    {firstName:"AJ", lastName:"Bilow", note:aLongString, item:105},
    {firstName:"Chuck", lastName:"Yushan", note:aLongString, item:106},
    {firstName:"John", lastName:"Roo", note:aLongString, item:107},
];

// Assign the data provider to the DataGrid to populate it.
// Note: This has to be done before applying the cellRenderers.
aDg.dataProvider = new DataProvider(myDP);

/* Set some basic grid properties.
Note: The data grid's row height should reflect
the number of lines you expect to show in the multiline cell.
The cell renderer wil size to the row height.
About 40 for 2 lines or 60 for 3 lines.*/

aDg.columns = ["firstName", "lastName", "note", "item"];
aDg.setSize(430,190);
aDg.move(40,40);
aDg.rowHeight = 40;// Allows for 2 lines of text at default text size.
aDg.columns[0].width = 70;
aDg.columns[1].width = 70;
aDg.columns[2].width = 230;
aDg.columns[3].width = 60;
aDg.resizableColumns = true;
aDg.verticalScrollPolicy = ScrollPolicy.AUTO;
addChild(aDg);
// Assign cellRenderers.
var col3:DataGridColumn = new DataGridColumn();
col3 = aDg.getColumnAt(2);
col3.cellRenderer = MultiLineCell;
-
FLA ファイルに "MultiLineGrid.fla" という名前を付けて保存します。
-
ActionScript ファイルを新規作成します。
-
次の ActionScript コードをスクリプトウィンドウにコピーします。
package {


    import fl.controls.listClasses.CellRenderer;

    public class MultiLineCell extends CellRenderer
    {

        public function MultiLineCell()
        {
            textField.wordWrap = true;
            textField.autoSize = "left";
        }
        override protected function drawLayout():void {
            textField.width = this.width;
            super.drawLayout();
        }
    }
}
-
"MultiLineGrid.fla" を保存したフォルダーと同じフォルダーに、ActionScript ファイルを "MultiLineCell.as" という名前で保存します。
-
MultiLineGrid.fla アプリケーションに戻り、制御/ムービープレビューを選択します。
DataGrid は、次のように表示されます。
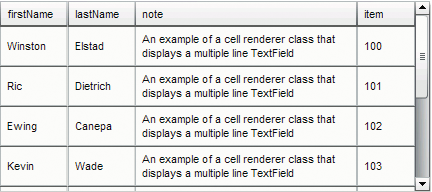
MultiLineGrid.fla アプリケーションの DataGrid
ヘッダースタイルの設定
ヘッダー行にテキストスタイルを設定するには、
headerTextFormat
スタイルを使用します。次の例では、TextFormat オブジェクトを使用して、Arial フォント、赤のカラー、フォントサイズ 14 およびイタリックを使用するように
headerTextFormat
スタイルを設定します。
-
新しい Flash ファイル (ActionScript 3.0) ドキュメントを作成します。
-
DataGrid コンポーネントをステージまでドラッグし、インスタンス名を
aDg
にします。
-
アクションパネルを開いて、メインタイムライン内でフレーム 1 を選択し、次のコードを入力します。
import fl.data.DataProvider;
import fl.controls.dataGridClasses.DataGridColumn;

var myDP:Array = new Array();
myDP = [{FirstName:"Winston", LastName:"Elstad"},
    {FirstName:"Ric", LastName:"Dietrich"},
    {FirstName:"Ewing", LastName:"Canepa"},
    {FirstName:"Kevin", LastName:"Wade"},
    {FirstName:"Kimberly", LastName:"Dietrich"},
    {FirstName:"AJ", LastName:"Bilow"},
    {FirstName:"Chuck", LastName:"Yushan"},
    {FirstName:"John", LastName:"Roo"},
];

// Assign the data provider to the DataGrid to populate it.
// Note: This has to be done before applying the cellRenderers.
aDg.dataProvider = new DataProvider(myDP);
aDg.setSize(160,190);
aDg.move(40,40);
aDg.columns[0].width = 80;
aDg.columns[1].width = 80;
var tf:TextFormat = new TextFormat();
tf.size = 14;
tf.color = 0xff0000;
tf.italic = true;
tf.font = "Arial"
aDg.setStyle("headerTextFormat", tf);
-
制御/ムービープレビューを選択して、アプリケーションを実行します。
DataGrid コンポーネントでのスキンの使用
DataGrid コンポーネントでは、次のスキンを使用して表示状態を表します。
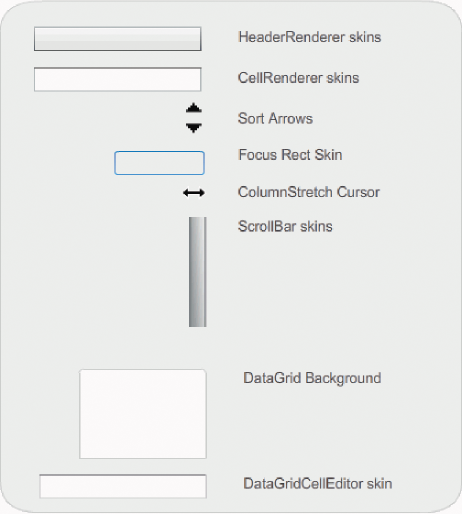
DataGrid のスキン
CellRenderer スキンは DataGrid の本文のセルに使用され、HeaderRenderer スキンはヘッダー行に使用されます。 次の手順では、ヘッダー行の背景色を変更しますが、同じ手順を使用して CellRenderer スキンを編集し、DataGrid の本文のセルの背景色を変更できます。
-
新しい Flash ドキュメント (ActionScript 3.0) を作成します。
-
DataGrid コンポーネントをステージまでドラッグし、インスタンス名を
aDg
にします。
-
コンポーネントをダブルクリックしてスキンのパレットを開きます。
-
ズームコントロールを 400% にして、編集のためにアイコンを大きくします。
-
HeaderRenderer スキンをダブルクリックして、HeaderRenderer スキンのパレットを開きます。
-
Up_Skin をダブルクリックしてシンボル編集モードで開きます。次に、背景が選択されてプロパティインスペクターの塗りカラーピッカーが表示されるまで、背景をクリックします。
-
塗りカラーピッカーでカラー #00CC00 を選択し、Up_Skin HeaderRenderer スキンの背景に適用します。
-
ステージの上の編集バーの左側にある「戻る」ボタンをクリックし、ドキュメント編集モードに戻ります。
-
タイムラインのフレーム 1 のアクションパネルに次のコードを追加し、DataGrid にデータを追加します。
import fl.data.DataProvider;

bldRosterGrid(aDg);
var aRoster:Array = new Array();
aRoster = [
        {Name:"Wilma Carter",Home: "Redlands, CA"},
        {Name:"Sue Pennypacker",Home: "Athens, GA"},
        {Name:"Jill Smithfield",Home: "Spokane, WA"},
        {Name:"Shirley Goth", Home: "Carson, NV"},
        {Name:"Jennifer Dunbar",Home: "Seaside, CA"}
];
aDg.dataProvider = new DataProvider(aRoster);
function bldRosterGrid(dg:DataGrid){
    dg.setSize(400, 130);
    dg.columns = ["Name", "Home"];
    dg.move(50,50);
    dg.columns[0].width = 120;
    dg.columns[1].width = 120;
};
-
制御/ムービープレビューを選択してアプリケーションをテストします。
DataGrid によって、次の図のようにヘッダー行の背景が緑で表示されます。
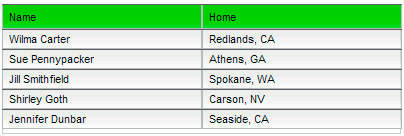
ヘッダー行の背景がカスタマイズされた DataGrid
|
|
|


