You
can dynamically populate a drop-down list or list box with values
from a data source.
If you have a predetermined and unchanging set of possible values,
you can populate a drop-down list or list box when designing the
form. See Using drop-down lists and list boxes. If you have a changing set
of values, you can dynamically populate a drop-down list or list
box from a data source at run time. If you have a long set of values,
having it stored in a data source gives the form more flexibility.
For example, you can populate a drop-down list with a list of
countries from a data source. Another example is to populate a list
box with French product names but have English data values submitted
to the data source.
For example, the schema you connect to could have the following
defined for a list:
<form>
      <lists>
         <item uiname="item1" token="value1"/>
         <item uiname="item2" token="value2"/>
      </lists>
</form>
And the data file you point to could have the following defined
for a list:
<form>
      <lists>
         <item uiname="MasterCard" token="MC"/>
         <item uiname="Visa" token="VS"/>
         <item uiname="Eurocard" token="EC"/>
         <item uiname="Special Card" token="SC"/>
      </lists>
</form>
When you merge the data file with the form design, you would
see MasterCard as one of the options in the list, but when
the form gets submitted, the token MC is sent to the data
source.
Before you perform this task, you must ensure the following settings
are in effect:
In the Object Library palette, click the Standard category
and drag a Drop-Down List or a List Box onto the form design.
For
example, insert a Drop-Down List.
(Optional) In the Object palette, click the Field tab and
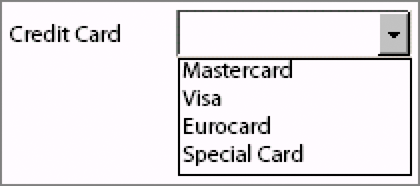
type a caption for the object in the Caption box.
For example,
type Credit Card.
Do one of the following actions:
Note: For
ease of use, both the List Items active label and the Specify Item
Values active label display the same Dynamic Properties dialog box.
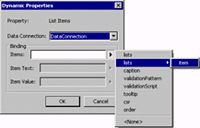
Select the data connection.
Note: If you
are not already connected to a data source, Default Data Binding
is the only selection in the Data Connection list.
Click the triangle beside the Items box and select a binding.
The
binding you select should be a repeating data value or group so
that the drop-down list or list box shows more than one item.
For
example, select lists > item.
The
following string appears in the Items box:
$record.lists.item[*]

You could type this string into the Items box instead
of selecting it.
Note: For OLEDB data connections,
the Items box is not available. Use the Item Text and Item Value
boxes to select the database columns to use to populate the list.
To show a user-friendly item name at run time, click the
triangle beside the Item Text box and select a binding.
For
example, select @uiname to show MasterCard.
The
data file you point to could have a repeating data value:
<form>
      <pymt>
         <cc type="MC">MasterCard</cc>
         <cc type="VS">Visa</cc>
      </pymt>
</form>
Note: If you select #data,
the drop-down list shows MasterCard.
(Optional) To save a different value than the Item Text label
to the data source, click the triangle beside the Item Value box
and select a binding.
For example, select @token to save MC
to the data file.
The data file you point to could have a
repeating data value:
<form>
      <pymt>
         <cc type="MC">MasterCard</cc>
         <cc type="VS">Visa</cc>
      </pymt>
</form>
Note: If you select #data,
the drop-down list shows MC.
Click OK.
After a binding has been set, a small link
icon appears with the active label.
View the form in the Preview PDF tab.