A
wizard guides you through the main steps of creating a curriculum,
such as entering curriculum information and selecting courses for
the curriculum. After you create a curriculum, you can complete
additional tasks, such as adding enrollees and sending reminders.
In creating a curriculum, your workflow involves the following
tasks:
1. Browse to a curriculum location
You can create or browse to a folder in the Training
library that will contain the curriculum (you must have permission
to access the folder). When you determine a location, you click
New Curriculum to open the New Curriculum wizard and create your
curriculum in the selected location.
View full size graphic
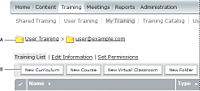
Navigating the Training library
-
A.
-
Determine a location
-
B.
-
Create
another folder or add a new curriculum
Note:
If
you want to save your curriculum in your User Training folder, you
can bypass this procedure by simply clicking the New Curriculum
link on the Adobe Connect Central Home page and following the steps
to enter curriculum information.
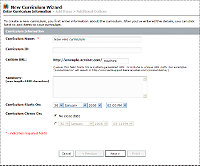
2. Enter curriculum information
The
first page of the New Curriculum wizard lets you enter details,
such as descriptive summary information and start and end dates,
about the curriculum. (You must enter the curriculum name, but all
other fields are optional.) The information that you enter in the
wizard appears later on the Curriculum Information page, as well
as on the page that enrollees access from their My Training link.
The
Custom URL box displays the first part of the URL that users click
to access the curriculum. You can leave the box blank to have Adobe
Connect generate a system URL or enter a custom URL in the box.
For example, you can enter a word that describes the curriculum.
Note:
The
start and end dates that you select override the start and end dates
for the individual items in your curriculum. For example, if you
add a meeting with an end date that already passed, but your end
date for the curriculum is in the future, the meeting assumes the
end date of the curriculum.
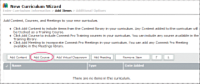
3. Add items to the curriculum
After
you enter curriculum information in the New Curriculum wizard and
click Next, a page appears that lets you add items to the curriculum.
When you add an item to a curriculum, you are actually adding a
link to the item, not copying the item in a new location within
Adobe Connect.
You can add content from the Content library,
a meeting from the Meeting library, a virtual classroom, or any
existing courses to a curriculum. Content added to a curriculum
is now automatically converted to a course so it can be tracked
accurately. The new course is added to the automatically created curriculum
resource folder. (This folder is in the same location as the curriculum and
has the same name as the curriculum with “Resources” appended to
the end.)
Note:
If you want to group items in
folders, do not add the items using the New Curriculum wizard. Instead,
exit from the wizard, open the curriculum information page for the
curriculum, click Add Item, click New Folder, type in a folder name,
click Save, select the new folder (you can also select the root
folder or a different folder), click Add Item, and then add items
to the folder. New items are always created at the root level and
you can rearrange items by clicking the Move button. Folders cannot be
nested in other folders.
4. Change the order or remove items, if necessary
After adding content and courses,
you can change the order of items to alter the learning path. You
also have the option to remove any items.
Note:
Although you
can move items within a folder, you cannot move items in or out of
folders.
5. Select any additional options
The
final step when creating a curriculum is to select any options you
require from the Additional Options page, such as adding enrollees,
setting prerequisites, and sending notification.