字串範例:ASCII 藝術Flash Player 9 以及更新的版本,Adobe AIR 1.0 以及更新的版本 這個「ASCII 藝術」範例會說明在 ActionScript 3.0 中使用 String 類別的多項功能,其中包括:
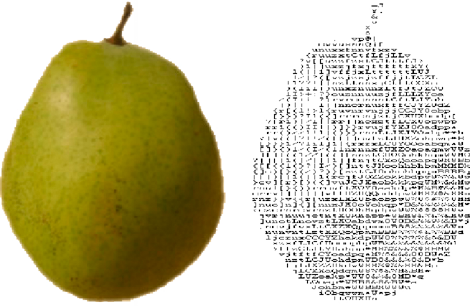
「ASCII 藝術」是指用文字來呈現影像,利用一組固定間距字體的字元 (如 Courier New 字元) 來繪製影像。下圖便是應用程式所產生的 ASCII 藝術範例:  右邊顯示的是圖片的 ASCII 藝術版本。 若要取得此樣本的應用程式檔案,請參閱 www.adobe.com/go/learn_programmingAS3samples_flash_tw。您可以在 Samples/AsciiArt 檔案夾中找到 ASCIIArt 應用程式檔案,此應用程式是由下列檔案組成:
擷取定位點分隔值這個範例會採取一般將應用程式資料與應用程式本身分開儲存的做法,這樣一來,如果資料變更 (例如加入其它影像或影像的標題變更),就不需要重新建立 SWF 檔。在此範例中,影像中繼資料 (包括影像標題、實際影像檔的 URL,以及用來操作影像的一些值) 會儲存在文字檔中 (即專案中的 txt/ImageData.txt 檔案)。文字檔的內容如下: FILENAME TITLE WHITE_THRESHHOLD BLACK_THRESHHOLD FruitBasket.jpg Pear, apple, orange, and banana d8 10 Banana.jpg A picture of a banana C8 20 Orange.jpg orange FF 20 Apple.jpg picture of an apple 6E 10 檔案使用特定的定位點分隔格式。第一行 (列) 是標題列。其它行則包含要載入的每個點陣圖的下列資料:
應用程式一啟動,AsciiArtBuilder 類別就會使用 AsciiArtBuilder 類別的 parseImageInfo() 方法的下列程式碼,載入並解析文字檔的內容,以建立要顯示的影像「堆疊」: var lines:Array = _imageInfoLoader.data.split("\n");
var numLines:uint = lines.length;
for (var i:uint = 1; i < numLines; i++)
{
var imageInfoRaw:String = lines[i];
...
if (imageInfoRaw.length > 0)
{
// Create a new image info record and add it to the array of image info.
var imageInfo:ImageInfo = new ImageInfo();
// Split the current line into values (separated by tab (\t)
// characters) and extract the individual properties:
var imageProperties:Array = imageInfoRaw.split("\t");
imageInfo.fileName = imageProperties[0];
imageInfo.title = normalizeTitle(imageProperties[1]);
imageInfo.whiteThreshold = parseInt(imageProperties[2], 16);
imageInfo.blackThreshold = parseInt(imageProperties[3], 16);
result.push(imageInfo);
}
}
文字檔的整個內容都包含在單一 String 實體 (即 _imageInfoLoader.data 屬性) 中。使用 split() 方法並將換行字元 ("\n") 設為參數,String 實體就會分割成 Array (lines),其元素即為文字檔中的每一行。程式碼接著會使用迴圈來處理每一行 (第一行除外,因為這只是標題,無實質內容)。在迴圈內,會再次使用 split() 方法,將單行內容分成一組值 (即名為 imageProperties 的 Array 物件)。split() 方法這次使用的參數是定位點 ("\t") 字元,因為各行的值都是用定位點字元隔開。 使用 String 方法標準化影像標題這個應用程式的其中一項設計決定,便是讓所有影像標題都以標準格式顯示,也就是將每個字的第一個字母都改為大寫 (只有少數通常在英文標題裡不大寫的字不改)。應用程式不會假設文字檔包含格式正確的標題,而會在擷取文字檔中的標題時予以格式化。 在前面列出的程式碼中,當擷取個別影像中繼資料值時,會使用下面這一行程式碼: imageInfo.title = normalizeTitle(imageProperties[1]); 在此程式碼中,從文字檔擷取的影像標題會透過 normalizeTitle() 方法傳遞,然後再儲存到 ImageInfo 物件中: private function normalizeTitle(title:String):String
{
var words:Array = title.split(" ");
var len:uint = words.length;
for (var i:uint; i < len; i++)
{
words[i] = capitalizeFirstLetter(words[i]);
}
return words.join(" ");
}
這個方法會使用 split() 方法,將標題分為獨立的單字 (用空格字元隔開)、將每個字透過 capitalizeFirstLetter() 方法傳遞,然後再使用 Array 類別的 join() 方法,將這些字再次組合成單一字串。 顧名思義,capitalizeFirstLetter() 方法就是將每個字的第一個字母改為大寫: /**
* Capitalizes the first letter of a single word, unless it's one of
* a set of words that are normally not capitalized in English.
*/
private function capitalizeFirstLetter(word:String):String
{
switch (word)
{
case "and":
case "the":
case "in":
case "an":
case "or":
case "at":
case "of":
case "a":
// Don't do anything to these words.
break;
default:
// For any other word, capitalize the first character.
var firstLetter:String = word.substr(0, 1);
firstLetter = firstLetter.toUpperCase();
var otherLetters:String = word.substring(1);
word = firstLetter + otherLetters;
}
return word;
}
在英文中,如果是下列的其中一個字,則在標題中這些字的第一個字元就「不」會大寫:“and”、“the”、“in”、“an”、“or”、“at”、“of” 或 “a” (這是簡化的規則)。為執行此邏輯,程式碼會先使用 switch 陳述式,檢查單字是否為其中一個首字母不應大寫的字。如果是的話,程式碼就會跳出 switch 陳述式。相反地,如果單字的首字母應大寫,那麼就會執行下列步驟來改為大寫:
產生 ASCII 藝術文字BitmapToAsciiConverter 類別可將點陣圖影像轉換為其 ASCII 文字形式。這是由 parseBitmapData() 方法執行,其部分內容顯示如下: var result:String = "";
// Loop through the rows of pixels top to bottom:
for (var y:uint = 0; y < _data.height; y += verticalResolution)
{
// Within each row, loop through pixels left to right:
for (var x:uint = 0; x < _data.width; x += horizontalResolution)
{
...
// Convert the gray value in the 0-255 range to a value
// in the 0-64 range (since that's the number of "shades of
// gray" in the set of available characters):
index = Math.floor(grayVal / 4);
result += palette.charAt(index);
}
result += "\n";
}
return result;
這段程式碼先定義一個名為 result 的 String 實體,以用來建立點陣圖影像的 ASCII 藝術版本。接下來便循序處理原始點陣圖影像的個別像素。利用多項色彩操作技巧 (因篇幅有限,不多詳述),程式碼將個別像素的紅、綠和藍色值轉換為單一灰階值 (0 到 255 之間的數字)。接著程式碼再將該值除以 4 (如上所示),轉換為 0 到 63 色階之間的值,然後將值儲存在變數 index 中 (使用 0-63 色階的原因是,這個應用程式所用 ASCII 字元的「面板」包含 64 個值)。字元面板定義為 BitmapToAsciiConverter 類別中的 String 實體: // The characters are in order from darkest to lightest, so that their
// position (index) in the string corresponds to a relative color value
// (0 = black).
private static const palette:String = "@#$%&8BMW*mwqpdbkhaoQ0OZXYUJCLtfjzxnuvcr[]{}1()|/?Il!i><+_~-;,. ";
由於 index 變數會定義面板中的哪一個 ASCII 字元與點陣圖影像中的目前像素相對應,因此便使用 charAt() 方法,從 palette String 擷取該字元。這個字元接著會使用連接指定運算子 (+=),附加到 result String 實體。此外,在每列像素結尾,會有換行字元連接到 result String 的結尾,以強制換行,產生一列新的字元「像素」。 |

|