DisplacementMapFilter 類別會使用 BitmapData 物件 (稱為置換對應影像) 的像素值,對新的物件執行置換特效。置換對應影像通常與實際顯示物件或是套用了濾鏡的 BitmapData 實體不同。置換效果牽涉到置換含濾鏡的影像像素,換句話說,就是在某種程度上將這些像素從原始位置偏移到其它位置。您可以使用這個濾鏡來建立偏移、彎曲或斑駁的效果。
套用至特定像素的置換位置與數量,需取決於置換對應影像的顏色值。在您使用此濾鏡時,除了指定對應影像外,還需指定下列數值,以控制對應影像中計算置換的方式:
-
對應點:在含濾鏡的影像中,用來對應至所套用之置換濾鏡左上角的位置。如果您只想要將濾鏡套用至部分影像,就可以使用這個方式。
-
X 組件:其對應影像的顏色色版會影響像素的 x 位置。
-
Y 組件:其對應影像的顏色色版會影響像素的 y 位置。
-
X 軸比例:指定 x 軸置換強度的倍數值。
-
Y 軸比例:指定 y 軸置換強度的倍數值。
-
濾鏡模式:針對因為像素偏移所產生的空白空間,決定處理方式。這些在 DisplacementMapFilterMode 類別中定義為常數的選項,可用來顯示原始像素 (濾鏡模式為
IGNORE
)、從影像的另一側開始圍繞像素 (濾鏡模式為
WRAP
,此模式也是預設值)、運用最近的偏移像素 (濾鏡模式為
CLAMP
),或是將空間填滿顏色 (濾鏡模式為
COLOR
)。
若要瞭解置換對應濾鏡的運作方式,請以下列基本範例為例。下列程式碼會載入一個影像,並在影像完成載入時將影像放在「舞台」的中央,接著套用一個置換對應濾鏡,讓整個影像中的像素都向左水平平移。
import flash.display.BitmapData;
import flash.display.Loader;
import flash.events.MouseEvent;
import flash.filters.DisplacementMapFilter;
import flash.geom.Point;
import flash.net.URLRequest;

// Load an image onto the Stage.
var loader:Loader = new Loader();
var url:URLRequest = new URLRequest("http://www.helpexamples.com/flash/images/image3.jpg");
loader.load(url);
this.addChild(loader);

var mapImage:BitmapData;
var displacementMap:DisplacementMapFilter;

// This function is called when the image finishes loading.
function setupStage(event:Event):void
{
    // Center the loaded image on the Stage.
    loader.x = (stage.stageWidth - loader.width) / 2;
    loader.y = (stage.stageHeight - loader.height) / 2;

    // Create the displacement map image.
    mapImage = new BitmapData(loader.width, loader.height, false, 0xFF0000);

    // Create the displacement filter.
    displacementMap = new DisplacementMapFilter();
    displacementMap.mapBitmap = mapImage;
    displacementMap.mapPoint = new Point(0, 0);
    displacementMap.componentX = BitmapDataChannel.RED;
    displacementMap.scaleX = 250;
    loader.filters = [displacementMap];
}

loader.contentLoaderInfo.addEventListener(Event.COMPLETE, setupStage);
用來定義置換的屬性如下所示:
-
對應點陣圖:置換點陣圖是一個由程式碼所建立的全新 BitmapData 實體,其尺寸符合載入影像的尺寸 (因此會將置換效果套用至整個影像中),並以純紅色像素填滿影像。
-
對應點:此值目前設為 0, 0 的點座標,並再一次將置換效果套用至整個影像中。
-
X 組件:此值目前設為常數
BitmapDataChannel.RED
,代表對應點陣圖的紅色值將決定要沿著 x 軸置換的像素量 (也就是像素移動的數量)。
-
X 軸比例:此值目前設為 250。置換的總量 (對象是完全置換為紅色的對應影像) 並不會全部用來置換影像,而是約為 1/2 個像素的小量置換,因此如果此值設為 1,則影像只會水平偏移 0.5 個像素。當數值設為 250 時,則影像大約會偏移 125 個像素。
這些設定都會導致含濾鏡的影像像素向左偏移 250 個像素。像素的偏移方向 (向左或向右) 與數量,取決於對應影像中的像素顏色值。在概念上,濾鏡會依序檢查含濾鏡影像的每個像素 (至少會針對套用濾鏡區域中的像素進行檢查,在這裡指的是所有像素),並對每個像素執行下列動作:
-
它會在對應影像中尋找相符的像素。例如,當濾鏡準備針對含濾鏡影像的左上角像素計算其置換量時,就會尋找對應影像的左上角像素。
-
這項作業決定了對應像素中的指定顏色色版值。在這個情況中,x 組件的顏色色版是紅色色版,因此濾鏡會查看有問題的像素,判斷其對應影像的紅色色版值是多少。由於對應影像使用純紅色,因此像素的紅色色版值為 0xFF,或為 255。此值將做為置換值來使用。
-
它會比較置換值與「中間」值 (也就是介於 0 與 255 中間的 127)。如果置換值小於中間值,則像素會往正數方向偏移 (x 置換會向右偏移,y 置換則向下偏移)。另一方面,如果置換值大於中間值 (如此範例所示),則像素會往負數方向偏移 (x 置換會向左偏移,y 置換則向上偏移)。精確一點的說法是,濾鏡會從 127 減去置換值,結果 (正數或負數) 就是要套用的相對置換量。
-
最後,它會判斷相對置換值所代表的完整置換百分比,來得出實際的置換量。在這個範例中,全紅色代表 100% 置換。接著再以 x 軸比例或 y 軸比例乘以該百分比,得出要套用的置換像素量。在這個範例中,100% 乘以 250 這個倍數就會得到置換量,大約是向左偏移 125 個像素。
由於並未指定任何有關 y 組件與 y 軸比例的值,所以會使用預設值 (也就不會置換),這就是為何影像不會沿著垂直方向做任何偏移的原因。
這個範例採用預設的濾鏡模式設定
WRAP
,因此當像素向左偏移時,右側的空白空間就會填滿由影像左側邊緣偏移過來的像素。您可以使用這個值來測試一下,就可以看到不同的效果。例如,假如您將下列這一行程式碼加入設定了置換屬性的程式碼區段中 (在
loader.filters = [displacementMap]
這一行之前),會讓「舞台」上的影像看起來好像一大片塗鴉:
displacementMap.mode = DisplacementMapFilterMode.CLAMP;
為了進一步說明較為複雜的案例,下列範例採用置換對應濾鏡,在影像上建立放大鏡效果:
import flash.display.Bitmap;
import flash.display.BitmapData;
import flash.display.BitmapDataChannel;
import flash.display.GradientType;
import flash.display.Loader;
import flash.display.Shape;
import flash.events.MouseEvent;
import flash.filters.DisplacementMapFilter;
import flash.filters.DisplacementMapFilterMode;
import flash.geom.Matrix;
import flash.geom.Point;
import flash.net.URLRequest;

// Create the gradient circles that will together form the
// displacement map image
var radius:uint = 50;

var type:String = GradientType.LINEAR;
var redColors:Array = [0xFF0000, 0x000000];
var blueColors:Array = [0x0000FF, 0x000000];
var alphas:Array = [1, 1];
var ratios:Array = [0, 255];
var xMatrix:Matrix = new Matrix();
xMatrix.createGradientBox(radius * 2, radius * 2);
var yMatrix:Matrix = new Matrix();
yMatrix.createGradientBox(radius * 2, radius * 2, Math.PI / 2);

var xCircle:Shape = new Shape();
xCircle.graphics.lineStyle(0, 0, 0);
xCircle.graphics.beginGradientFill(type, redColors, alphas, ratios, xMatrix);
xCircle.graphics.drawCircle(radius, radius, radius);

var yCircle:Shape = new Shape();
yCircle.graphics.lineStyle(0, 0, 0);
yCircle.graphics.beginGradientFill(type, blueColors, alphas, ratios, yMatrix);
yCircle.graphics.drawCircle(radius, radius, radius);

// Position the circles at the bottom of the screen, for reference.
this.addChild(xCircle);
xCircle.y = stage.stageHeight - xCircle.height;
this.addChild(yCircle);
yCircle.y = stage.stageHeight - yCircle.height;
yCircle.x = 200;

// Load an image onto the Stage.
var loader:Loader = new Loader();
var url:URLRequest = new URLRequest("http://www.helpexamples.com/flash/images/image1.jpg");
loader.load(url);
this.addChild(loader);

// Create the map image by combining the two gradient circles.
var map:BitmapData = new BitmapData(xCircle.width, xCircle.height, false, 0x7F7F7F);
map.draw(xCircle);
var yMap:BitmapData = new BitmapData(yCircle.width, yCircle.height, false, 0x7F7F7F);
yMap.draw(yCircle);
map.copyChannel(yMap, yMap.rect, new Point(0, 0), BitmapDataChannel.BLUE, BitmapDataChannel.BLUE);
yMap.dispose();

// Display the map image on the Stage, for reference.
var mapBitmap:Bitmap = new Bitmap(map);
this.addChild(mapBitmap);
mapBitmap.x = 400;
mapBitmap.y = stage.stageHeight - mapBitmap.height;

// This function creates the displacement map filter at the mouse location.
function magnify():void
{
    // Position the filter.
    var filterX:Number = (loader.mouseX) - (map.width / 2);
    var filterY:Number = (loader.mouseY) - (map.height / 2);
    var pt:Point = new Point(filterX, filterY);
    var xyFilter:DisplacementMapFilter = new DisplacementMapFilter();
    xyFilter.mapBitmap = map;
    xyFilter.mapPoint = pt;
    // The red in the map image will control x displacement.
    xyFilter.componentX = BitmapDataChannel.RED;
    // The blue in the map image will control y displacement.
    xyFilter.componentY = BitmapDataChannel.BLUE;
    xyFilter.scaleX = 35;
    xyFilter.scaleY = 35;
    xyFilter.mode = DisplacementMapFilterMode.IGNORE;
    loader.filters = [xyFilter];
}

// This function is called when the mouse moves. If the mouse is
// over the loaded image, it applies the filter.
function moveMagnifier(event:MouseEvent):void
{
    if (loader.hitTestPoint(loader.mouseX, loader.mouseY))
    {
        magnify();
    }
}
loader.addEventListener(MouseEvent.MOUSE_MOVE, moveMagnifier);
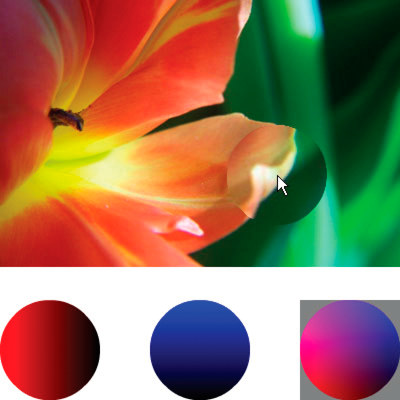
程式碼首先會產生兩個漸層圓形,以便加以結合並形成一個置換對應影像。紅色圓形會建立 x 軸置換 (
xyFilter.componentX = BitmapDataChannel.RED
),而藍色圓形則會建立 y 軸置換 (
xyFilter.componentY = BitmapDataChannel.BLUE
)。為了協助您認識置換對應影像的外觀,程式碼加入了原始圓形以及結合後放在畫面底部做為對應影像的圓形。
程式碼會接著載入影像,並在滑鼠移動時,將置換濾鏡套用至位於滑鼠底下的影像部分。用來做為置換對應影像的漸層圓形,會讓置換的區域從游標往外散開。請注意,置換對應影像的灰色區域不會產生任何置換效果。灰色值為
0x7F7F7F
。由於此灰色色調的藍色與紅色色版剛好與這些顏色色版的中間色調一樣,因此在對應影像的灰色區域中不會產生任何置換效果。同理,圓形的中心位置也不會產生任何置換效果。雖然該處的顏色不是灰色,然而該顏色的藍色色版與紅色色版卻與淺灰色的藍色色版及紅色色版一模一樣,而且由於藍色與紅色都是會產生置換效果的顏色,因此該處不會有任何置換情況。