위치 변경 맵 필터Flash Player 9 이상, Adobe AIR 1.0 이상 DisplacementMapFilter 클래스는 BitmapData 객체(위치 변경 맵 이미지)의 픽셀 값을 사용하여 새 객체에서 위치 변경 효과를 수행합니다. 위치 변경 맵 이미지는 필터가 적용되는 실제 표시 객체나 BitmapData 인스턴스와는 일반적으로 다릅니다. 위치 변경 효과는 필터링된 이미지에 있는 픽셀의 위치를 변경하는 것 즉, 이미지의 픽셀을 원래 위치에서 다른 곳으로 이동하는 것입니다. 이 필터는 이동, 비틀기 또는 얼룩 효과를 연출하는 데 사용할 수 있습니다. 지정된 픽셀에 적용되는 위치 변경의 위치와 정도는 위치 변경 맵 이미지의 색상 값에 의해 결정됩니다. 필터를 사용하여 작업할 때는 맵 이미지를 지정하는 것 이외에도 다음 값을 지정하여 맵 이미지에서 위치 변경이 계산되는 방법을 제어합니다.
기본적인 예제를 통해 위치 변경 맵 필터의 작동 방식을 알아보겠습니다. 다음 코드는 이미지를 로드한 후 해당 이미지를 스테이지의 중앙에 배치하고 위치 변경 맵 필터를 적용하여 전체 이미지의 모든 픽셀을 왼쪽 가로 방향으로 이동시킵니다. import flash.display.BitmapData;
import flash.display.Loader;
import flash.events.MouseEvent;
import flash.filters.DisplacementMapFilter;
import flash.geom.Point;
import flash.net.URLRequest;
// Load an image onto the Stage.
var loader:Loader = new Loader();
var url:URLRequest = new URLRequest("http://www.helpexamples.com/flash/images/image3.jpg");
loader.load(url);
this.addChild(loader);
var mapImage:BitmapData;
var displacementMap:DisplacementMapFilter;
// This function is called when the image finishes loading.
function setupStage(event:Event):void
{
// Center the loaded image on the Stage.
loader.x = (stage.stageWidth - loader.width) / 2;
loader.y = (stage.stageHeight - loader.height) / 2;
// Create the displacement map image.
mapImage = new BitmapData(loader.width, loader.height, false, 0xFF0000);
// Create the displacement filter.
displacementMap = new DisplacementMapFilter();
displacementMap.mapBitmap = mapImage;
displacementMap.mapPoint = new Point(0, 0);
displacementMap.componentX = BitmapDataChannel.RED;
displacementMap.scaleX = 250;
loader.filters = [displacementMap];
}
loader.contentLoaderInfo.addEventListener(Event.COMPLETE, setupStage);
위치 변경 정의에 사용된 속성은 다음과 같습니다.
이러한 설정은 필터링된 이미지의 픽셀이 왼쪽으로 250 픽셀만큼 이동하도록 합니다. 이동 방향(왼쪽 또는 오른쪽) 및 이동 정도는 맵 이미지에 있는 픽셀의 색상 값을 기반으로 합니다. 개념적으로 필터는 필터링된 이미지의 픽셀을 하나씩 거쳐가면서(최소한 필터가 적용된 영역에 있는 픽셀, 이 예제의 경우에는 모든 픽셀) 각 픽셀에 대해 다음 작업을 수행합니다.
y 구성 요소 및 y 배율에 지정된 값이 없기 때문에 기본값(위치 변경이 수행되지 않음)이 사용되었으며 결과 이미지가 세로 방향으로 이동하지 않습니다. 기본 필터 모드 설정인 WRAP이 이 예제에 사용되어 픽셀을 왼쪽으로 이동하면 오른쪽의 빈 공간이 이미지의 왼쪽 가장자리로 이동된 픽셀로 채워집니다. 이 값을 활용하여 다른 효과를 확인해 볼 수 있습니다. 예를 들어 위치 변경 속성이 설정된 코드 부분(loader.filters = [displacementMap] 행 앞)에 다음 행을 추가하면 이미지가 스테이지 전체에 퍼진 것처럼 보입니다. displacementMap.mode = DisplacementMapFilterMode.CLAMP; 보다 복잡한 예제의 경우 다음 샘플에서 위치 변경 맵 필터를 사용하여 이미지에 돋보기 효과를 만듭니다. import flash.display.Bitmap;
import flash.display.BitmapData;
import flash.display.BitmapDataChannel;
import flash.display.GradientType;
import flash.display.Loader;
import flash.display.Shape;
import flash.events.MouseEvent;
import flash.filters.DisplacementMapFilter;
import flash.filters.DisplacementMapFilterMode;
import flash.geom.Matrix;
import flash.geom.Point;
import flash.net.URLRequest;
// Create the gradient circles that will together form the
// displacement map image
var radius:uint = 50;
var type:String = GradientType.LINEAR;
var redColors:Array = [0xFF0000, 0x000000];
var blueColors:Array = [0x0000FF, 0x000000];
var alphas:Array = [1, 1];
var ratios:Array = [0, 255];
var xMatrix:Matrix = new Matrix();
xMatrix.createGradientBox(radius * 2, radius * 2);
var yMatrix:Matrix = new Matrix();
yMatrix.createGradientBox(radius * 2, radius * 2, Math.PI / 2);
var xCircle:Shape = new Shape();
xCircle.graphics.lineStyle(0, 0, 0);
xCircle.graphics.beginGradientFill(type, redColors, alphas, ratios, xMatrix);
xCircle.graphics.drawCircle(radius, radius, radius);
var yCircle:Shape = new Shape();
yCircle.graphics.lineStyle(0, 0, 0);
yCircle.graphics.beginGradientFill(type, blueColors, alphas, ratios, yMatrix);
yCircle.graphics.drawCircle(radius, radius, radius);
// Position the circles at the bottom of the screen, for reference.
this.addChild(xCircle);
xCircle.y = stage.stageHeight - xCircle.height;
this.addChild(yCircle);
yCircle.y = stage.stageHeight - yCircle.height;
yCircle.x = 200;
// Load an image onto the Stage.
var loader:Loader = new Loader();
var url:URLRequest = new URLRequest("http://www.helpexamples.com/flash/images/image1.jpg");
loader.load(url);
this.addChild(loader);
// Create the map image by combining the two gradient circles.
var map:BitmapData = new BitmapData(xCircle.width, xCircle.height, false, 0x7F7F7F);
map.draw(xCircle);
var yMap:BitmapData = new BitmapData(yCircle.width, yCircle.height, false, 0x7F7F7F);
yMap.draw(yCircle);
map.copyChannel(yMap, yMap.rect, new Point(0, 0), BitmapDataChannel.BLUE, BitmapDataChannel.BLUE);
yMap.dispose();
// Display the map image on the Stage, for reference.
var mapBitmap:Bitmap = new Bitmap(map);
this.addChild(mapBitmap);
mapBitmap.x = 400;
mapBitmap.y = stage.stageHeight - mapBitmap.height;
// This function creates the displacement map filter at the mouse location.
function magnify():void
{
// Position the filter.
var filterX:Number = (loader.mouseX) - (map.width / 2);
var filterY:Number = (loader.mouseY) - (map.height / 2);
var pt:Point = new Point(filterX, filterY);
var xyFilter:DisplacementMapFilter = new DisplacementMapFilter();
xyFilter.mapBitmap = map;
xyFilter.mapPoint = pt;
// The red in the map image will control x displacement.
xyFilter.componentX = BitmapDataChannel.RED;
// The blue in the map image will control y displacement.
xyFilter.componentY = BitmapDataChannel.BLUE;
xyFilter.scaleX = 35;
xyFilter.scaleY = 35;
xyFilter.mode = DisplacementMapFilterMode.IGNORE;
loader.filters = [xyFilter];
}
// This function is called when the mouse moves. If the mouse is
// over the loaded image, it applies the filter.
function moveMagnifier(event:MouseEvent):void
{
if (loader.hitTestPoint(loader.mouseX, loader.mouseY))
{
magnify();
}
}
loader.addEventListener(MouseEvent.MOUSE_MOVE, moveMagnifier);
먼저 코드는 두 개의 그래디언트 원을 생성하고 해당 원은 서로 결합되어 위치 변경 맵 이미지를 형성합니다. 빨강 원은 x축 위치 변경(xyFilter.componentX = BitmapDataChannel.RED)을 만들고, 파랑 원은 y축 위치 변경(xyFilter.componentY = BitmapDataChannel.BLUE)을 만듭니다. 위치 변경 맵 이미지 모양에 대한 이해를 돕기 위해 코드에서 원본 원과 함께 해당 맵 이미지인 결합 원을 화면의 맨 아래에 추가합니다. 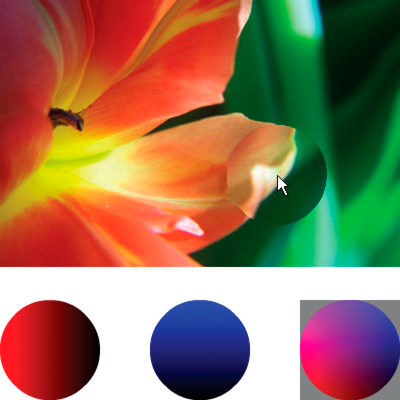 그런 다음 이미지를 로드하고 마우스 움직임에 따라 마우스 아래에 있는 이미지의 부분에 위치 변경 필터를 적용합니다. 위치 변경 맵 이미지로 사용된 그래디언트 원은 위치 변경된 영역이 포인터에서부터 퍼지도록 합니다. 위치 변경 맵 이미지의 회색 영역에서는 위치 변경이 발생하지 않습니다. 회색 색상은 0x7F7F7F입니다. 회색 음영의 파랑 채널 및 빨강 채널은 해당 색상 채널의 중간 음영과 정확히 일치하므로 맵 이미지의 회색 영역에서는 위치 변경이 발생하지 않습니다. 마찬가지로 원 중심에서도 위치 변경이 발생하지 않습니다. 색상에 회색이 없다고 하더라도 파랑 채널과 빨강 채널이 중간 회색의 파랑 채널 및 빨강 채널과 똑같고, 위치 변경을 발생시키는 색상이 파랑 및 빨강이기 때문에 원 중심에서 위치 변경이 발생하지 않습니다.
|

|

