|

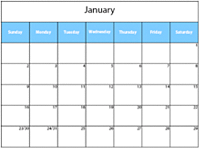
You can create a calendar
by using a table.
Select View > Master Pages.
In the Object palette, click the Master Page tab and select
Landscape.
Click the Design View tab.
In the Object Library palette, select Table > Insert Table.
In the Insert Table dialog box, type 7 for
columns and 6 for rows.
Select Include Header Row In Table and click OK.
Move the table to the top of the page.
Resize the columns so that the table fits the width of the
page.
Select Table > Distribute Columns Evenly.
Select the last row of the table. See To select a table, row, column, cell, or section.
In the Layout palette, type 1.1in in the
Height box.
Select the table. See To select a table, row, column, cell, or section.
Select Table > Distribute Rows Evenly.
Select the first row of the table. See To select a table, row, column, cell, or section.
Select Table > Merge Cells.
Type the month and set the font properties.
In the second row, type the days of the week and set the
font properties.
In the remaining cells, type the numbers for the days of
the week and set the font properties.
|
|
|