|

Configure the Assign Task operations in the process diagram
for these reasons:
The user who is involved with the process. For example,
configure the Review And Approve Loan Form operation to assign the
task to John Jacobs, who is the loan officer.
The instructions to display to the user in Workspace.
The form and form data to display to the user.
Buttons to complete the task in order to choose the next
step in the process when multiple routes are available. The next
step is based on the button that the user clicked. Typically, when
multiple routes are configured from an operation, you add conditions
to each route to determine the next step to take. The Assign Task
operation can be configured to let the user choose the next step
in the process. For example, for the Review And Approve Loan Form operation,
you can click an Approve and Deny button.
Configure the Review and Approve Loan Form operationIn
the editor for PreLoanProcess, click the Review and approve loan form operation.
In the Process Properties view, click the Initial User Selection property
group and complete these steps to configure the user who is assigned
the task:
Beside the Assign To Specific User box,
click Browse. The Select User dialog box appears.
Select John Jacobs and click OK. If you did
not configure the LiveCycle Sample Environment, select another user.
(See Understanding the sample environment.) Remember which user you selected
because you need to log in as that user to perform testing later.
Click the Task Instructions property group. Complete
these steps to specify the instructions displayed to the user in
Workspace:
In the rightmost list, ensure that template is
selected. Use Template values to specify strings that are a combination
of text that you type and values from process variables.
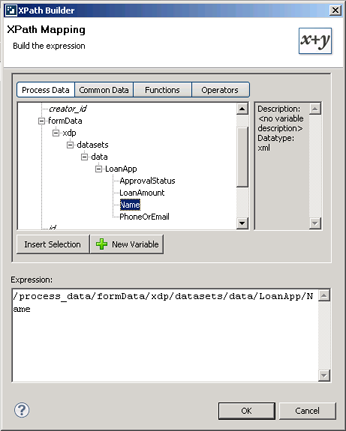
Beside the Task Instructions box, click the Insert or replace XPath expression  button.
The XPath Builder dialog box appears. button.
The XPath Builder dialog box appears.
Double-click process_data > formData > xdp > datasets > data > LoanApp > Name and
click OK. In the Task Instructions box, {$/process_data/formData/xdp/datasets/data/LoanApp/Name$}
appears. As shown in the following illustration, to double-click
Name, you must expand the tree structure.
 XPath Builder. After the {$/process_data/formData/xdp/datasets/data/LoanApp/Name$} text,
add a space and type has requested a loan. Please review the form and click Approve or Deny. in
the box.
Click the Presentation & Data property group and
complete these steps to specify the data to merge with the form:
Ensure that the use an application asset option is
selected.
In the Application Asset area, beside the Asset box, click
the ellipsis  button.
The Select Form Asset dialog box appears. button.
The Select Form Asset dialog box appears.
Click FirstApp > FirstApp/1.0 > PreLoanForm and
click OK.
In the Variable list, select formData.
Click the User Actions property group and complete
these steps to add buttons for the user to complete their task:
Click Add A User Action  button.
The Action Properties dialog box appears. button.
The Action Properties dialog box appears.
In the Action Name box, type Approve to
replace the default text.
In the Destination list, select Set Form To APPROVED,
and click OK.
Click the Add A User Action button to add a second
button.
In the Action Name box, type Deny to
replace the default text.
In the Destination list, select Set Form To NOT APPROVED,
and click OK.
Select the This action needs confirmation, and will use the following text as the message check
box.
In the box below the check box, type Do you really want to deny the loan request? Click OK.
Click the Output property group to configure the location
to store the output results from the operation by completing these
steps:
Beside the Task Result, click the Create A Variable  button.
The Variable dialog box appears. The type of Task Result is automatically
provided. button.
The Variable dialog box appears. The type of Task Result is automatically
provided.
In the Name box, type approverResults and
click OK.
In the Outputdata list, select formData to
save changes that were possibly made to the form.
Configure the View Approval StatusIn the editor for PreLoanProcess,
click the View approval status operation.
In the Process Properties view, click the Initial User Selection property
group and select the Assign to process initiator option.
Selecting this option routes the form back to the user who started
the process.
Click the Task Instructions property group and type Your loan form has been reviewed. If the loan was approved, a Fin@nce representative will contact you within three business days. in
the Task Instructions box. This step specifies the instructions displayed
to the user who is reviewing the approval status of the form.
Click the Presentation & Data property group to
configure the form design and data to merge by completing these
tasks: (The merged form is displayed to the user in Workspace.)
Ensure that the Use an application asset option is
selected.
In the Application Asset area, beside the Asset box, click
the ellipsis button.
The Select Form Asset dialog box appears.
Click FirstApp > FirstApp/1.0 > PreLoanForm and
click OK.
In the Variable list, select formData.
Click the Output property group and, in the Outputdata list,
select formData.
Select File > Save.
You
have configured the Review And Approve Loan Form and View Approval Status
(Assign Task) operations.
|
|
|

