|

In the Data Model view, you can add items that you can
use in your Guide. These items are available only for the current
Guide and are not saved in the original data model. Any data that
these items retrieve is not submitted when your Guide is deployed
as part of a process.
You cannot reuse these items in other Guides that are based on
the same data model. To reuse any of these items, edit the model
source file. For example, edit the FML file in the Data Model perspective,
or edit the XDP form in Designer.
In the Data Model view, you can add the following items for your
Guide:
- Data objects
- If the model associated with a Guide contains several persistent entities,
only the entity you selected as the root appears in the Data Model
view. To use another entity in the associated model, you can add
it as a data object.
- List sources
- Use a list source to populate the contents of a list. In
the Control Type properties, when you specify a List Box or a Drop
Down List, you must select a list source. When the Guide is submitted,
the list contents are not submitted. However, the selected value
from the list can be submitted as data.
- Inputs
- Inputs are data-entry fields.
- Rules
- Rules contain conditional logic that you can bind to items
in your Guide. Rules are driven by existing Guide information and
they affect the behavior of your Guide.
- Bindings
- Use bindings to copy data from one item in the Data Model
view to another.
- Variations
- A variation is a special list that controls aspects of a
Guide during different steps in a process. You can use a variation
to display a different view of a Guide, based on user action.
Data objectsYou can add additional entities from your model to the
Data Model view in the Guide Design perspective. The Data Model
view displays only data objects in the root entity that you selected
when you created the Guide. If your model contains additional entities
that are outside the root entity, you can add them to the Data Model
view.
After you add a data object in the Data Model view, you can use
it in your Guide.
Add a data object:From the Data Model view menu,
select Add Data Object. The Add Data Object dialog box displays
each entity in your model, as well as the associated service and
function.
Select the entity to add to the Data Model view in the Guide
Design perspective, and then click OK.
In the Data Model view, right-click the entity you added
and select Properties.
Edit the properties as required.
List sourcesA list source contains the list items that are used by
a list. Each list item has a label and a value. Separating the label
and the value enables you to translate the labels without changing
the associated values.
List sources replace the selection lists in previous versions
of Workbench. Existing selection lists continue to work in Guides
that were created in previous versions of Workbench.
When to use a list sourceUse a list source
when the data model does not include a collection of list items that
you need to associate with a list control. You can also use a list
source when you need to localize the list items.
Use a list
source to specify a list of items for a list control, when the list
contents are not specified in the data model. For example, use a
list source to populate a list box with a list of countries. You
can also use a list source for a code table of states, to code the
label California to the value CA.
Note: If
you configure a list to update dynamically at run time, when the
list of selected items changes, the value in the list resets to
the first item. The Guide filler must select a new value from the
new list.
Add a list and a list sourceYou can add a list source to
the Data Model view in the Guide Design perspective. When you add
a list source, it is added only to the Guide, and is not added to
the data model. Only the associated Guide can use the list source;
it is not available to other Guides that are based on the same data
model. To reuse a list in another model, create a collection in
an data model (FML) or create a list in an XDP or PDF form.
When
the Guide is submitted, the list contents are not submitted. However,
the selected value can be submitted if you bind the list source
to the list.
The list source appears in the List Source section
in the Data Model view.
From the Data Model view
menu, select Add List Source. The list source properties appear
in the Guide Properties view.
Type the List Source Name.
Specify the list items:
To add list items directly
in the list source, select Specify List Items. For each list item,
click the Add button and then type the Label and Data.
To add list items from an XML file, select Get List Items
From XML File. The following example shows the format of the list
source file. It includes the label and data for each list item:
<model xmlns:xliff="urn:oasis:names:tc:xliff:document:1.2">
    <ListSource>
        <items>
            <label xliff:rid="...">Bicycle Yellow</label>
            <data>370A-3</data>
        </items>
        <items>
            <label xliff:rid="...">Bicycle Blue</label>
            <data>370A-4</data>
        </items>
    </ListSource>
</model>
Add a data model item or an input to the Guide.
To add a data model item, drag the item from the Data Model
view onto the panel in the editor.
To add an input, from the Data Model view menu, select Add
Input. The input appears in the Data Model view and the input properties
appear in the Guide Properties view.
In the Guide
Properties view, type a name for the input.
In the Data Model view, select the input and drag it onto
the panel in the editor.
In the editor, select the data model item or input that you
added. The field properties appear in the Guide Properties view.
In the Guide Properties view, from the Control Type properties,
select a list type from the Display As options. The list types that
you can select include Check Box List, Drop Down List, List Box,
Radio Button List, and Static List.
From the List Source options, select the list source that
you created.
If necessary, specify a default value for the list:
To specify a default value for an item that you added from
the data model, from the Data Model view menu, select Add Binding.
The binding properties appear in the Guide Properties view.
In the Source property, type the data value of list source
item that you want to set as the default value.
From the Copy To property, select the data model item that
you set as the list.
To specify a default value for an input, in the Data Model
view, right-click the input, and then select Properties. The input
properties appear in the Guide Properties view.
For
more information about the list source properties, see List source properties.
VariationsA variation is a special kind of list. It allows
you to associate customized Guide behavior with a specific step
in a process. In some cases, a process step requires a variation
in the Guide interface or functionality. For example, after a Guide passes
an approval step, you can configure subsequent steps to use a variation
in which some fields are read-only.
Instead of creating multiple copies of a Guide to meet the requirements
of different steps, configure one Guide to vary its display and
behavior. Associate each view of the Guide with an item in the variation
list. You can then use the variation list to specify which view
of the Guide a step in the process uses.
Add a variationAdd a variation to the
Data Model view in the Guide Design perspective. Only the associated
Guide can use the variation; it is not available to other Guides
that are based on the same data model.
After you add the
variation, add the required variations as list items. For example, create
items based on the status of a Guide, filled or approved, or the
names of process steps, such as initialstep or finalstep.
After
you define a list of variations, you can control the properties
of the items in your Guide based on the selected variation. You
can bind it to the display, read-only, and required rules, and the
set the condition. If the Guide needs more complex rules, bind the
variations to a rule, and then bind the rule to the property.
You
can only add one variation to a Guide.
From the Data
Model view menu, select Add Variation. The variation properties
appear in the Guide Properties view.
Edit the properties as required.
For more
information about the variations properties, see Variation properties.
Binding rules to variationsAfter you
create a variation, its values appear in the Data Model view.
The
variation appears in the Selection Lists category in the Data Model
view. It includes the following items that you can bind a rule to: listOfItems: Returns a list of items.
selectedItem: Returns the value that is selected.
selectedItem == <list item>: The list
items that you create in the Guide Properties view for the variation.
The list items are boolean values that return true or false.
Use
the variation to control the properties of a Guide item. For example,
bind an Approved item to the Read-only property for a Totals field.
(See Binding items in the Data Model view.)
Variations and processesWhen you design
processes, you often specify a Guide as the asset used by an Assign
Task or Assign Multiple Tasks operation. These operations represent
a step in the process where tasks are assigned to users and groups.
If the specified Guide has a variation list, the list appears in
the operation's Presentation and Data properties. From the list,
select the appropriate variation to use for the operation.
At
runtime, the configuration associated with the variation and the
variation specified for the process step determine the behavior
of the Guide.
If you modify the variation list for the Guide
later, the variation list that appears in the process designer updates
automatically.
InputsAn input is a data-entry field that appears in a
Guide but is not part of the data model. Inputs are used for Guides
only, and retrieved data is not submitted when the Guide is deployed
as part of a process.
For example, use inputs to specify display rules or default values.
You can also set inputs using the Render Guide process as part of
variations processing. An application that uses the Guide component
with multiple Guides, based on multiple data models, can use inputs
to share common data.
Add an input:From the Data Model view menu, select
Add Input. The new input appears in the Data Model view.
In the Guide Properties view, edit the input properties as
required.
RulesA rule contains conditional logic that you can bind
to an item in your Guide. Rules are driven by existing Guide information
and they affect the behavior of your Guide.
After you add a rule, add one or more conditions to the rule.
You can bind each condition to an item in the Data Model view, including
data model items and Guide-specific items, such as inputs.
Note: Do not bind a condition to the rule it belongs to, because
that creates an endless loop.
After you add a rule in the Data Model view, you can bind it
to a property in the Guide Properties view. You can bind a rule
to the following properties:
The Display Rules for a field or panel
A condition for another rule, which chains the rules together
The Copy To property for a binding item
The Retrieve Data condition for a list source or a data object
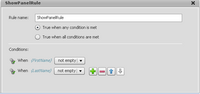
For example, use a rule to specify that a particular panel appears
in the navigation panel when two specific fields are filled.
View full size graphic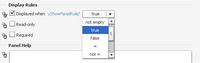 Bind the rule to the Display Rules for the panel that you
want to appear when the fields are filled. The rules you add to the Data Model view are available only for
the current Guide. You cannot reuse these rules in other Guides
that are based on the same data model.
Add a ruleFrom the Data Model view menu, select Add
Rule. The new rule appears in the Rules category in the Data Model
view, and the properties appear in the Guide Properties view.
Add one or more conditions for the rule. You can set the
conditions to either All or Any condition.
Select the item that you want to bind to a rule.
In the Guide Properties view, bind a property to the rule.
BindingsUse bindings to copy data from one item in the Data Model
view to another. Bindings enable you to copy data from an external
data source, such as an input or a data object, into the root entity.
When the data is copied into the root entity, it is submitted when
the Guide is deployed as part of a process.
The bindings you add in the Data Model view are available only
for the current Guide. You cannot reuse these bindings in other
Guides that are based on the same data model.
Add a binding:From the Data Model view menu, select
Add Binding. The new binding appears in the Bindings category in
the Data Model view and the properties appear in the Guide Properties
view.
In the Guide Properties view, type the Binding Name.
Specify the Source. You can type a string literal value or
bind an item in the Data Model view.
From the Copy To options, select the item in the Data Model
view where you want to copy the data.
If necessary, drag an item from the Data Model view onto
the binding icon for the Perform Copy property, and then select
a When condition.
Data Model view menuIn the Data Model view, you can add data objects, inputs,
list sources, rules, and bindings. These items are available for
use in the Guide, but are not part of the root entity and any data
that is entered is not submitted.
The menu in the Data Model view includes the following options:
- Add Data Object
- Displays the Add Data Object dialog box. The dialog box displays
each entity in the data model that the Guide is based on, as well
as the associated service and function. If the data model contains
additional entities that are outside the root entity, you can add
them to the Data Model view. When you add a data object, it appears
in the Data Model view and the properties appear in the Guide Properties
view.
- Add Input
- Adds an input in the Inputs category and displays the properties
in the Guide Properties view. An input is a data-entry field
that appears in a Guide but is not part of the model. Inputs are
used for Guides only, and retrieved data is not submitted when the
Guide is deployed as part of a process.
- Add List Source
- Adds a list source in the List Source category and displays
the properties in the Guide Properties view. It is added only to
the Guide, and is not added to the model. Only the associated Guide
can use the list source; it is not available to other Guides that
are based on the same model. A list source is not part of the model.
Therefore, data that is retrieved is not submitted when the Guide
is deployed as part of a process.
- Add Variation
- Adds a variation in the Selection Lists category, and displays
the properties in the Guide Properties view. A variation is
a special kind of list. It allows you to associate customized Guide
behavior with a specific step in a process.
- Add Rule
- Adds a rule in the Rules category, and displays the properties
in the Guide Properties view. A rule contains conditional
logic that you can bind to an item in your Guide. Rules are driven
by existing Guide information and they affect the behavior of your
Guide. After you add a rule, add one or more conditions to the rule.
You can bind each condition to an item in the Data Model view. After
you add a rule in the Data Model view, you can bind it to a property
in the Guide Properties view.
The rules you add to the Data
Model view are available only for the current Guide. You cannot
reuse these rules in other Guides that are based on the same model.
- Add Binding
- Adds a binding in the Bindings category and displays the properties
in the Guide Properties view. Use bindings to copy data from one
item in the Data Model view to another. Bindings enable you to copy
data from an external data source, such as an input or a data object,
into the root entity. When the data is copied into the root entity,
it is submitted when the Guide is deployed as part of a process.
The bindings you add in the Data Model view are available only for
the current Guide. You cannot reuse these bindings in other Guides
that are based on the same model.
- Delete
- Deletes the selected item from the Data Model view. You can
delete only the data objects, inputs, list sources, variations,
rules, or bindings that you added to the Data Model view.
- Refresh Model
- Refreshes the Data Model view when the associated data model has
been changed.
- Data Model Settings
- Displays the Data Model Settings dialog box. You can view
and change the data model, data model root node, and pre-built data model
(SWF) for the Guide.
- Show/Hide Constraints
- Shows or hides any constraints in the Data Model view.
- Show/Hide Labels
- Shows or hides the labels in the Data Model view.
- Properties

- Displays the properties for the selected item in the Guide Properties
view.
|
|
|